How Do I Use Customer Feedback To Position My Products?

This is an excellent process from Lisa Sasevich, that you can use to determine the positioning of any of your products and services. I also learned this same process at a workshop with Stephan Stavrakis and I’m sure it’s taught by a number of people cause it’s just that good!

You can use this process over and over again. It’s a condensed version of determining the pain points (problems) of your customer and then determining the top benefits your product or service provides.

Use Customer Feedback To Determine Positioning

Answer these questions below (in writing!) and in the following order. If you find the questions difficult or confusing, then check out my example below – where I put LTYF through this process – or watch the video there, then come back here and do it for your product or service.

NOTE: As you go through this process, just pick ONE product, service, or program at a time.


My product/service: ________________________________________________________

  1. What is it that people say about how I’ve helped them. Think of ONE person that was a real success story from using my product/service. What are his/her exact results, in his/ her words?


  1. What additional transformation happened as a result of my help?
  2. What would have been the cost of NOT accepting my help?


  1. Now go back to what you wrote down in point #1 and turn each of their specific statements → into a more global statement, or a statement that gets to the essence of what they’re saying.

For example: I learned to ride a bike in only 3 days, it was a blast! → Learn to ride a bike quickly (days, not weeks!) and easily and have a great time doing it!

  1. Do the same thing for all the statements you wrote down for point #2 – encapsulate the feeling or essence and turn it into a statement that applies to everyone.

Example: I felt this loosening and then the swelling in my arm started to go down in front of my eyes → Feel your condition loosening and witness it beginning to heal.


  1. Now take all of the global statements you created in points 4 and 5 above and list them here, one after the other:
  2. Now turn those points listed in #6 above into a cohesive paragraph – and that is your positioning statement, or compelling o er, for your product or service! Again, see my example (or the video) below if you need more guidance in how to carry out this process for your own stuff.


Example: Using Customer Feedback To Determine LTYF Positioning

Now I’m going to put my LTYF program though this exact same process. Instead of using customer feedback, I’m using feedback from Testers. But I’m going to combine points 1 and 4; and points 2 and 5, so you can see how to convert the personal statements into more global ones:

1. & 4. What is it that people say about how I’ve helped them. Think of ONE person that was a real success story. What are his/her exact results, in his/her words? Then create a global statement for each feedback point.

Isabella:

  • Without LTYF, this would have taken me 10 years.Vector customer feedback concept in flat style
    Converts to→ Want to start living my purpose and shift my life quickly.
  • LTYF makes it so easy, I don’t even notice I’m getting all this stuff done.
    Converts to→ I’m not good at school or tech stuff, or details.

Michael:

  • Wish I’d had this years ago, would have saved me so much time and I’d be much farther ahead.
    Converts to→ Already wasted time on other methods or tracks, not seeing results.
  • I can help groups of people now, instead of just one-on-one.
    Converts to→ Help more people in less time, and earn more money.

2. & 5. What additional transformation happened as a result of my help?

Isabella:

I got to experience the moment my unique brilliance burst forth.

Converts to→ Offer my unique gifts to the world.

Michael:

I have a mobile biz that can support my lifestyle and travels.

Converts to→ Automated = freedom.

3. What would have been the cost of not accepting my help?

Isabella:

I’d still be struggling, knowing I was meant to do something really big in the world, but not knowing how to get there.

Converts to→ For those who know they have a greater purpose.

Michael:

I wouldn’t have the freedom to live in different countries and still earn excellent money no matter where I am.

Converts to→ For those who want to earn good money but not lose their freedom of time, mobility, hobbies.

6. Now take all of the global statements you created in points 4 and 5 and list them here, one after the other:

Want to start living my purpose and shift my life quickly.

But I’m not good at school or tech stuff, or details

Already wasted time on other methods or tracks, not seeing results

Help more people in less time, and earn more money

Offer my unique gifts to the world

Automated = freedom

For those who know they have a greater purpose

For those who want to earn good money but not lose their freedom of time, mobility, hobbies.

Do it Yourself keyboard key. Finger7. Now turn those points listed in #6 into a paragraph – and that is your positioning statement, or compelling offer, for your product or service!

Shift your life quickly: Start living your greater purpose and offer your unique gifts to the world. I’ll show you how to set up an automated system to earn good money and not lose your freedom of time, travel, or passionate hobbies. For those that want to help more people in less time, and earn more money – whether or not they are good at school or tech stuff. Even if you feel you’ve already wasted time on other methods or systems, without seeing results, this program will be the one you wish you’d started with!

*                  *                  *

Pretty cool process, eh? You can come back and use this process over and over for any new products you create, or additional services you want to offer. This easy process allows you to position your product for your ideal customer and create your compelling product offer.

Here’s a video of Lisa Sasevich at a live event where she walks a volunteer through this exact same process of creating her compelling sales offer:

Want to know more about pricing and positioning? Have I got the page for you

How Do I Decide What To Charge For My Products or Services?

There are many methods you can use to decide what to price your product or service at, but your baseline for setting your pricing has to first take into account what it costs you to produce or offer that product. I know, this sounds very simple and commonsense, but you’d be surprised how many people have not run their numbers, and are working off a guesstimate!

Now don’t go all math-phobic on me! Because ‘running your numbers’ is not only invigorating, it’s empowering – and yes, I’m someone who loathed math in school too. So this kind of math needs to be put into the ‘I love receiving money‘ section of your brain – not the math section. If you view it this way, you may even find yourself enjoying this process! And yes, as per usual, I’m going to walk you through every single piece…

Determine Baseline Cost of Products

So let’s say you want to sell a printed book. First, you have to calculate your baseline or hard cost to produce and offer that book for sale. So you might figure out the cost per unit (cost per book) this way:

Printing 100 copies $400
Shipping books to warehouse $50
Cover design cost $60
Book layout design cost $60
TOTAL: $570

So your hard cost per book ($570 divided by 100 books) is $5.70 per book

Then, you may also want to factor in these costs:

Fulfillment cost per book $0.40
Warehouse, insurance, shopping cart (per month) $80

Optional: Are you going to include the cost of your monthly storage and insurance fees? Are you going to factor in the cost (broken down) of your website hosting, telephone, shopping cart, office rent, etc.? Or are you going to ignore these costs, since you are selling 5 other products as well, and just write them off as “cost of doing business”? There is no right or wrong answer – you can choose to be super accurate, or happy with a rougher ballpark figure.

So let’s say you ballpark your grand total cost per book at $7.00

Acceptable Amount Of Profit

Now that you know that your total baseline cost is $7.00 per unit, your next step is to decide how much profit you want to make per book.

You might say, “Well, I’m happy with a 100% markup, so I’ll price the book at $14.00”

If you were only going to sell your book directly to your customer, that price would be fine. But what if you want to sell your book in bookstores? The standard wholesale price for books is a 40% discount off the retail price. This means if your retail price is $14, then 40% of 14 is $5.60, so you would need to sell the book to bookstores for $8.40.

Wait a minute, your cost per book is $7.00, so that means you’re not only making $1.40 profit per book… now how does that sound? Not so great, eh?

Wholesale Pricing

So even if your business model is to sell direct, you may want to set your pricing to take into account the fact that you may want to sell in stores at some point. Standard wholesale pricing is 40 – 50% off the retail price. If you are going to sell to a distributor – who then sells to retail stores – the distributor will want a 50 – 60% discount.

A quick and easy way to take into account all these pricing scenarios is to take your baseline cost and multiply it by at least 3. Here’s what that looks like for your $7 book:

Production cost per unit: $7
Cost x 3 = Retail Price: $21
Selling Direct: $21 (profit to you is $14)
Wholesale Price (40% discount) $12.60 (profit to you is $5.60)
Distributor Price (50% discount) $10.50 (profit to you is $3.50)

The rationale for making less money from wholesale or distributor sales is that selling through these channels should result in a greater number of books sold (higher volume). So even though your profit per unit is less, you hopefully will net out with more money due to a much larger number of books being sold.

Choose a Method to Use to Set Your Price

Now that you know your baseline cost and you have a good ballpark on the minimum retail price you need to set, it’s time to determine your final price.

Fine-Tune Your Price

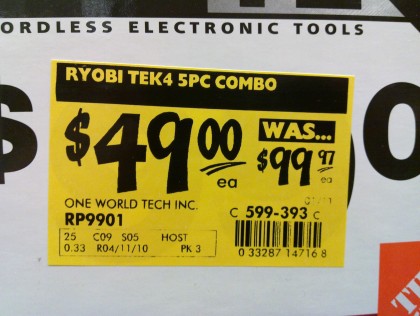
Once you’ve figured out your retail price, fine-tune it further by making the number appeal to the widest audience.

Make sure your price ends in a 5, 7, or 9. This is because split tests have shown that if you offer a product at say, $22.99 versus $23 – more people will buy the $22.99 product because it feels cheaper to them. Amazingly enough, most people round down, not up.

Tim Smith, PhD and founder of Wiglaf Pricing has an explanation for this phenemenon:

Busy consumers will try to make decisions based on value, and since we read from left to right, the most important numbers are always on the left. So you’re more likely to notice the first number when something is $9.99 and think it’s a much better deal than $10 because nine is less than 10. Your mind discards the rightmost digits to save mental energy and time. Although it’s only a penny less, a $29.99 item is psychologically perceived as a mental victory against the vendor than paying $30.”

Other Internet split tests have shown that ending the price in a 5, 7, or 9 triggers the most purchases. For example, $97 will pull better than $94 (yes, even though it’s more expensive!).

So if you want $100 for your product, price it at $97.

If you want $25, price it at $24.99

If you want $7, price it at $6.95

One last tip: Adding zeros or commas to a price makes it look/feel larger.

So if you want to minimize the impact of your price, keep it short and sweet.

For example, $249 is better than $249.00

And $4999 is better than $5,000.00

But if you want to emphasize the price – let’s say you’re including some free bonuses with your program – then throw in those commas and zeros! For example, if I want you to appreciate that I’m giving you a great free gift with your purchase I can list the price of my product at $67 and the free bonus value at $38.00.

Adding free bonuses or add-ons can increase the perceived value of your product – but before we get into bonus land, let’s figure out some of your own base pricing…


Pick at least one of your products and figure out a profitable price for it, using the tips and techniques I gave you in this unit:

What is the total cost of producing or providing the product or service?

Multiply that cost x3 to get the base retail price for the product/service

Make sure your number ends in a 5, 7, or 9

Use zeroes to make your price look bigger – get rid of the zeroes to make your price look cheaper.

Keep in mind that the profitable price is not necessarily the best price for your product
or service – because you also need to take positioning into account. Maybe your course is profitable if you sell it at $39, but because you are positioning it as an exclusive, premier product, you should actually sell it at $149 and thus you will get more buyers at that price. If you’re confused, we cover pricing and positioning more in audio format below:


Join me as I talk about the elements of deciding how to price your products or services:

  • Selling solutions vs. selling products
  • What your product is worth vs. what your people can afford
  • Researching your competitors (why this is not so helpful)
  • Before-purchase vs. after-purchase knowledge
  • The Happiness Test

I’ll give you real-life examples and prices, and tell you stories about how we learned to price and position our products to our customers to build a multi-million-dollar business. Lots of goodies in this 31-minute audio!:

DOWNLOAD Pricing & Positioning Part 1 or click the PLAY button below:

[sc_embed_player fileurl=”http://listentofreedom.s3.amazonaws.com/pricing-positioning-part1.mp3″]

When you get to the part of the Audio where I talk about what your product is worth versus what people can afford, keep in mind this quote from Paul Zelizer:

While I’m a BIG fan of you getting paid well for your skills and expertise, there is hidden ego focus in a “Charge what you deserve!” approach.  At a deep level, it’s saying your needs and desires are the ONLY thing that matter.  It implies that your clients and prospective clients are like human ATM’s without any feelings or needs of their own.”

And then when you get to the place in the Audio where I talk about the “dollar store phenomenon”, check out this actual order from my health shoppe to see what I mean!

Got all that? Now join Ian Thompson as he fields questions from Freedomite Lori Clarke. Lori has a new Audio series and she needs to pick Ian’s brain on what and how she should price it.

Here are some of the topics discussed in this lively call:

  • How to price something your heart wants to give for free
  • Why connection is more important than price
  • How to use webinars or teleseminars to sell your products
  • How to test pricing and give yourself the flexibility to lower your price whenever you want – without devaluing your product.

As Ian walks Lori through the process, you’ll get to experience your own A-ha moments and also learn why positioning is more important than the price!

DOWNLOAD Pricing & Positioning Part 2 – Right-click to download this 51-minute audio, or click the PLAY button to listen:

[sc_embed_player fileurl=”http://listentofreedom.s3.amazonaws.com/pricing-positioning-part2.mp3″]


How Do I Make a Final Sales Pitch?


Attractive casual woman pointing down. Isolated on white.

Now that you know how much you want to charge for your product and what to call it (that positions it as a solution or benefit), let’s look at how you can make the final presentation of that product to your site visitor.

This is sometimes called your sales pitch, or your sales offer. It’s basically part of how you position your product (or service) when you ask for the sale.

And yes, you do have to ask – even gently – for the sale! Don’t assume that ‘if someone wants to buy it, they will.’ Everyone needs a nudge, or a bit of encouragement. Because it’s very easy to say, ‘That looks really good, I’ll come back next week.’ Except that by next week, they may have forgotten your website, or come across another offer that encouraged them (or gave them an incentive) to buy right away, and now they’re learning from someone else.

You absolutely do NOT want to be pushy, or selly, or needy. But you need to keep in mind that buying is an emotional decision, so you want to be positioned to cash in on your visitor’s enthusiasm.

Everyone loves to feel they got a bargain – because that feels like winning! The methods I’m going to give you below, are each designed to give your visitor this feeling. So not only are you giving them a great benefit or solution to their pain or problem, you are giving them the chance to feel like a winner – does it get any better than that?

So let’s go through the ways you can encourage a site visitor, or someone on your email list to buy from you, rather than from someone else. Keep in mind, that each of these methods can be used singly, or in combination – you’ll see what I mean:

Scarcity

Inducing a feeling of ‘scarcity’ is when you position your offer to let people know you only have a limited number of items available, or available at that price, and then they’re gone. This makes the person feel an urgency to purchase – before they lose out on the chance to purchase, or they lose out on the great deal (discount).

Timed Offer

A timed offer is also a form of scarcity. It’s when you say to the person: This offer is only available for 24 hours. Or for 7 days. Or until the end of the month. And then this special offer is gone.

What makes the offer special could be a discount on the regular price, or perhaps you’ve added an extra product or service (free bonus). Or maybe it’s the unedited, or uncut version of a film or audio. Anything that makes the product or package they’ll receive different from what you normally sell, constitutes your special offer. The fact that this special offer will cease to exist in a certain amount of time, makes it a timed offer.

Guarantee

Maybe your offer is special because you’re packaging it with an outrageous guarantee – a guarantee you wouldn’t normally give. Perhaps your normal guarantee is for 30 days on unopened product, but you’re going to extend that offer to 365 days (1 year) and they can send the product back in any condition. Or maybe they don’t need to send the product back. Whatever you figure will completely take away the risk of purchasing, you can offer that as a special guarantee.

Again, you can combine this outrageous guarantee with a timed offer (only available if you buy in the next 48 hours), or you can use scarcity and only offer the guarantee for the first 200 products sold.

Now here’s an inside tip on guarantees: Figure out what kind of guarantee would make it completely risk-free for you to purchase… and then make that your regular guarantee.

When I looked at my books and put myself in my customer’s shoes I realized that if the book had an unconditional guarantee (no questions asked!) and the company paid for my return shipping, then that would completely take away the risk of trying something I wasn’t sure would work, or give me value for my money.

Now you might say: I can’t afford to do that! That’s crazy. What if people read the book, pass it around their friends and then return it 6 months later and I can’t re-sell it, plus I have to completely refund their money and then pay for their return shipping… that’s going to cost me money!

So then I say to you: TEST IT. That’s what we did. Go ahead and offer a completely risk-free guarantee for a month or two. Then track those customers that purchase and see what happens.

What I bet will happen is that your sales go way up – because now no one is afraid to buy. And your returns go way down! When you remove the time limit from a return, people feel like they have all the time in the world to try or test the product. Then time passes, and they either love your product, or they forget about it.

Let’s say they forget about it; by the time they remember, it feels like a big hassle to hunt for that 8 month old receipt, contact you, package it up and send it back. Plus, there’s likely some embarrassment there too.

Sure, you’ll still get some returns, but your increase in sales will likely 10x compensate you for the money lost in returns. For my books, my return rate is less than 1%. Here’s how we position that guarantee:

365 Day, No-questions-asked Money Back Guarantee + Return Postage!

Our 1 year guarantee gives you plenty of time to read through and try the protocols and therapies in Listen To Your Gut, at no financial risk. We offer such an unlimited guarantee because we know so many of you have already tried so many things that didn’t work – and we don’t want you to be afraid that this is just one more disappointment. In fact, we believe so strongly in the value of Listen To Your Gut, that if you want to return it, we’ll even pay for your return postage! It doesn’t get any more risk-free than that.

Free Bonuses

Another great way to encourage customers to buy is to package your product up with some fabulous free bonuses. That way people feel like they’re getting a ‘steal of a deal’ for so much stuff!

You likely have some blog posts that you could package together and turn into a free eBook. Or have someone interview you and offer it as a free teleseminar.

Try to think of free bonuses that mesh with or support the product or service you’re selling.

Another great tactic is to approach people with complementary products or services and see if they would like to include anything in your free bonuses. For example, for my Listen To Your Gut book, I approached an EFT Therapist and a Life Coach. I asked them if they would like to offer a free consult (20 minutes) to every person who bought my book. Which would then act as a continual lead generation for them of potential new clients.

This arrangement was a win-win for all three parties involved: Me, who got to add great value and help to my book purchasers; the therapist, who ended up with a high conversion rate on those free consults (because the prospects were pre-qualified as being the ideal client for them); and the customer who got two free therapy sessions which they found really helpful!

Along with those free consults, I also offered a free recipe eBook, a free Resource eBook and 1 month Gold Membership in my Wellness Circle – here’s what the Free Bonuses looked like on my sales page:

You’ll see in the screenshot above (this is one of my split-test sites I was using to test sales formats and offers), I have also combined the free bonus offer with a timed offer.

TEST: What’s the big no-no I committed in the first Free Bonus?

Leveraging your FAQ’s is a great way to create excellent content – but I should NEVER have called the eBook a “Question and Answer” book (or an “FAQ” book or anything else along those lines). That’s right, this free bonus would have had a much higher perceived value if I’d called it: Tales From The Healing Journey or Tips & Strategies for Your Healing Journey and then adjusted the description accordingly.

Comparative Pricing

Comparative pricing is a way to justify the price you are charging for your product or service, by comparing it to what the person might pay for other items or services. Again, take a look at this screenshot from my old test-site to see how I compared the price of a visit to a naturopath, herbalist, massage therapist, rolfer, and EFT therapist to the price of my healing program:

You’ll also notice that I then offered a discount on that price if they purchased in the next 24 hours (timed offer).

However, these screenshots are from my old test site that didn’t get as many sales as my normal site, and led to negative feedback in forums about how ‘it smelled fishy; it was so ‘selly’ it must be a scam.’

Well, when you read the copy on these screenshot pages – does it sound like me? Hell no. I was doing what a top Internet marketer told me to do! The words and the pitch were his, not mine. And boy, did it show!

That’s why I won’t give you the words or templates to use for your sales page, or for the emails you send to your list. Every point of contact with your site visitor or customer has to sound and smell like YOU!

I also decided that timed offers, without a legitimate reason, were not ME. I don’t mind doing Christmas specials, or back-to-school discounts. And to everyone on the waitlist for LTYF I gave a massive discount. But this pressure-tactic timed offer just didn’t feel good to me – because there wasn’t a reason for it.

Likewise, I also would feel fine about offering a discounted sales price in the next 24 hours as a special offer following a teleseminar, and only for the attendees of that teleseminar. Because that feels like a special gift to me, not a pressure tactic.

Your words will always carry the energy of your intent. That’s why you should always do the ‘customer shoe test’ and only put out things that YOU would like to be on the receiving end of.

Every single point of contact with your site visitor, or your customer, must live, breathe, feel and sound like YOU. Everything must carry your intent and your energy – or you will betray your connection to your tribe and they will lose trust in you. Which, of course, will reduce your sales over time.

So let’s get back to comparative pricing strategy. An easy way to position your product is to compare it against something you already offer. For example, if you offer private sessions for $100/hour, then your new 5-session Audio Course priced at only $97 is a steal of a deal!

Annabel Fisher transitioned from doing single sessions to group sessions and her clients were thrilled because a package of 4 group sessions was only $47 more than a single private session… Annabel positioned her group sessions using comparative pricing to her single session; which highlighted the value of the offer – what a great deal – 4 for almost the price of one! Of course, it was also an excellent deal for Annabel because her time went from being worth $150/hour to $492/hour. A win-win scenario that carries a great positive energy for all involved!

Another way to use comparative pricing, is to compare your product or service to something that feels similar, but costs more.

For example, let’s say you’re an artist and you want to offer workshops or private sessions. You could research what the art schools in your area are charging and then position your pricing against theirs. If they are paying the costs of admin staff, office rent, insurance, etc. You can certainly undercut their price (and probably walk away with more profit) due to your owner-operator setup.

Any digital content you are selling can be comparatively priced against a live session that offers the same benefit. And of course, you can charge less for digital content than live, physical, one-on-one sessions.

Remember that everyone loves to feel they are getting a bargain, because that feels like winning! So which of these positioning tools would you feel good about using? Grab your notebook…

Sketch out your offer for a current product or service (or one you’re working on) using the positioning tools given in this unit: Scarcity, Timed Offer, Guarantee, Free Bonuses, and Comparative Pricing. How can you position (offer) your product or service to your people to make them feel they are winning something, and which of these techniques feels good/right to you?


Let’s go check in with Lisa Sasevich for a bit of inspiration on how to present your price to a live audience. Of course, the same principles apply when using text on a webpage. Notice how she talks about comparative pricing.

Note: The good stuff starts at 2:00 minutes

Now, let’s just go through a few more aspects of positioning and re-positioning before we close out this module and complete the sales process.

How Do I Name My Products?

When most people talk about their product or their service, they focus on telling people WHAT it is. But what they should be focusing on is HOW the person will USE it and what benefits the person will experience (how their life will change) as a result of usage. This is going to affect how you name your products as well as how you present and position them.

Here’s an infographic to help you understand the difference between Features and Benefits:

So for each product or service that you offer, ask yourself this question:

How will someone use this and how will it change their life?

Use your answers to this question to form your sales copy, your product name, and make your answers (the benefits) the focus of all your promotional efforts; blog posts, teleseminars, webinars, etc.

Benefits vs Features

There’s a big difference between benefits (how the customer feels) and features (what the product does) and why you always want to focus on the benefits your product or service will bring. When you talk about the benefits – how the customer will feel, be, experience, improve, and in what ways their life will get better – you give your customer the emotional motivation to buy. Remember: People don’t buy what they need, they buy what they want, and how people feel about the story the product tells is far more important than what the product is.

Whether you’re positioning your website, or your individual products, you always want to focus on the SOLUTION you will provide. Not just describing what the item is. Harvard Business School professor Theodore Levitt summed this up when he said, “People don’t want to buy a quarter-inch drill. They want a quarter-inch hole!”

How To Name Your Stuff

So when you’re trying to figure out what to call your product or service, use my copywriting tips and techniques to come up with a memorable, appealing name for your product. Try to make sure your title includes the benefit your customer will receive – not just describe what it is.

Then you might want to think about whether there’s a way to package that product or service that will allow you to charge more for it.

For example, which of these products or services would you want to buy?

Boring Catchy Catchy+Extra
Retirement Planner eBook by Emily Jones, CPA $9.95 How To Plan Your Secure, Sexy Retirement eBook by Emily Jones, CPA $9.95 How To Plan Your Secure, Sexy Retirement eBook by Emily Jones, CPA plus a 1-hour Personal Mastermind Session with Emily Jones $249
Renovate Your Bathroom DVD by Jack Mulligan $14.99 Art Deco Your Bathroom! DVD by Jack Mulligan $24.99 Art Deco Your Bathroom! DVD by Jack Mulligan and 1-hour Personal Consult with Josh to go over your ideas and design. $137
How To Lose That Extra Weight CD by Annette Walters $16.95 21 Days To a Healthier, Slimmer You CD by Annette Walters $16.95 21 Days To a Healthier, Slimmer You CD by Annette Walters includes a weekly 1-hour compassionate group support, advice and cheerleading session with Annette (maximum 15 participants to ensure quality!) for 3 weeks in a row. $197

Note: that the prices here end in a 5, 7, or 9. This is because split tests have shown that if you offer a product at say, $22.99 or $23 – people will buy the $22.99 product because it feels cheaper to them. Other split tests have shown that ending the price in a 5, 7, or 9 triggers the most purchases. For example, $97 will pull better than $94. Don’t worry – we’ll cover pricing much more extensively throughout this Module.

Brainstorm Your Product Names

Now it’s your turn. Using the examples in the chart above, take a look at the current names you have for your products or services. Do you need to make them more appealing? Do your names contain a promise, solution or benefit? Can you add on a product (audio, video, eBook) or a service (consult, coaching, mastermind) to value-pack your product, or enable you to charge more?

Or, if you’ve just started thinking about products or services you might create, brainstorm those ideas now too.


How Do I Re-Position or Expand My Products?

Once you know how to position your core products or services, and once you’ve been selling those for a while, do you have to create new products all the time?

Not necessarily. Often you can simply re-position an existing service or product and sell it as something different, or sell it to a different audience.

Differentiate & Expand

The easiest way for me to explain how this works, is to give you some examples. Here are some examples to stimulate your ideas about ways to present (position) your existing services beyond the obvious:

  1. Horse Trainer or Dog Trainer: Let’s say you currently offer private training sessions and group workshops. Not everyone can afford to hire you personally to come out and work with their animal. And others may not live near you, so can’t come for a workshop. But, many people just need some advice, or a fresh perspective. So you could offer:

Problem-Solving Phone Consult (30 minutes)

and/or

Training Advice Phone Consult (60 minutes)

TIP: Once you have held a consult with someone, you are now primely positioned to capture them as a client once they are ready to proceed with training. You can set up an automatic email sequence (autoresponder) to move them along this pathway; give them more help and keep yourself top-of-mind for when they are ready to book someone to physically work with their pet. Want to know more about using autoresponders to develop a deeper relationship with the people on your email list?

  1. Home Renovation: You currently handle home renovation projects for people who want to renovate their kitchen or bathroom, or entire house. But what about the people who are in the dreaming or planning stage (they’re not ready to do the renovation) and they just want to get some professional input at this stage?

Brainstorm Your Reno Consult (1 hour)

and/or

Reno Ideas & Advice Consult (1 hour)

  1. Professional Artist or Photographer: You currently sell your art and prints and maybe you offer workshops teaching others your style. But instead of just selling your own work, or specific technique, how about helping other artists with your global artistic expertise, or business experience?

5-Painting Art Critique (1 hour) – Submit up to 5 works and then we will discuss your strengths, what needs to be developed, easy tips for improvement that yield big results and what direction you should go in next.

and/or

Sell More Art! (1 hour) – We’ll talk about your unique situation, assess your strengths and constraints and I’ll share my ideas for how you can take your art marketing to the next level.

Your Turn


Use the above examples to help you brainstorm how to expand your products or services, or appeal to a new type of customer:


What are some ways you can expand the products or services you o er to make them bigger, or more interesting, or capture a new type of customer? You may be able to charge more too… refer to the examples in this unit if you need some ideas.


Now let’s look at other ways you can re-position an existing service or product and sell it to a completely different audience.


Re-positioning Existing Products For A New Market

You’ll notice that I often talk about multi-purposing your digital content; taking what you already have and packaging it up in different ways, and at different price points.

Well, you can also do this with physical products and services and the best way for me to show you what I mean, is to give you an example.

Example: Andy the Horse Trainer

Andy is a horse trainer. He offers a standard 2.5 day Horsemanship Clinic format. This is a standard length of time for people in the horse world, and the price at $375 is also considered very reasonable.

But Andy wants to expand his product offerings and he wonders how he could appeal to other audiences; which would give him a wider reach and more income streams.

So whilst his current Horsemanship Clinic format is great for people who own their own horse – neither the time commitment, nor the intensity would fit with people who do not own their own horse, or regularly spend time with horses.

He can however, teach pretty much the exact same content (techniques, methods) to anyone who’s interested in being with a horse, by packaging it up and positioning it differently. Here’s how…

Andy could offer a half-day workshop. But his positioning wouldn’t be for horse owners. It would be for people desiring leadership, or personal mastery, and the horse is the vehicle or coach for that process.

Using a similar fee rate for his existing clinic ($375 for 2.5 days) he could charge $149 and that would be a very easy sell to a wide circle of people.

He could also offer these workshops as Part 1, Part 2, etc. So that people who enjoyed the experience, could keep going (repeat customers!). Taking the exact same techniques he teaches in his regular Horsemanship Clinic, he could break down the content and re-position it.

For example, Andy could take 3 simple things; catching the horse, grooming her, and leading her… and turn that into a $149, half-day workshop. Here’s how he would position that…

Leadership Training – The Way of the Horse

Catch a horse in your mind first, then with the rope – Learn how to adjust your intention and body cues so the horse practically places its nose in the halter for you. Foster congruence between your mental intention and your body language, which will allow people to perceive you as trustworthy.

Experience how your energy transfers to others – When you groom a horse, his heart rate will sync to yours. Become aware of your breath, your emotions, and the energy you’re holding. Begin understanding that you can control your energetic presence in the world – and consequently, how people respond to you.

Leading and stopping the horse – Lead your horse with a hair trigger of pressure only; while maintaining your boundaries and groundedness. Learn that you can get your horse to walk slower or faster simply by using your own body energy and a simple cue. Have your horse stop with only a gentle, yet firm signal – or even just a shift in your body and energy. Go deeper into emotional and physical body congruence. Learn more about how your energy and intention affect those around you – especially your employees, or your children, or anyone else with whom you are in a leadership role.

Does that sound like a great workshop, or what? And well worth the money. Andy could market this workshop to a number of different audiences – and he would change the wording (re-position it) accordingly:

  • Parents struggling with kids who won’t listen or don’t respect them
  • Single women having trouble in relationships because men don’t respect them, or walk all over them
  • Anyone having difficulty in a leadership role
  • Anyone wanting to improve their leadership skills

The workshop positioned to teach or improve leadership could be marketed to large corporations for all their management staff. Andy could also target non-profit, or community organizations; which often have funds allocated for personal development. And he could also market directly to individuals in leadership roles.

You see how this works? More money for Andy, for less time. Yet he is also diversifying his revenue streams, which will protect his cash flow. He can also train an assistant to handle the lower level workshops, while he is teaching the higher levels, thus increasing his revenue. Let’s use Andy’s example and apply it to your own product offerings…


Use the example of Andy the Horse Trainer and brainstorm how you can apply it to your own business…

Look at all the different points of contact with your site visitors and your customers; examine the ways you are communicating with them. How are you making them FEEL? Are there any places you could position things in a better way? Make sure you take a look at common elements like: Returns, guarantee, shipping guidelines, customer service contact, policies, safety issues, rules and regulations, etc. Make your to-do list and jot any ideas down here:


Positioning Your Customer Contact Points

In every interaction you have with your customer, you need to be thinking about positioning. Because how you position something, determines how your customer perceives it. Which then determines how he feels about you – which is extremely important!

So positioning does not just apply to your products and services. It applies to every point of contact you have with your customer.

For example, how do you position (present) your safety guidelines, without making your customers feel they are in danger, or afraid to take a step without your permission?

Or how do you position your return policy in a way that makes your customers feel safe to order from you? And that you are on their side if something goes wrong with a product?

Let’s look at an example again, from Andy the horse trainer’s business. Andy has a horse training program that goes through three stages, from haltering through to saddling and riding. The first stage of groundwork is crucial to the success of the program, so he doesn’t want people to advance to Stage 2 unless he sees they are ready and gives his approval.

So how does Andy communicate (position) that to his clients?

BEFORE:
Note: You cannot advance to the next stage until Andy gives the go-ahead. You must learn this stage thoroughly before you will be given permission to move on to the next stage.

Now let’s say the same thing, but change the positioning (presentation).

AFTER:
Note: You will not be advanced to the next stage until Andy gives the go-ahead. He has worked with hundreds of horses over many years and this stage cannot be rushed, or the training will not hold. Andy wants nothing but success for you and your horse, so he needs to make sure you have both mastered this stage before progressing. You may not recognize the difference between learning and mastery, but Andy does, and he will support you and your horse for however long it takes for you to get there.

Which notice would make you feel safe with Andy? Which notice would make you feel he’s got your back and is looking out for your best interest, rather than trying to control you?

Both notices are saying exactly the same thing, but they are positioning it in completely different ways. Personally, the first notice would be enough to stop me from buying this course. I would be afraid that Andy could pull all kinds of egotistical crap on me and I’d have no recourse. Or that he could stall me indefinitely for no good reason. I would not trust him or feel safe.

The second notice makes me feel that Andy is a trustworthy guy of great integrity. I feel like he’s not only got my back, but also has some skin in the game – he’s willing to support me for however long it takes, wow, that’s commitment!

Do you see how important positioning is? Grab notebook, and let’s look at how your positioning is making your customers or site visitors feel…


Look at all the different points of contact with your site visitors and your customers; examine the ways you are communicating with them. How are you making them FEEL? Are there any places you could position things in a better way? Make sure you take a look at common elements like: Returns, guarantee, shipping guidelines, customer service contact, policies, safety issues, rules and regulations, etc. Make your to-do list and jot any ideas down here:


Okay, now that you have encouraged your customer to purchase from you, what happens AFTER you’ve made the sale? Are you done? No chance Lance…

How Do I Know When to Start Selling My Stuff?

There is no magic time, and the sooner the better!

It is really important that you immediately start thinking about selling something on your site or to your email list if you aren’t already – even if it is just one simple eBook.

The longer you wait, the longer you are exponentially prolonging financial abundance. Just like a retirement fund can double in size if you start only 5 years sooner, likewise, the money you generate from your website can be drastically increased if you just get something (of good quality) out there as soon as possible.

Pat Flynn from smartpassiveincome.com illustrates this beautifully by sharing his actual revenues from when he first started his blog; to when he added AdSense ads to his blog; to when he made his first eBook available for sale. Here’s his chart:

13_01January – started blog
April – added AdSense ads
October – added eBook for sale

Now, keep in mind that the reason his eBook sales were so high in the month he launched it, is because he had spent 10 months building his email list and blogging great quality content pretty much every day.

You’ll hear me say this over and over again: Most people won’t buy on a first-time visit to your site, or your Facebook page, or from following you on Twitter. They will buy when they have opted in to your email list and you have built a great relationship with them over time, by continually sending them helpful, encouraging, or entertaining stuff (via your blog posts, videos, etc.).

I encourage you to subscribe to Pat Flynn’s blog, because not only will he send you exactly the kind of helpful, encouraging stuff you can then use for inspiration, but your business will also benefit from his advice.

So Pat then did a projection (extrapolating the same numbers) and he wondered, what would have happened if I had started monetizing my site in March instead of April – just one month earlier? And he realized that by December, he would have made an extra $10,000!:

13_02

Is that enough motivation to kick your butt into gear?

Remember, that procrastination is not the cause, or reason, for lack of action – it is a symptom. So if you find yourself procrastinating, you need to get to the reason (often fear) that is underneath the symptom (procrastination).


How Can I Use Free Talks or Demonstrations to Make Great Sales?

Great Positioning = Great Sales

Lisa Sasevich is a former Hewlett-Packard and Pfizer executive who switched to public speaking when she had kids; she wanted more control and flexibility in her life, yet still wanted to make good money.

Lisa would drop her kids off at daycare and school and do free lunchtime talks to places like the Chamber of Commerce, or women’s groups. She used these free speaking gigs to educate and empower people with her great free content. She spoke about pretty much the same thing, over and over. She called it her Signature Talk and she came up with it by asking herself this question:

What is that one topic that would attract those people I’m meant to help? What would be the one talk that I could talk about over and over again?

And then she always made a compelling offer while speaking (positioned for her ideal customer) for her paid coaching package. She spoke only three times per month, for 90 minutes in the back of an Olive Garden or TGI Fridays restaurant and that earned her $5400/month in product sales! Here’s how that breaks down:

Average audience 30 people
20% conversion = 6 sales
Her coaching package cost $297 = $1800 per gig
She spoke 3 times per month
= $5400/month
= $65,000 per year

At this point, she had no eBooks, or online products, or any other content to sell – just her live coaching.

As she became more comfortable, she expanded her product offering to include an audio book and a few more coaching sessions per month. By that point, she was speaking to larger groups of about 50 people, but only twice per month. Her sales conversion rate remained the same, so here’s what that looked like:

Average audience 50 people
20% conversion = 10 sales
Her coaching package cost $497 = $5000 per gig
She spoke 2 times per month
= $10,00/month
= $120,000 per year

Now, if you don’t feel comfortable ‘selling from the platform’ or making your sales pitch during your talk, I’m going to show you a rather brilliant way around that.

How To Avoid Selling From The Stage!

Personally, when I speak, my main goals are to connect, give the audience something that changes their life, and begin building a relationship with those people. If I were to then give them a sales pitch, it would feel incongruent for me.

So what I do instead is I give a sales pitch, or compelling offer, for a freebie! That’s right, I choose something really great that I can give everyone in attendance for free. I tell people there is a sign-up sheet coming around where they can write down their email.

That way, there is no pressured sale for either of us! I can take my time building a relationship and educating them. I know they will want to take advantage of my help and solutions to their pain or problems, and this allows the relationship to develop naturally and for them to purchase when they are ready.

I find it works well to give people a choice of 2 – 3 freebies, so they can check the box next to the one they want. This makes it more real for people and is also more fun. I also send 2 sign-up sheets out at the same time – one from each side of the room. Here’s a sign-up sheet that I just created myself in Microsoft Word:

However, you may feel comfortable giving your product offer live, from the stage, and in that case, go for it! It is certainly an effective method of generating sales.

Also, there’s no reason why you can’t do both – use my trick to capture the emails of everyone there, so you can continue the relationship AND make your pitch from the stage.

In explaining why her talks were so well received and her sales conversion rate so high at her speaking engagements, Lisa says:

People are buying the destination, not the plane. Give them the ‘wedge’ that allows them to step into that space and hold it open. I call it the ‘wedge of possibility’ because when possibility opens, you need to put something there to hold it open. Otherwise it just becomes one of those things that are so amazing in the moment and then it disappears. You have to make people an Irresistible Offer – one that makes people say, Yes, I’m going to do that now and I’m going to do that with YOU. An offer that inspires action.”

Want to know more about how to position your product for the best price – and to make the sale? Here’s how to use customer feedback to inform and adjust your product positioning.

How Do I Use Social Media to Promote My Business?

If you use any social media right now, you’re probably used to seeing ads all over it, usually targeted somewhat at you. A lot of people get anxious about knowing how to use social media “properly” to promote their business. The truth of the matter? Social media algorithms change, and the tricks you learn or figure out or pay for become less effective or obsolete over time. And even though you get instant feedback in terms of likes, comments, views and shares, none of that necessarily contributes to making an actual sale. What people see on social media is momentary, and then they’re on to the next thing. And if the formulas change, they might not even get to see your content. There is still absolutely nothing that compares to a really good email list. Whatever you do on social media, you want it all to point back towards your site, where people can engage more thoroughly with you and sign up for your freebie in exchange for their email. So take the anxiety out of social media marketing and try to remember the one rule that stands while the others change: just post engaging content that can link back to your site. That way, you can choose to use whichever platforms are most intuitive for you.

Facebook and Twitter are two of the most well-known social media platforms. You may already have a preference for one or the other, but let’s start with Facebook first.

Facebook is a great way for people just starting out to notify a whole bunch of people at once about their new business, or product, or service. Why? Because everyone has friends and family! And even if you don’t have that many friends, you likely have a lot of people you went to school with over the years, or worked with, or belonged to groups, or churches with.

Facebook is a very fast and easy way to access all of these friends, acquaintances and colleagues in one swoop. And because everyone likes to show that they have lots of “friends” on Facebook, everyone is likely to accept your “friend request”.

You can create a free account (personal profile) on Facebook and invite all your friends to become “friends” with you. You can also search for the school or college you attended and invite your classmates to be friends. Make sure you select your school info and hometown locale when you sign up as this alone can bring a flood of “friend requests” from others. Here’s what my Facebook personal profile page looks like:

You can see from the top right side post from Gigi Chan, that even though this is my personal page, people are still asking me business questions here and they feel like they can easily connect directly to me.

On your personal profile page you can either just post a little excerpt from your blog post, along with the link to your post, or you can post photos (with a blog link), or information (that links to your site) directly on your personal timeline (used to be called your Wall), OR you can also create a free Facebook PAGE or Fan Page.

A Facebook Page (Fan Page) is also free, but can be focused entirely on your business and you can promote freely on it without alienating any of your real friends!

You can also buy ads (very reasonably priced) from Facebook that send people to your Facebook Page for more info. Once on your Facebook Page, you then send them to your site. Facebook has all the instructions for setting up Pages and it is very easy. Just make sure you link to your website right in the header of your Page, so people can click to your site easily. Here’s what my Facebook Page (called Listen To Your Gut) looks like:

See how I have linked directly to my Shoppe and my Videos and other social media right at the top of the page? And my site URL is at the top left hand side.

The other advantage to having a Facebook Page, is that it’s fairly common for other people to ‘stumble’ across your page from:

  • Having seen it on a friend’s Like section
  • Having seen a post or photo you posted that got shared around
  • Having one of their friend’s post that they love you or your work

If you have a great photo or logo associated with your page, that will often intrigue people enough to click through and check you out.

Remember that your Facebook page never takes the place of your site, and it’s primary purpose is to drive people to your site. But it is definitely useful as a place to get you added or unexpected exposure.

Free Marketing!


I strongly recommend you set up at least a Facebook personal profile. When you’re just starting out, your family and friends are the largest network you have – and with Facebook, whatever you share with them can also be ‘shared’ with all their family and friends, if they like your post – kind of like pyramid marketing.

So yes, you definitely want to share your new business and new website with all your family and friends on Facebook – do a search for your schoolmates going back to your elementary school days and that will automatically garner you a few hundred ‘friends’. Could marketing (sharing yourself and your ideas) be any easier?

Also, if you have kids in school, you can ‘friend’ all of the other parents you chat with in the schoolyard. Or people like your massage therapist, hairdresser, chiropractor, etc.

The other benefit of Facebook is it makes people feel you are more accessible and more likely to answer them personally. When you’re first starting a business this is gold as it gets you lots of interaction, questions and feedback from your audience. After your business has grown bigger, you can always get your personal assistant to answer all your Facebook queries.

The other type of page people like to use on Facebook is a GROUP. People can become members of your group and then they can post questions to you, you can announce events, or post content, etc.

However, a PAGE allows you to do more things than a Group, so for that reason, I closed my group down and am getting everyone there to transfer over to my Page (by “Liking” it). Here’s what my Group looks like and you can see just from this screenshot that both the Page and the Personal Profile offer more options to promote your business:

Personally, I feel the main use for Group would be if you want to run a support group, or a private (secret) group for members of a program. But as I said, in the beginning, you only need a Personal Profile. And if you can add a Page, then great!

In the meantime, Jo Barnes has provided us with a free eBook to get you started on the nuts and bolts of how to use Facebook to promote your site and your stuff. She outlines all the details for you on how to set up and get going. Click here to get the download link for this free guide (Jo’s gift to you!). Here’s a snapshot of what she’s going to teach you, that gives you a nice visual of what I’ve already explained:

If you really like Facebook and want to work it, there are two great tools I can personally recommend. The first is a course offered by Jo Barnes – a totally down-to-earth, funny Brit who knows Facebook like the back of her hand. The second is GroSocial, which would be most useful if you have already been using Facebook for a while (it’s more advanced) and want to run really targeted contests and promotions.

Remember, I don’t recommend anything that I haven’t tried myself, and use for my own business. That doesn’t mean that another program is not just as good, or perhaps better – by all means go ahead and do your own research. It just means that you can have the confidence that I walk my talk; whatever I refer you to is something I have used or am using myself.

Facebook Ads

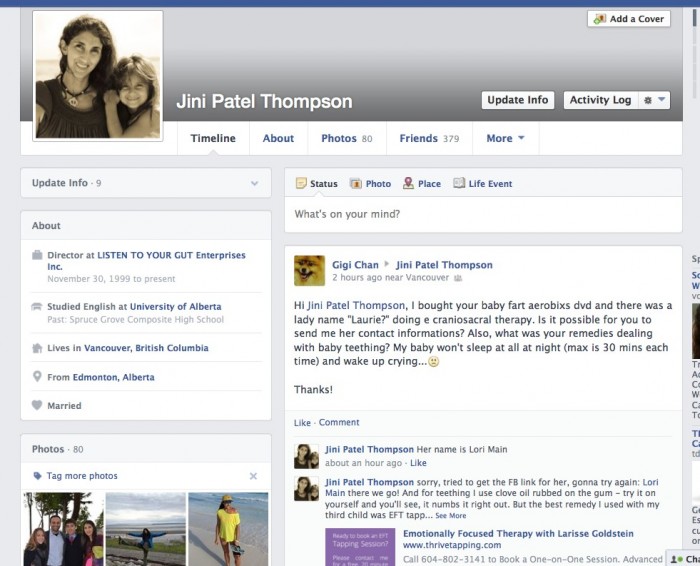
If you’ve been on Facebook, then you have already seen the advertising options available – the ads are in the sidebar and in “sponsored posts” that appear right on your timeline.

Facebook ads are effective not only in terms of generating “Likes” but, even more importantly, generating the “likes” that you want – from your target audience, no matter how narrow and specific it is.

Facebook allows you to target your ads to your audience in three ways:

  • According to demographics (location, age, sex)
  • By very specific interests (health, natural remedies, healthy food, recipes, for example)
  • By Likes – for example you can target your ads at Facebook users that “like” your competition’s fan pages by typing in their fan pages’ names.

What’s great about Facebook ads is that you can switch off your ads whenever you want to (if, for example, they are not effective at all) or you can change the copy and images within the currently displayed campaign, with no additional costs.

Advertising on Facebook is also really affordable! $30 – $50 is a reasonable budget to test an ad campaign on Facebook – that is enough money invested to tell you if your ads are working and whether you should continue, or hire someone to help you with it, or if it’s a good venue to advertise your business.

When we tried Facebook ads for our health business, we discovered they were a good way to increase page ‘Likes’ but not a good way to drive sales. We got much better results for our health stuff from using Google AdWords.

Automate Other Social Media to Post to Facebook

The great thing is that once you have your Facebook component set up, you can automate all your blog posts to appear as soon as you publish them. Simply install a free plugin on your blog, like NextScripts: Social Networks Auto-Poster. And you can have this plugin automatically post to Facebook and other social media as soon as you publish each new post.

You can also link your YouTube account so your videos are posted automatically to Facebook. And you can “like” or “share” anything on the web that relates to or helps promote your business.

For example, let’s say you “share” a great photo with an inspirational quote on your Facebook page and wall, and a bunch of your friends think it’s great, so they all share it, and so on, until it goes viral. That photo could end up being seen by 2 million people and some of those people are bound to be curious about who posted that photo and they will see your website URL (address) on the photo, or click on your name and voila! – new traffic to your brand or your site.

Another trick: If you had the time, instead of just ‘sharing’ someone else’s photo, you could download that photo, or take a screenshot of it. Then do a blog post about the photo and inspirational quote (remember, a few lines is sufficient) along with the photo credit (copyright) and a link to the original photo – to cover yourself legally. Then re-post the photo with your blog link on Facebook. That way, if it goes viral, people will have a direct link to your blog and you will likely add many names to your email list via your site opt-in. Exciting stuff!

Twitter

Like Facebook, Twitter is free and you can easily “share” your blog posts and videos with Twitter, so they are automatically tweeted out to all your followers. Personally, I don’t feel it’s a great tool for promotion, because I’ve found it doesn’t drive much traffic compared to other methods, but it’s so easy, you might as well add it to your repertoire. It’s also super easy to have your blog post directly to Twitter automatically for you.

Tim Grahl from Out:think echoes my experience in a story about his client, NY Times Bestselling author Dan Pink. Dan has almost 200,000 Twitter followers, however, when he Tweets something only 650 click on the link. So whilst the 200K number looks very high, the actual effect, or engagement is very low (less than 1 percent).

My experience with Twitter confirms this, which is why I don’t recommend you spend too much time with Twitter. But if it’s easy and you enjoy Tweeting, then why not?


Write down now whether you want to use Facebook or Twitter. And do you want to have just a personal profile, a business page, or a group?

Do you have the budget yet to hire someone to post to Facebook of Twitter for you, or do you need to start by doing it yourself? Or do you want to install a plugin on your blog that will automatically post your blog content to Facebook, Twitter, etc)?


Photo-Sharing Sites – Pinterest & Instagram

Photo-sharing services allow you to pin, or post photos that (as in the Facebook example I gave above) can easily go viral. The key to this method of social marketing is to make sure you add text to your photos that shares something about yourself or your topic that speaks to viewers. Remember, you don’t just want people to look at a great photo, you want them to click back to you and check out your site. So be creative. As our lovely Jo Barnes says:

“Put simply, Pinterest is a ruddy great online collaborative photo album where each user can share interesting images about a wide variety of topics with other users. Its power is in the fact that firstly – everyone loves to share photos right? Remember hours of pouring over old photo albums with your folks & friends. We LOVE it. Hence why photo sharing has become the No 1 activity online and why Pinterest has grown so rapidly!

But it doesn’t end there. Add to that, utilizing the right keywords in pin descriptions, linking to fantastic, high converting landing pages, sales pages or amazing content, your pins and boards can not only have a HUGE affect on your referral traffic, but they could even make it to the top of search results on Google or Bing.”

For example, you could create a photo (Pinterest calls these “Pins”) that has a Top 5 list. So let’s say your business (website) is about Natural Horsemanship. You get a photo of a gorgeous horse and superimposed over the picture you put the text: “The 5 Best Ways To Connect With Your Horse”. You then “pin” this photo to your Pinterest account. When someone clicks on the photo, it takes them to your blog post about that topic.

Note: You can use this exact same process to post the same photo to your Facebook page. And you can also post it as a blog post – either as is, or with a paragraph or two of text. Always multi-purpose your content whenever you can as this increases your marketing reach (tells more people about you) with zero extra work!

Here’s an example of what a Pinterest ‘pin’ looks like:

Note how she has made sure to include her website URL for when this image gets shared, posted and blogged around? This image then also becomes her photo at the top of her blog post about this topic.

Optional for the Tech-Lovers: If you can, add a “Pin It” button beneath the photo and write a smart, searchable tag for the caption. You may think you don’t need to add a “Pin It” button to your blog posts — that people who use Pinterest will naturally just pin the posts they like. But this is not true. People aren’t always thinking about Pinterest and so you need to tell them to pin the post. The pin button is an easy way to say, “Hey, go ahead and pin this.” It also shows that you are giving the person permission to pin the content. Remember, when you put the “Pin It” button on your post, you can customize the copy. Take advantage of that and be sure to include key words and hash tags to make your content searchable.

If this sounds too complicated, then never mind, when we had your blog installed, you had SHARE buttons added and these include a Pinterest Pin button – so people who are looking for great photos to pin can still grab yours.

Tip: You can easily add text to any photo by using free tools like Preview on iMac, or Gimp on PC. Or, you can use a free online tool to add text to your photos like AddText.com

Here’s a video where I show you step-by-step how to add words to your photo on Mac:

Using Preview with Mac

And Here’s a video showing you how to add words to your artwork or photo on a PC:

Here’s another example of text added to a photo (see how she’s included her website for when it gets emailed or passed around places other than Pinterest):

Here’s another great photo/quote that started out on Pinterest and then got passed around Facebook – it has now been “Liked” 2,700 times and shared 1,442 times – note how the creator made their website clearly visible, so they can benefit from all this free promotion:

If you find you really love Pinterest and want to make it a major part of your marketing efforts, Jo Barnes has an excellent course on Pinterest that is very reasonably priced. Jo is a fantastic, no-nonsense instructor who practices everything she teaches and is fun to learn from. She has also provided us with some excellent Pinterest training in a free eBook – click for the download link!

Or, you can hire someone on Elance to run your Pinterest account (and/or Facebook, Twitter, Instagram etc.) for as cheap as $5/hour. Just be sure to go look at the examples applicants give to make sure their English is good enough for you.

This is how I run my Pinterest account. I found Bbrave Marketing through Elance.com and they handle not just my Pinterest and Instagram, but my entire social media portfolio (Facebook, Twitter, Google+) as well – for only $50/week. They are fantastic and we’ve seen a noticeable increase in new site traffic since they took over.

But again, before you pay for anything, Jo Barnes has given us a really great eBook on getting started with Pinterest, for free! Jo will walk you step-by-step through setting up your account to maximize your efforts (i.e. least effort for most result!) and the best way to use Pinterest to tell people about your stuff and drive them to your site.


*Add instagram updated info?*

Instagram is also a rapidly-growing photo sharing app that started out just being used by cell phones, but they are now developing their website too. Facebook bought Instagram for $1 billion at the end of 2010, so I’m sure we’ll be seeing many new and interesting ways to use Instagram and also integrate it with Facebook in the years to come.

Instagram is a more personal posting platform than Pinterest. It is more about posting spontaneous pictures of yourself and your interests. For example, preparing a new recipe, in your office working on a new blog post, pictures of you attending workshops and seminars, interviewing people, etc.

And like all social media, these photos link back to your site. You can also optimize them for search engines by adding hashtags (#) with the keyword when you post the photo on instagram. E.g.: #homecooking, #pioneer, #slowfood. More about exactly how and when to use hashtags over here.

How Do I Promote My Own Site For Free?

The main reason you want to promote your site is not just to market yourself and your stuff to potential customers, but to get people to opt-in (sign-up) to your email list.

It is very rare that a person will buy anything from you on their first visit to your site. That is why capturing their email address is CRUCIAL.

Once you have their email address, you can begin to build a relationship with them, by sending them lots of free and helpful stuff.

Your free, helpful stuff is located on your site or blog, so this drives traffic to your site (which increases your search engine ranking) and also keeps bringing them back to you.

After they know you and TRUST you, then they are likely to buy from you, if you have what they need.

So here’s what that looks like:

SOCIAL MEDIA
Facebook ~ Twitter ~ YouTube ~ Pinterest ~ Instagram ~ LinkedIn ~ etc

17_02

 YOUR SITE
Your Blog Post or Your Homepage or Your Landing/Special Offer Page

17_02

OPT-IN
Opt-In to your great freebie
and become part of your email list

17_02

EMAIL MARKETING
You start building a relationship with them
by giving them more great stuff for free

17_02

PURCHASE
Now they buy from you

So first you have to get people to your site.

Then you have to get them to opt-in and give you their name and email address.

Your email list (database) is your most valuable asset. It is your most powerful marketing tool, but it is also easy to overwork your list and lose people. If you email people too often, it becomes annoying and they will unsubscribe. And yes, I’ve tested this! I’ve found that a maximum of 1 email per week results in long-term email retention. Some of my list have been with me for over 10 years without unsubscribing.

There is lots more to learn about the best way to use your email list, and build a relationship using that list (email marketing), over here!

For now, let’s focus on the free and easy ways to tell people about you, and get them to your site, so they can sign up for that precious email list! So this module is all about the free ways you can market your stuff and build your tribe, using various social media. I will also help you figure out which social media you should be using to promote yourself and your stuff. But first…

Pressie Time!

Yay, time for another free gift: I took this marketing and sales sequence I gave you above (with the arrows, showing each step) and had my designer turn it into a nice pdf chart/graphic for you.

Print this out and pin it near your computer, so that it imprints on your brain and also so that you can check off the steps easily and quickly, making sure you haven’t missed any steps in the process.

This chart is not just useful for your social media marketing, but for ANY vehicle, platform or media you use to tell people about your stuff (Google AdWords, Joint-Ventures, Blog Posts, Guest Posts or Interviews). So I have expanded the chart to reflect all these different ways of telling people about the awesome stuff you have for them.

DOWNLOAD the Easy-Peasy Sales Success Chart

Remember: You don’t just tell people about your stuff, you always send them to a place on your site that has a sign-up box, where you can capture their name and email for your list.

Social Media

Many people rave on about the power of social media, but in reality, the main use of Facebook, Twitter, LinkedIn, Pinterest, etc. is to drive people to your site/blog, where they can sign up for your email list, see what you have to offer and get to know you better. Social media will rarely generate you direct sales (unless you are using it to promote a specific campaign), but your email list will.

Tim Grahl from Out:think (a marketing firm specializing in authors) illustrated this point perfectly when he revealed that one of his authors’ email list outsold ALL her social media activities by 100:6. That means that all her posts on Twitter, Facebook, her blog, etc. netted her 6 sales of her new course. Two emails to her list (an announcement email, then a last-chance email) netted her 100 sales. I can absolutely confirm their experience through my own testing of various marketing methods.

Your email list is King and the purpose of all of your social media marketing is to drive people to your site, where they can sign-up for your email list.

How Do I Tell People About My Stuff?

Your website (blog posts, keywords) and your daily marketing activities are like the backbone of your site promotion that keep working for you while you sleep, or even when you’re on vacation. You just have to blog once and it keeps working for you – even years later, you will still have people leaving fresh comments on a good blog post.

Likewise, you only have to upload a great video once, and year after year it will continue to tell new people about you and your solutions, prompting them to visit your website or blog, where they can sign up to your list.

Your daily, ongoing marketing and promotion should include things that don’t cost you a dime – like blogging, posting to Facebook, Twitter, Pinterest, commenting on other people’s blogs, posting in forums, uploading videos to YouTube, etc.

A lot of this ongoing “marketing” activity (giving people helpful information, or entertaining them) will likely occur naturally, since you have chosen a business that is something you’re already active, passionate and interested in.

Don’t turn this kind of site-promotion into a big deal!

If you have time to text your friends and family, you have time to carry out at least one of these social media marketing activities each day. And of course, remember to always provide a link to your site and give your full name, or the name of your site (in case the link is deleted and someone wants to Google you).

How To Promote Your Stuff Offline

Now let’s say, for example, that you absolutely hate blogging. Or maybe it’s just that publishing blog posts – whether written, or video, or audio downloads – is just not something you can get into a groove with. So you find you hardly ever do it. And as a result, no one knows about you! And your site generates very little organic search engine traffic.

If this is the case, then even if you have the best website in the world, you still won’t make much money because no one is coming to your site – they don’t even know you exist.

If this sounds like you, then don’t despair. Instead, either get some great affiliate partners with active blogs to promote your stuff for you, or, focus on all the offline ways you can let people know you exist and what you can offer them.

Depending on your niche or topic, different venues will work better than others, but here’s a list of ideas to get you going:

Give talks; free or paid – community organizations, local businesses, interest groups, clubs, etc. Make sure you have hand-out cards or postcards listing your tagline, elevator speech and website available, so people can find you. Maybe let them know you have a free gift for them on your website.

Host introductory, or free workshops – again, these can be local, or you can offer them in whichever cities or areas are likely to have a good concentration of your ideal customer. Make sure you have hand-out cards or postcards listing your tagline, elevator speech and website available, so people can find you online. If possible, let them know you have a free gift for them on your website, to encourage them to visit and sign up to your list.

Offer free seminars on specific topics – this will be particular to your niche. For example, if your business is health-related, then many health stores have monthly or weekly seminars you can sign up to present at. Check with local business groups if you have a biz-related service or product, etc. Check with hardware stores if you have DIY or special carpentry expertise, and so on. Of course, be sure to bring your cards along!

Post your cards at related, local businesses – grocery stores, coffee shops, specialty stores and health stores are all places that host bulletin boards where you can pin your postcard or hand-out card. Other businesses, like bodyworkers, new age shops, medical offices, chiropractors, dentists, etc. may allow you to leave a holder with your cards on their counter if they think your stuff will help their clientele – or, if you can offer them a referral fee. Again, make sure your tagline and elevator speech are on your card, along with your website address.

Attend local sales venues – like flea markets, farmers markets, craft fairs, or anywhere else your ideal customer is likely to show up. You can sell your products or services, but also make sure you focus equally on encouraging people to take one of your hand-out cards or brochures and visit your site.

Aside from these handy offline ways to promote your site, you can also use Google AdWords to drive traffic to your site via ads posted on other people’s sites and in search result listings. You can test this out yourself, or hire a Google AdWords specialist from Elance.com to set up a campaign for you. Google AdWords works brilliantly for some people’s sites and not so well for others, so it’s good to appoint a budget of $200 dollars or so to test it out first.


How Do I Make My Own Visual Posts For Social Media?

We’ve all seen how quickly a great quote can go viral. Quotes also cause your reader to connect more deeply with you – because a resonant quote shows that you understand how they feel, or you share a frustration, but also a hope, or provide encouragement, or humor to lighten their day. And again, no matter which type of quote you post, a short quote is very easily and often shared among friends and family members (free marketing for you!).

The other reason to artwork your own quotes is that you can easily post your quote in many places:

  • Your blog
  • Pinterest, Instagram or any other photo-sharing site or app
  • Your Facebook Page or personal profile
  • Set it to music and upload as a video to your YouTube channel – you could also string 3 or 4 quotes together on a single topic, add music and voila you have a video.
  • Tweet your quote and have your tweet link to your blog or Pinterest pin
  • Email it out to your list

You can either quote other people – grab topic-specific quotes from quote-sharing websites online – or quote yourself. Either make up a quote, or write down something that you often hear yourself saying, or grab a quote from your latest blog post, or article or eBook.

If you want to use quotes from other people, then just type in the keyword for the quote you’re looking for, for example, you could enter into Google:

Inspirational quotes
or
Sports quotes
or
Encouragement quotes

As discussed above, you can either take a great photo and add your words over top of the photo, or you can use a service like Canva to create a really swanky, designer image quote. Or, you can quickly paint a background and use that instead. Like this one that has gone viral on Pinterest and Facebook, and has even been emailed to people:

Watercolor paints are the easiest way to create a beautiful, totally unique image to put your quotes over top of. And require no artistic talent whatsoever! In fact, you could even get your kids to do them for you. You may recognize this tutorial – it is the same technique, just put to a different use.

Here’s how you can easily artwork your own quotes using just a cheap set of kids’ watercolor paints from Staples, a cheap dollar store brush, masking tape, a spray bottle (also from the dollar store) and pieces of watercolor paper. You can’t use regular paper with watercolor paints as the paper needs to be thicker and absorbent.

And when I say this is so easy, even your kids can do it for you, I’m not kidding. Here’s one done by my friend’s 3-year-old, using exactly the same tools and method I’m going to show you. It’s beautiful, isn’t it? It’s a great background to add a quote on top of:

Okay, so no excuses left and let’s get started!

STEP 1: Tear your watercolor paper into the size of piece that you want. I find a square makes a nice shape for pinning or posting. Just make your fold line, scrape tightly across the fold line (we’re just using a vitamin bottle here to scrape down on the fold line), fold back again to the opposite side and scrape the fold line again, then tear:

You can either use your hands to tear the paper:

or you can use a ruler to tear the paper:

STEP 2: Tape down your piece of paper, using the masking tape, to make a border on all four sides (the tape will form a border underneath the part of your paper that is covered by the tape) like this:

STEP 3: Now use the spray bottle to spray water all over your piece of paper – go ahead and soak it!:

STEP 4: Next, spend some time thinking about which colors would fit the “feel” of your quote. If your quote is peaceful, then maybe you want to use yellow and peach, rather than black and red, for example. Now use your brush (moisten first in some water) to smoosh around in the paint color of your choice and get a nice lot of paint on the brush. Then just put that paint onto your wet piece of paper. You can paint it on, splatter it on, tap it on, dab it on, circle it on – whatever you want! Let your inner child come out to play here and just go for it! It’s impossible to make a mistake:

OR

STEP 5:  Wait for your art to dry, then gently tear off the masking tape. Scan the image into your computer. Or you can use your camera or cellphone to take a photo of the image and upload that to your computer:

STEP 6: Now add your quote to your photos by using Preview (on iMac), or Gimp (PC), or Photoshop. Below are videos where I show you how to do this. Free online tools you can use to add text to your images are AddText.com and Fotor.com

OR (changed font color and text position – I like this one better):

Voila! Your original piece of artwork and quote is ready for blogging, pinning, posting and tweeting. How easy is that? Here’s a video where I show you step-by-step how to add the words (the quote) to your artwork on Mac:

And Here’s a video showing you how to add words to your artwork or photo on a PC:

Using Gimp with PC

In keeping with what I’m teaching you, I will now multi-purpose this tutorial:

  1. It will appear as part of the Listen To Your Freedom program, as a valuable tool to help members build their business through social media marketing.
  2. It will appear as a blog post on www.BrainstormYourBiz.com – in this way it will be a freebie to all visitors, but will also show the kind of awesome content people will receive if they join the LTYF program.
  3. I will also post it as an Art Tutorial on my art website, where it will add value to other artists who want to share their work. And who knows, maybe some of them will come on over and join the Listen To Your Freedom (LTYF) program as a result.

Always, always, always multi-purpose your content whenever possible! I will keep repeating this throughout this program, showing you how you can leverage or multi-purpose content (use the exact same content in different ways) to get the biggest bang from your time and effort – and also how to make the same content available to a wider audience by catering to different learning styles. Some people prefer written stuff, others are visual, others want an audio recording they can listen to in their car, or while jogging or gardening. More on how to do this over here!

No excuses now, eh? So listen to your freedom and get painting! Or grab a photo and add your quote to it.  Or use a service like Canva to create a really swanky, designer image quote.


Make a list here (or do an Internet search) of some great quotes that are applicable to your business:


Do you already have a photo or piece of artwork you could pair with a quote?: