This is your FAQ for the entire program. If you are ever looking for how to do something, that wasn’t given in previous modules, either scan through the Questions here below
OR
Press and hold down both the ‘Ctrl’ and ‘F’ keys on your keyboard if you have a PC (press and hold at the same time) or press and hold “Command” and “F” if you have a Mac, to bring up a Search box you can use to search for any specific word (keyword or keyword phrase) in this module.
Questions
- How Do I Make A Video Using PowerPoint?
- How Do I Add a Link To Another Site From My Blog?
- How Do I Add Social Media Icons to my Homepage?
- How Do I Change The Social Media Icons On My Blog?
- How Do I Add Amazon Affiliate Products or Links To My Blog?
- How Do I Add An Opt-In or Sign-Up Box To My Blog Sidebar?
- How Do I Add a Free Slideshow At The Top of My Blog?
- How Do I Take Photos of My Computer Screen (Screenshots)?
- How Do I Add Words to Photos or Artwork?
- How do I use Google Docs so I can enter my answers for LTYF online? Or so I can share a working document or spreadsheet with someone else online, so we can each work on the same document?
- How do I create a chart, infographic, or other colored visual to use for an eBook, or blog post, or tutorial, etc.?
- Where can I go to hire a cheap, yet good designer for my logo, biz cards, graphics, website, etc.?
- My site has been on Weebly, which is easy and working well for me. Should I switch to WordPress?
- How do I stop a page title from appearing at the top of my Page (eg. HOME on my homepage)
- How do I use Google Analytics to get information about my site?
- How Do I Feature a List or Recommended Items on My Blog (with or without affiliate links)?
- How Do I List a Blog Post Summary Instead of the Full Text on my BLOG page?
- Is there a way to automatically convert my blog posts to a newsletter or email and broadcast that out to my email list?
- How do I make a group call using Skype – with more than 2 people and can I share my computer screen with them?
- How do I make my YouTube Channel Art big enough, or format it properly?
- I’m in Australia, who is the best merchant provider for processing credit cards on my site?
- Why is there no information in LTYF about Metatags?
- What about assigning tags to my blog posts? Are they important?
- Which membership plugin should I use that integrates with my shopping cart and affiliate program?
- WordPress is deleting my coding for videos or affiliate links when I save the post – help?
- How do I record an Audio file using Audacity and export it as an MP3 file?
- How do I embed videos from sites other than YouTube?
- I’ve watched your video, but I’m still having trouble inserting Amazon affiliate links to my blog. They disappear after I paste them in – help?
- How do I create a ‘hidden’ page on my website?
- How can I extract the MP3 audio from my film in iMovie?
- How do I convert an AIF or WAV or m4a file into an MP3 file in iTunes?
- I’ve recorded an audio but the volume is too low! What can I do?
- What are the best settings to use to export video for uploading to Vimeo or YouTube?
- How do I upload an ebook or audio file to my server?
- How do I deliver my eBook, or my audio to my customer after they have purchased it?
- How do I set up an autoresponder series or email campaign?
- Is Facebook making people pay for their fans and followers to be able to see their posts? I heard that Facebook is now only showing about 20% of what I post to people who “like” my page, is this true?
- Is it possible to put html links into a pdf document?
- How do I install WordPress on my GoDaddy hosting account?
- How do I label my MP3 Audios with my name, album, etc.?
- How do I add an anchor or jump link which makes a word a clickable link which links down to a specific spot on a the same page (or a different page) – not just to the top of the page?
- Is there a FREE shopping cart I can use?
Question: How Do I Make A Video Using PowerPoint?
Answer: You can produce great videos without ever having to show your face! Use PowerPoint to create your slides, then save as Pictures (jpgs), import these photos into iMovie (or your editing software), record a voice-over and voila! You’re done.
Question: How Do I Add a Link To Another Site From My Blog?
Answer: This video shows you how to insert a link into your blog post – to link to another site from your WordPress blog post, also called hyperlink. And how to get that site to open in a new window, so people don’t lose your site.
Question: How Do I Add Social Media Icons to my Homepage?
Answer: This video shows you how to add your social media icons – links to YouTube, Twitter, Facebook, etc. – to the Homepage of your WordPress Blog site.
Question: How Do I Change The Social Media Icons On My Blog?
Answer: This video shows you how to change the twitter, facebook, youtube, linkedin and other social media icons on your WordPress blog – how to delete the ones you don’t need, or change them to a different style of icon.
Question: How Do I Add Amazon Affiliate Products or Links To My Blog?
Answer: This video shows you how to add Amazon affiliate links and products to your WordPress blog – in text link form, or as photos that link to the products on Amazon. It shows you either the manual way to add products or links, also plugins you can use, or widgets.
Question: How Do I Add An Opt-In or Sign-Up Box To My Blog Sidebar?
Answer: This video shows you how to collect names and emails and start building your list! Jini shows you how to quickly and easily grab your opt-in code and have your sign-up form appear in the sidebar of your blog.
Question: How Do I Add a Free Slideshow At The Top of My Blog?
Answer: Here’s a tutorial on how to install and setup a slideshow (slider) display of photos for your blog using MetaSlider; a free plugin. Maybe you want photos that fade from one to the next, or a series of photos the person can select from.
Question: How Do I Take Photos of My Computer Screen (Screenshots)?
Answer: This video shows you how to take pictures of images or photos on your computer screen, or on the internet, using free software apps for both Mac and PC.
Question: How Do I Add Words to Photos or Artwork?
Answer: We have separate videos showing you how to do this, depending on whether you are using a Mac or PC, or online free services like AddText.com. You can create your own Pinterest or Facebook posts of a great quote – maybe it will go viral! Don’t forget to put your website somewhere on the image.
Video #1 – Using Preview for Mac
Question: How do I use Google Docs so I can enter my answers for LTYF online? Or so I can share a working document or spreadsheet with someone else online, so we can each work on the same document?
Answer: Everything you need to get started is here:
http://www.google.com/drive/apps.html
And we’ve also got a quick video showing you exactly what to do:
Question: How do I create a chart, infographic, or other colored visual to use for an eBook, or blog post, or tutorial, etc.?
Answer: There are two ways to get customized infographics, diagrams or mind maps done. Firstly, you can do this yourself for free by using Google Drawing. All you need is a free Google account and go here:
https://docs.google.com/drawings/create?usp=apps_start&hl=en
Or, if you find something you like, or a certain graphic style that you like, you can also email the designer to do some custom work for you.
Question: Where can I go to hire a cheap, yet good designer for my logo, biz cards, graphics, website, etc.?
The best places I’ve found (and that I use myself) are:
Question: My site has been on Weebly, which is easy and working well for me. Should I switch to WordPress?
Answer: You will not get the same Search Engine rankings with Weebly as you will get using WordPress – set up exactly the way I direct you. For long-term growth and flexibility, yes, I definitely recommend you switch. Even to be able to implement all the stuff in LTYF (which will turbo-charge your business) you should switch. This popular review on the topic is a good overview of basic differences – what they don’t tell you is that THEIR site is on WordPress!:
http://www.websitebuilderexpert.com/weebly-vs-wordpress-whats-the-difference/
Also, WordPress will NOT be more difficult for you to use as we have a full set of excellent, super-easy, tutorial videos on every aspect of WordPress – see Module 23.
Question: How do I stop a page title from appearing at the top of my Page (eg. HOME on my homepage)
Answer: Insert this code at the bottom of the Page (switch to TEXT mode, not VISUAL) in your Page Editor. Different blog themes require slightly different codes, so try each of the codes below and see which one works for your blog. Note: If you don’t know how to set up or edit a Page – check out the WordPress tutorials in Module 23 first:
<style><!–
h1.page-title{display:none !important;}
–></style>
OR
<style>
h1.entry-title{display:none !important;}
</style>
*make sure you copy/paste the code exactly as shown here into the TEXT (not the VISUAL) version of your page.
Question: How do I use Google Analytics to get information about my site?
Answer: Here is a concise tutorial on how to use Google Analytics when you first get your site up and want to track the basics, compliments of digital marketing strategist, Sujan Patel:
A startup without measurable analytics goals is truly a ship without a rudder, which is what makes Google Analytics such an important part of any new business’s growth and development.
To get started making sense out of all the information this program provides, check out the following list of the most important metrics to consider when integrating Google Analytics into your startup’s website:
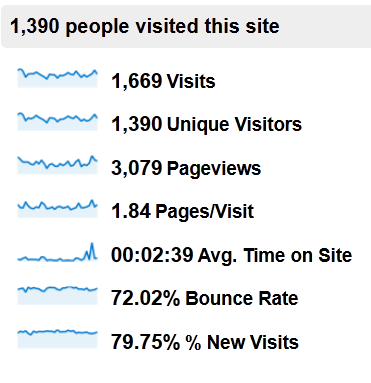
1 – Overall Visitors
The number of overall visitors arriving on your site is a blunt metric, but it’s one that you should pay attention to nonetheless. Ideally, as your startup grows and your marketing strategy develops, the number of visitors arriving on your website should go up month after month.
To view your overall visitors, log in to Google Analytics and click on the “Audience” heading in the left-hand sidebar. The default “Overview” will provide total visitor counts for the last month (you can adjust the reporting period using the calendar feature in the upper right-hand area of the display):
 Of course, overall visitor counts don’t paint a realistic picture of the quality of your traffic – it’s entirely possible to attract more of the wrong type of visitor, artificially inflating these numbers. Keep an eye on this statistic, but be sure to pair it with some of the related metrics below for a more complete understanding of the quality of your traffic.
2 – Bounce Rate
If a website visitor arrives on your startup’s website and then leaves from the same page, this is considered a “bounce.” A lower bounce rate is better, as this indicates that visitors are engaging with your site and finding value that encourages them to stay.
Pay attention to both your overall bounce rate and the bounce rate of specific pages. Visitors who are arriving on your home page and then leaving obviously aren’t finding what they’re looking for, while visitors who land on your opt-in page and leave to subscribe should naturally have a high bounce rate.
However, since your overall site bounce rate can play a role in how your startup’s website is ranked in the search engines, it’s a good idea to set a goal of reducing this metric as much as possible.
3 – Average Time on Site
If your startup is driven by content or social engagement (as in the case of blogs and startup social networking sites), average time on site is a critical metric.
To boost your average time on site, consider taking any of the following actions:
- Include internal links that direct visitors to other interesting pages on your site
- Use “related posts” plugins or scripts to display other relevant content to visitors
- Make use of embedded videos, which naturally require users to stay on your site longer
- Develop interesting, “link bait” style content that captures reader attention
When implementing any of these tactics, be sure to record your baseline average time on site to see which techniques have the biggest impact on improving this metric.
4 – Conversion Rate
On the other hand, if your startup is more sales-oriented than engagement-focused, your key analytics goals should be based around how many visitors convert into buyers – not necessarily how long they remain on your site or how many pages they read.
To track conversion rates within Google Analytics, you’ll first need to set up “Goals”, which allow you to specify the parameters that indicate a successfully completed conversion.
If you sell a single product, click on the gear icon in the upper right-hand corner of your Analytics dashboard, navigate to the “Goals” tab within your site’s profile and click “Add Goal”. Select the “URL Destination” goal type, enter the URL of the thank you page a visitor lands on after purchasing your product and then enter the purchase price of your product into the “Goal Value” field:
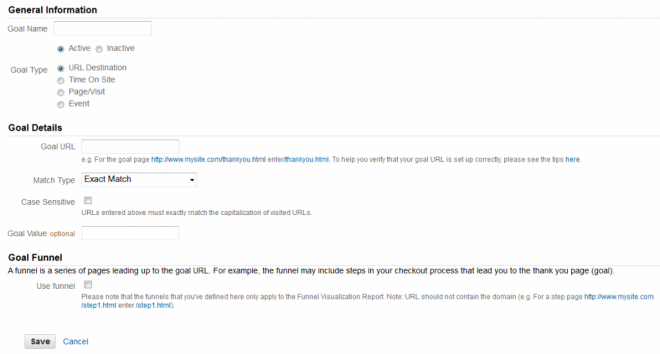
Setting up your goal in this way will allow Google Analytics to track the number of visitors that purchase your product and the total value of your overall sales.
If you sell multiple products on your site or if you use a multi-step sales funnel that pitches visitors on upsells or additional purchases, Google Analytics can still capture your conversions data, although it will require a few extra steps to set up. The following help articles from Google Analytics will show you how to perform advanced conversion goal tracking:
5 – Traffic Sources
Another interesting metric that all startups should consider is the percentage of visitors coming in from different traffic sources. To view where your visitors are coming from within Google Analytics, log in to your dashboard and click on “Traffic Sources” from the left-hand menu bar:
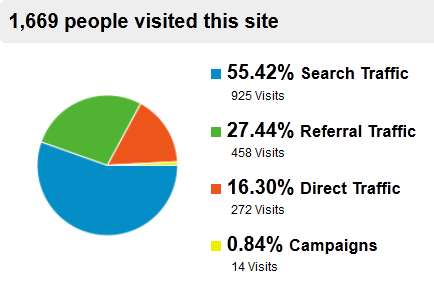
From the Overview section that appears automatically, you’ll see the percentage of your traffic that comes from each of the four main traffic sources:
- Search Traffic – Visitors that come to your site from search engine queries
- Referral Traffic – Visitors that come to your site from links on other websites
- Direct Traffic – Readers who enter your URL directly into their browser windows
- Campaigns – Visitors who come from your email marketing campaigns and other indirect traffic sources.
Each of these sections can be broken down to give you more detail on which sites and search keywords are sending you the most traffic. Pay special attention to the top keywords that are sending you search traffic, as this data could reveal potential opportunities to capture additional search engine visitors by targeting related keywords with new content.
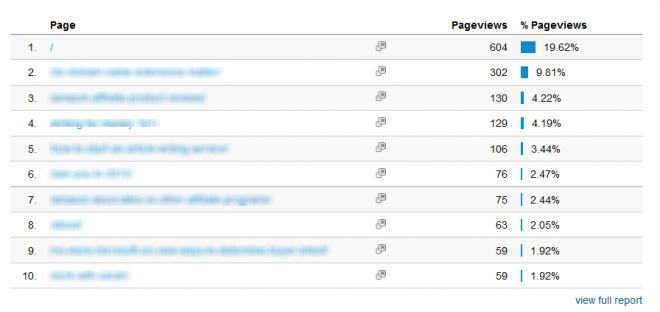
6 – Top Content
Understanding which pages on your site receive the most views can also prove to be interesting data for your startup’s website, as it allows you determine which pages your readers find most engaging and provides possible direction for your future content development.
For example, if you publish content to your startup’s blog that falls into four different categories and find that your readers tend to view articles in one category more than the others, you could decide to develop more content in this category that’s proven most engaging to your readers.
To find this information, click on “Content” in the left-hand menu bar and look for the list of your Top 10 Content Pages within the Overview section:
7 – ROI
One final metric your startup should pay attention to when integrating Google Analytics into your website is the overall ROI of your different promotion methods.
So far, we’ve covered how to track sales and measure the income these conversions generate, as well as how to identify which traffic sources are sending you the most traffic. But to truly get the most out of Google Analytics, you’ll want to combine these two metrics in order to determine which traffic sources are sending you the most paying customers.
For example, if you knew that the traffic you received from the organic search results was sending you three times more sales or opt-ins than your social media traffic, you’d know to either focus more of your efforts on SEO than social media or to retool your social networking campaigns to attract different visitors.
The key to making this connection lies in creating Advanced Segments that allow you to filter your conversion data based on different traffic sources. To do this, click on the “Advanced Segments” from any screen in the Standard Reporting view, and then select “+ New Custom Segment” from the lower right corner of the Advanced Segments screen.

Use the “Source” modifier to create a separate Advanced Segment for each of your Top 10 traffic sources, and then apply this filter to your conversions data to see which traffic source is the most profitable for your startup.
Keep in mind that these recommendations only scratch the surface in terms of the full power of the Google Analytics program. However, implementing these tips into your startup’s website represents a great starting point when it comes to harnessing the power of data-driven decision making in order to increase your company’s overall profitability.
Question: How Do I Feature a List or Recommended Items on My Blog (with or without affiliate links)?
Answer: You may have noticed that blogs often feature lists of recommended items, or perhaps the list is composed of the author’s favorite things.
As you learned in the copywriting module, people love lists! And they are also really easy to compose as we all have our favorite books, or music, or tools, or gear, etc.
I’m going to show you the different ways you can feature a list of recommended or favorite things on your site – and also how to monetize them, so that when someone clicks on an item, if they purchase it, you will get a commission on the sale!
Let’s use books as our example, but keep in mind that you can feature anything that you wish – hunting gear, cooking tools, music, movies, sports gear, etc.
Let’s say that you want to feature a list of Books I Love. You’ve already done Module 8, so you want to have an affiliate link to your Amazon Associates account for each book (so you will earn a commission on the sale). But where on your site do you put this list? Is it a fixed Page, or what?
Well, the choice is entirely up to you and depends on how you want the list to appear:
- If you just want to give the book titles, then your would set it up as a list of CLICKABLE LINKS in the sidebar of your blog.
- If you want to write only one paragraph about each book, and have all the books together on one page or list, then you would set it up as PAGE.
- If you want to write one blog post about each book, then you would set each book review up as a single blog post within a BLOG POST CATEGORY.
Let’s get into exactly how you would set up and use each one of these options…
Clickable Links Book List
If you want your Books I Love list to appear as just a clickable list of book titles in your side column, like this:
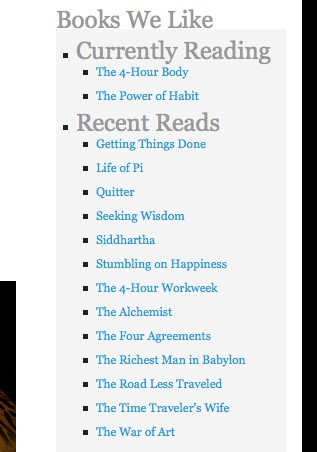
then you need to set them up as LINKS in the Settings → WIDGETS section of your blog. Get your programmer to do this, or watch the WordPress how-to video, Creating Links in Module 23 for instructions.
However, if you want to be able to write a description or commentary on each book, then it’s best to set them up either as one Page or as a Blog Post Category.
Book Recommendations on ONE Page
You would set up your book list as a PAGE if you want to just have all the books you love listed on one Page. So your Page for Books I Love would have:
- All your favorite novels, listed one after the other, with a brief description of why you love them – maybe a paragraph or so per book.
- Each book title and book cover photo would be hyperlinked with your Amazon affiliate link. So if someone clicks on the product (the photo, or the book title) it goes via your affiliate link to Amazon.
Here’s are two examples of what that could look like.
This first site has their ads and affiliate links down the left hand side and then their book list with affiliate links to Amazon for each book on the right hand side. Note that they have uploaded jpg photos of each book cover and then the book title is their Amazon affiliate link for each book:
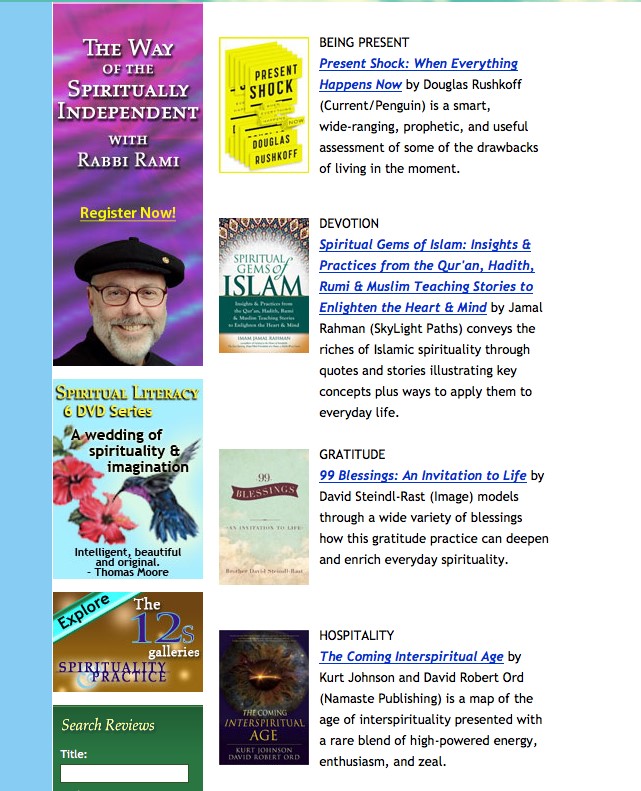
OR, your Page could look like this one in Module 1.8 where I have added the actual product listings from Amazon to the Page:
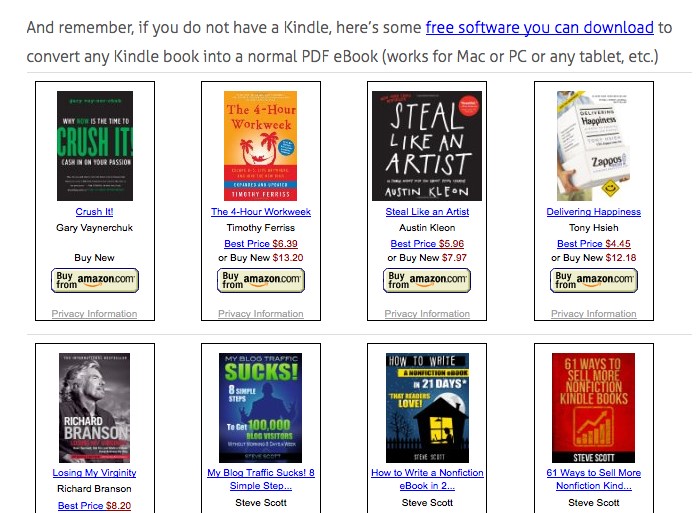
If you don’t know how to set up a PAGE, then watch the WordPress tutorial video in Module 23, Posts vs. Pages.
Blog Post Category with Individual Book Reviews
Lastly, you could choose to set your list up (Books I Love) as a blog CATEGORY, then you would feature one book per blog POST, where you would write a fuller critique or review of each book. Then of course, you affiliate link the book to your Amazon affiliate acct.
After writing each blog post, you simply click the CATEGORY you want to assign the post to, here’s what that looks like on one of my blogs, see the categories I can choose from on the right hand side (you can see I’ve put this blog post in the MUSINGS category):
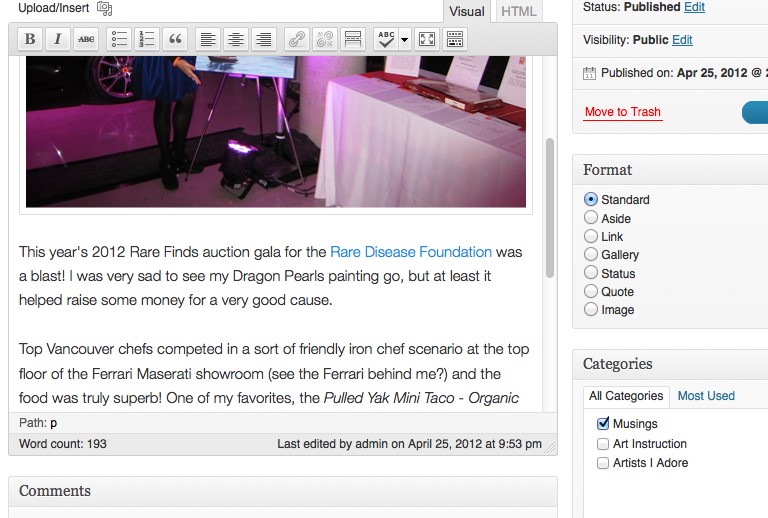
So if this was your blog, you would have one more Category appearing in this list, you would have:
- Musings
- Art Instruction
- Artists I Adore
- Books I Love
And then you would write a blog post about each book, one at a time, and then classify each post into the appropriate category (Books I Love). This option would also work well if you had a Book Club and wanted to write about your club’s reaction to your monthly book selection – as you would want more space to do this, than just a brief blurb, or a title link.
If you don’t know how to set up a blog post, see the WordPress tutorial video in Module 23 called, Creating A New Post. You may also need to watch the video, Categories and Tags.
So the method you choose simply depends on: How much do you want to write about each book?
- If you just want to give the titles, then set it up as a list of LINKS. Click here for the tutorial video on how to set up a list of links.
- If you want to write one paragraph about each book, then set it up as PAGE. Click here for the tutorial video on how to set up a Page.
- If you want to write a separate blog post about each book, then set it up as a BLOG POST CATEGORY. Click here for the tutorial videos on how to create a blog post and/or how to set up a blog post category.
Whichever way you set it up, make sure you have signed up for an Amazon Affiliate account (see Module 8).
And then use your affiliate link for each book (and photo of the book) that you list or write about. This way, when people click through to Amazon to learn more about the book, or to buy it, you will earn a commission on the sale.
Here is my quick video on how to grab the Amazon affiliate link for whatever book or product you want to feature and then how to add the affiliate link to your blog post or page:
Question: How Do I List a Blog Post Summary Instead of the Full Text on my BLOG page?
Answer: On your blog page – where it lists all your posts – it may currently be showing the full, complete text of every blog post. But maybe you want it to show only a summary or brief teaser of each blog post. So here’s how you can do that:
Some blogs are set up to do this automatically, so go to:
Dashboard -> Settings -> Reading
And select “Summary” as shown here:
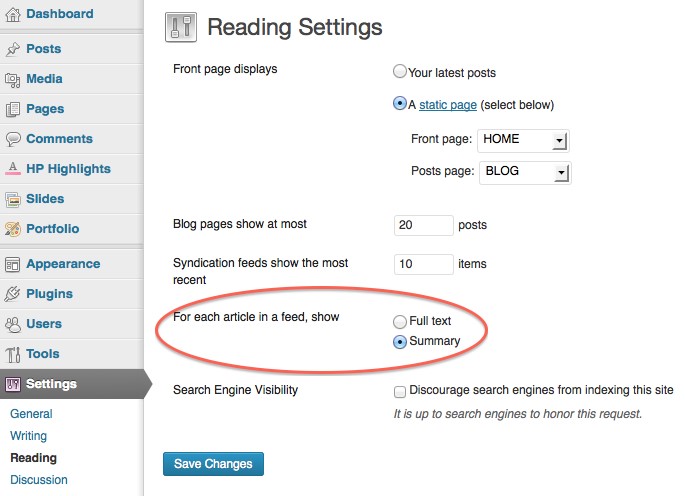
If that does not work on your particular blog theme, then use this next technique where you can set it manually for each post.
To manually show only the summary on the blog listing page (or if you want a different amount of text shown in the summary) you will then need to edit the post.
Choose one of your blog posts and go the Post Editor for that post in your Dashboard. Note: If you don’t know what any of these words mean, then you first need to watch the basic WordPress How-To Videos in Module 23.
Put the cursor where you want to break the content of your blog post and separate the portion at the top that you want to comprise the summary, or teaser.
Then click the icon highlighted in the screenshot below.
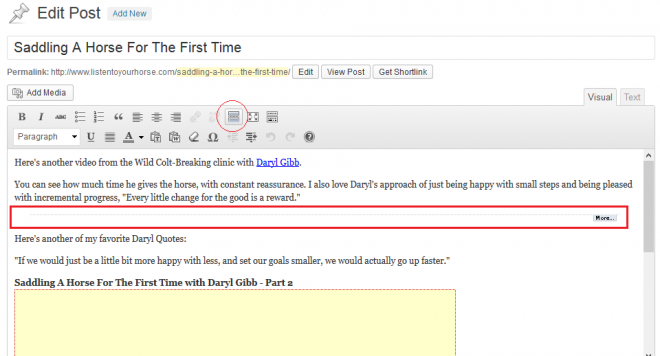
And you will then see a horizontal line with the ‘more’ link (outlined in red above) – indicating where you have set the summary text. That’s it.
Only the summary will now show (the portion of text above the MORE link) and if they click on the “more” or the blog post title, then those will link to the entire contents of the blog post, on its individual blog post page.
Question: Is there a way to automatically convert my blog posts to a newsletter or email and broadcast that out to my email list?
Answer: Yes there is! You can save yourself a whole lot of time and work by automating this process. It’s called RSS-to-Email. An RSS-to-Email service watches your blog’s RSS feed. When it sees a new post on your blog, it pulls the content from the feed, drops it into a template and emails it off to your subscribers.
Most services accept subscriptions from visitors, verify their email address, and manage opt-outs for you. Once you’ve set it up and customized the look of your emails (or newsletter), it is relatively hands-free. If you signed up for GetResponse, here’s how it works:
Question: How do I make a group call using Skype – with more than 2 people and can I share my computer screen with them?
Answer: For all questions like this, it’s best to go to the provider’s website and search their FAQ or user instructions – since instructions will change as the provider upgrades their software, or changes functions. But for now, here’s the detailed instructions on how to do this for Mac:
https://support.skype.com/en/faq/FA10809/making-a-group-call-mac
Or for Windows PC:
https://support.skype.com/en/faq/FA2831/making-a-group-call-windows-desktop
Question: How do I make my YouTube Channel Art big enough, or format it properly?
Answer: YouTube channel art must be 2120 x 1192 pixels minimum. The easy way to format one of your photos or images so that it is this size (if you don’t have specialized photo editing software) is by using a browser-based tool to create your YouTube channel art.
Watch this video and it will show you exactly how to do this. BUT important to keep in mind, when you go to File → Page Setup, here is what 2120×1192 pixels works out to in inches or centimeters: 29 inches x 16 inches OR 75 cm x 45 cm. Once you know how to do it, it will take you less than 5 minutes!
Question: I’m in Australia, who is the best merchant provider for processing credit cards on my site?
Answer: Have you already looked at WorldPay? Also, we always have 2 active payment processors at any time, in case one goes down or glitches (which has happened). So you may want to also get a back-up in place to your bank or main payment processor anyway.
These Aussie providers look good
And this may be useful (keep in mind this site is owned by Merchant Warrior):
http://www.paymentgatewayaustralia.com/reviews/australian-payment-gateways-reviews
And here’s their bank comparison:
http://www.paymentgatewayaustralia.com/reviews/australian-bank-comparisons
Basically, you will have to do your research and pick the best processor for your particular situation, needs, sales volume, etc.
Question: Why is there no information in LTYF about Metatags?
Answer: This is because a WordPress blogsite does not need metatags – WordPress has done a lot of the SEO for you. As long as you have installed the All In One SEO Pack as recommended – and then you fill out the fields for each post, you’re good!
Question: What about assigning tags to my blog posts? Are they important?
Answer: There are two ways to organize your blog posts on WordPress: tags or categories. One is not better than the other from a SEO (search engine optimization) perspective. It just pretty much depends on whether you prefer to use categories, or tags. Personally, I find tags look messy and confusing on a blog, so I’ve always used categories to organize my posts. Using categories also forces me to keep things simple and I feel this makes it easier for my readers. But here is a comprehensive answer:
http://en.support.wordpress.com/posts/categories-vs-tags/
Question: Which membership plugin should I use that integrates with my shopping cart and affiliate program?
I am having some technical challenges at the moment, but am trying to sort it out. I am planning to use Optimizepress for my membership site, but just found out it does not integrate with Premium Webcart, which I wanted to use for the Affiliate system. Wondering if you have a quick recommendation for me? They integrate with 1shopping cart though… but I think they have no affiliate program.
Answer: I would check out WishList Member for your membership site (it is the most robust and is the one I’m using for LTYF) and I believe that it integrates with Premium Webcart (although I don’t recommend Premium Webcart as their customer service is really bad and their system has some significant glitches). You could keep OptimizePress just for your landing/sales pages.
For your stage of business though, I would look seriously at either 1ShoppingCart (which does indeed have an affiliate program) or Infusionsoft – shopping cart, affiliate program, email marketing platform, landing pages etc. all-in-one. And it integrates with WishList Member. Module 10 has all the details on each option.
Question: WordPress is deleting my coding for videos or affiliate links when I save the post – help?
When I click Preview, it doesn’t show the Amazon affiliate links. They’re showing up in text, then disappearing when I save.
Answer: For videos and other code, you have to save in TEXT mode and then leave it in TEXT mode.
Then you cannot see them until you PUBLISH.
Then you can go in and UPDATE if you need to fix or tweak anything. That’s just the way it is.
Question: How do I record an Audio file using Audacity and export it as an MP3 file?
Answer: This is a question best answered using a demo rather than words! So here are three instructional videos that walk you through the process of installing both Audacity and the LAME MP3 Encoder on your PC and then recording your audio:
Install Audacity
Install Audacity LAME Encoder for MP3 Export
Question: How do I embed videos from sites other than YouTube?
Answer: whichever video platform you’re on, look for the SHARE button – then follow their instructions. For example:
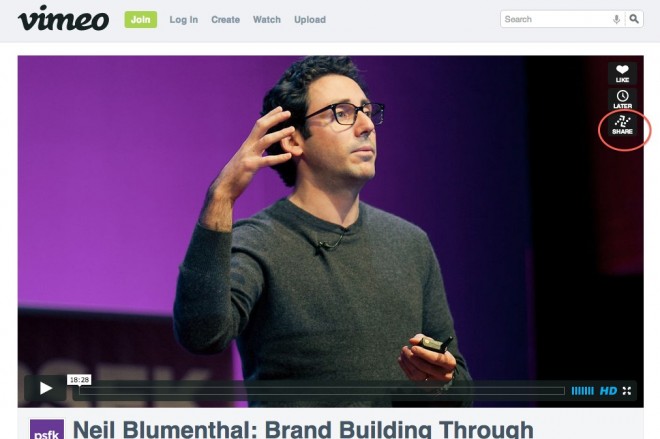
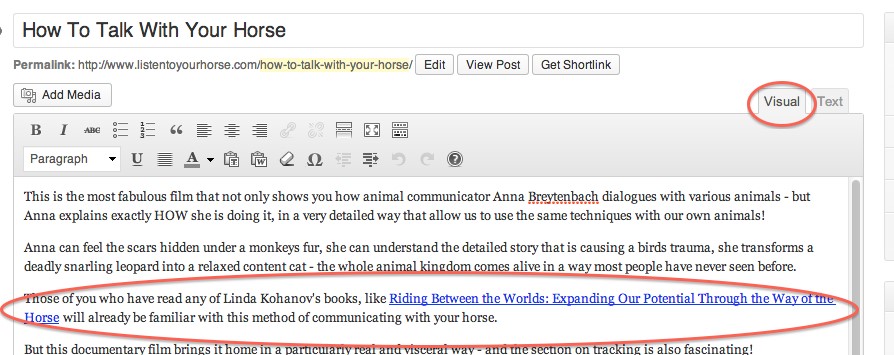
Some video platforms do not allow sharing, they will only let you link to the page. You can see how I handle that issue here:
http://www.listentoyourhorse.com/how-to-talk-with-your-horse/
Question: I’ve watched your video, but I’m still having trouble inserting Amazon affiliate links to my blog. They disappear after I paste them in – help?
Answer: So you have copied the affiliate link from Amazon, pasted it into Notepad or TextEdit. You copy the aff link again from Notepad or TextEdit and then paste it into your blog post, making sure the Post Editor is in TEXT mode. It should look like this:
 Then you click SAVE DRAFT.
After Saving, you can switch to VISUAL mode and here’s what it should look like:
NOTE: You cannot PREVIEW Amazon affiliate links that include a photo, and you cannot preview an embedded video either – both will not appear.
AND when you are ready to publish your blog post, make sure you are in TEXT mode, click SAVE DRAFT, then click PUBLISH, and then go VIEW POST.
Do not SAVE or PUBLISH in VISUAL mode, and do not switch it back to VISUAL mode if you have code in your post. For some types of javascript code, you can never view that blog post in VISUAL mode, or the code will disappear. If the code is HTML, then you can switch back and forth between TEXT and VISUAL after saving or publishing. It’s just one of those annoying things!
Question: How do I create a ‘hidden’ page on my website?
I want to create a page that isn’t displayed as a tab at the top, nor shown as a new blog post, but is still publicly accessible, so that I can link to that page.
Answer: The easiest way to do this is to install this super simple plugin (takes about 40 seconds and no configuration required!) You can either download the plugin from here:
http://wordpress.org/plugins/exclude-pages/
Or the easy way is to go to your blog dashboard: Plugins →Install New Plugin. Then type: Exclude Pages into the Search box. When the search pulls it up, click INSTALL.
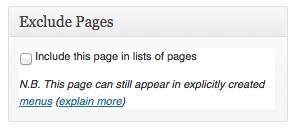
This plugin adds a checkbox: “[] Include this page in menus”, that appears in the right side column of your Page Editor. Simply uncheck the box to exclude the Page from the menu navigation that users see on your site. It looks like this:
Or, if you have some programming knowledge, you can use the wp_list_pages with exclude option, and this will exclude your page from the list.
Question: How can I extract the MP3 audio from my film in iMovie?
Answer: This can be done two ways…
Export video from iMovie using QuickTime:
go to Share –> Export using QuickTime
Then open the video file in QuickTime Player on your desktop
go to File –> Export
select Format: Audio Only
This will save the audio as an m4a file.
If you then need to convert it to mp3, then either open it in iTunes and convert it there, or import it to Audacity and convert it there.
OR
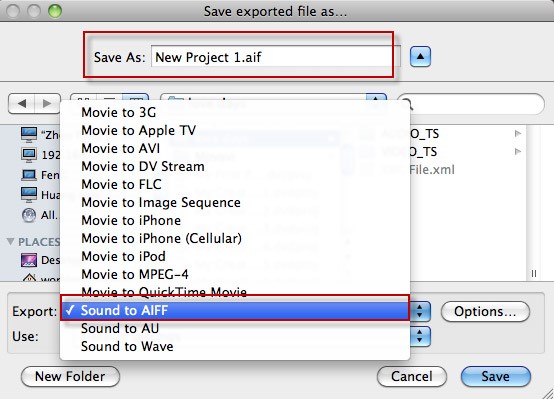
Open up your video in iMovie, then click Share → Export using QuickTime
In the box that opens up, go to the tab down near the bottom of the box that says EXPORT and select the Sound to AIFF option:
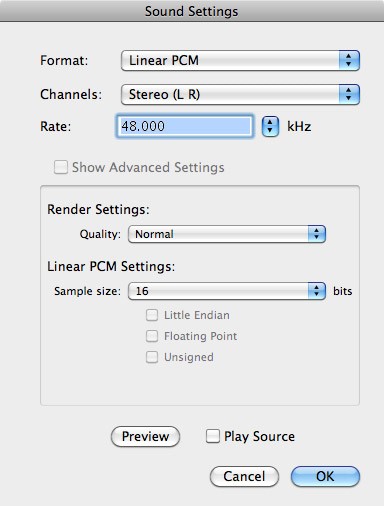
Then click the button next to EXPORT that says OPTIONS and customize the sound settings like this, click OK when finished:
Now go to the folder where you saved this AIF file and drag the file into iTunes (or use the LAME encoder for PC) and then convert the AIF file into an MP3 file.
Question: How do I convert an AIF or WAV or m4a file into an MP3 file in iTunes?
Answer: If you have a PC, then LAME is an excellent free MP3 encoding software to use. You can use it to either make an MP3 file smaller, or to convert a WAV file to a smaller MP3 file. You can download it and get all the instruction for use here: http://lame.sourceforge.net/download.php
Then here is an instructional video, showing you how to use LAME and Audacity to compress and export MP3 files if you have a PC:
First of all, here is a good video that shows you how to use the MP3 encoder in iTunes to make your MP3 files smaller:
The original recording was done at 160 kbps (kilobits per second – the data transfer speed) and the finished file was 50.3 MB, which is a bit large.
I then tested compression rates for the file and here are my results:
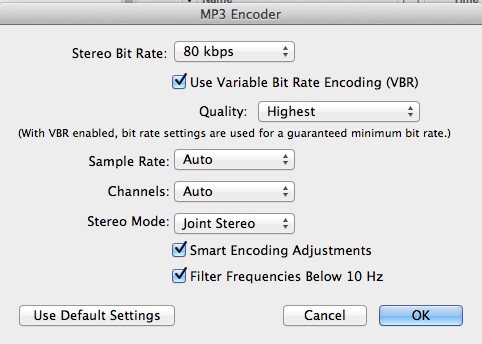
80 kbps – file size dropped to 27 MB, no noticeable drop in audio quality.
64 kbps – file size dropped to 21 MB. The music sounds the same, the voice is slightly more muffled; has mildly lost the upper treble/sharpness range. MAY be preferable though as voice may feel a bit more soothing.
56 kbps – file size dropped to 16.9 MB. Voice is noticeably more muffled; not good quality for the voice – sounds like a cheap recording. And the music has lost its range and complexity of sound.
I also kept these setting as follows (rather than MONO as the video suggested) as I didn’t want the recording to play only out of one earphone, or only play out of one speaker in the car!:
Sample Rate: Auto
Channels: Auto
Stereo Mode: Joint Stereo
So it looked like this:
ONE more thing: I noticed when playing the file on my computer, that I had to have the volume turned way up. Which may be okay for an iPod, but if someone was playing this recording in an MP3 player that is across the room, or in a yoga studio (for example), then I have not left enough volume for them to increase as needed.
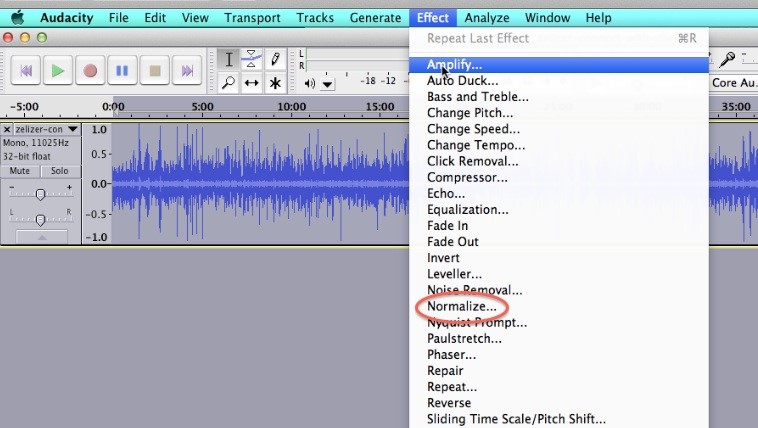
So the way to fix that is in Audacity – I had to go back to the original recording and set the volume level higher before exporting. The current volume needed to be roughly doubled. You can increase the volume on an audio file by first Selecting the entire track (Edit→Select→All) then go to Effect→Normalize the track volume, then Effect→Amplify the track volume:

Then you export your file again. If you have LAME installed, then you can export it as an MP3 file. But if you don’t (or if it’s buggy) then you can export it as a WAV file, then use iTunes to convert the WAV file to an MP3 using the MP3 encoder as shown in the video above.
By the way, for those of you who want a really thorough understanding of what all the options on the MP3 Encoder in iTunes are, here is the complete explanation from the Apple Help Library:
The MP3 Encoder pane contains the following settings.
Extension: This field displays the MP3 file extension (.mp3) automatically after the MP3 output format is selected from the File Format pop-up menu or the (+) pop-up menu in the Settings tab.
Allow Job Segmenting: This checkbox allows you to turn off job segmenting. It is relevant only if you are using Compressor with distributed processing and with multi-pass encoding. (The distributed processing feature is limited to computers that have Final Cut Studio installed.) For more information, see Job Segmenting and Two-Pass or Multi-Pass Encoding.
Stereo Bit Rate pop-up menu: The higher the Mono or Stereo kilobits per second (kbps), the higher the audio quality and the larger the file size. The most common bit rate for stereo MP3 files is between 128 kbps and 192 kbps. Lower bit rates are more appropriate for sound files containing voice recordings (as opposed to music).
Some example settings and uses include:
- 32 kbps: AM radio quality, suitable for medium quality speech
- 96 kbps: FM radio quality, suitable for high quality speech or medium quality music
- 128 kbps: Suitable for good-quality music
- 256 kbps and 320 kbps: Suitable for music that is near CD quality
Use Variable Bit Rate Encoding (VBR): This setting varies the number of bits used to store the music depending on the complexity of the music. This can help keep file size to a minimum.
Sample Rate pop-up menu: The number of times per second that the music waveforms are captured digitally. The higher the sample rate, the higher the quality and the larger the file size. Don’t choose a sample rate higher than the rate used originally to store the music or you’ll waste space. CD quality, for example, is 44.100 kHz, so choosing a higher rate when you’re encoding from a CD is unnecessary.
Channels pop-up menu: If you don’t have stereo speakers or if your audio files are monaural, choose Mono (mono files are about half the size of stereo files). If you’ll be listening to your MP3 files using your stereo system, choose Stereo.
Joint Stereo: When this checkbox is deselected, your MP3 files contain one track for the right stereo channel and one track for the left. In many cases, the two channels contain related information. When the Joint Stereo checkbox is selected, one channel carries the information that’s identical on both channels, and the other channel carries the unique information. At bit rates of 160 Kbps and below, this can improve the sound quality of your converted audio.
Smart Encoding Adjustments: Select this to have Compressor analyze your encoding settings and music source, and then adjust settings to maximize quality.
Filter Frequencies Below 10 Hz: Filtering inaudible frequencies results in smaller, more efficient files without perceptible loss of quality.
Question: I’ve recorded an audio but the volume is too low! What can I do?
You may have noticed when playing the file on your computer, that you had to have the volume turned way up. Which may be okay for an iPod, but if someone was playing the recording on an MP3 player that is across the room, or in a yoga studio (for example), then you may realize you have not left enough volume for them to increase as needed.
So the way to fix that is in Audacity – go back to the original recording and set the volume level higher before exporting. The current volume may need to be roughly doubled. You can increase the volume on an audio file by first Selecting the entire track (Edit→Select→All) then go to Effect→Normalize the track volume, then Effect→Amplify the track volume:
Then you export your file again. Make sure you also have LAME installed, so you can export it as an MP3 file.
If your audio is still not loud enough, you might be able to pay a professional audio recording engineer to make it louder for you (use Upwork.com or www.fiverr.com). Otherwise, you will just have to re-record it.
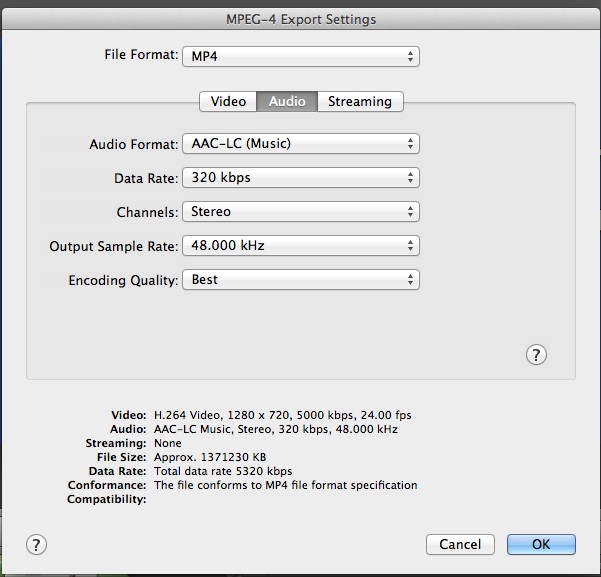
Question: What are the best settings to use to export video for uploading to Vimeo or YouTube?
Answer: YouTube says it’s okay to upload .mov files, but in many people’s experience (including mine), it doesn’t work well. Instead, upload in MPEG-4 (MP4) which is also the preferred format for Vimeo. For both YouTube and Vimeo, export using Quicktime and use the following settings:
Go to File → Export as Quicktime → Movie to MPEG-4
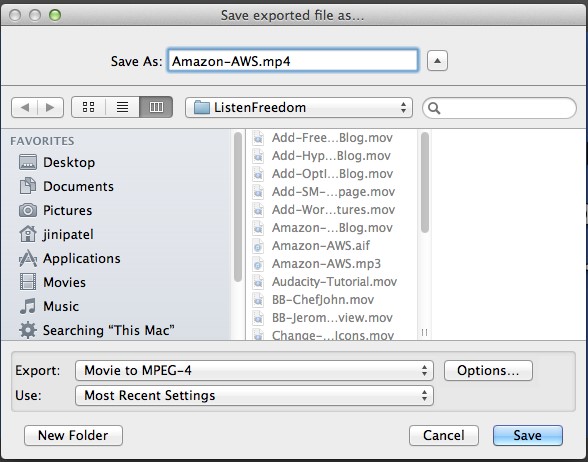
Then click on OPTIONS and configure all the settings to match as shown below:
VIDEO:
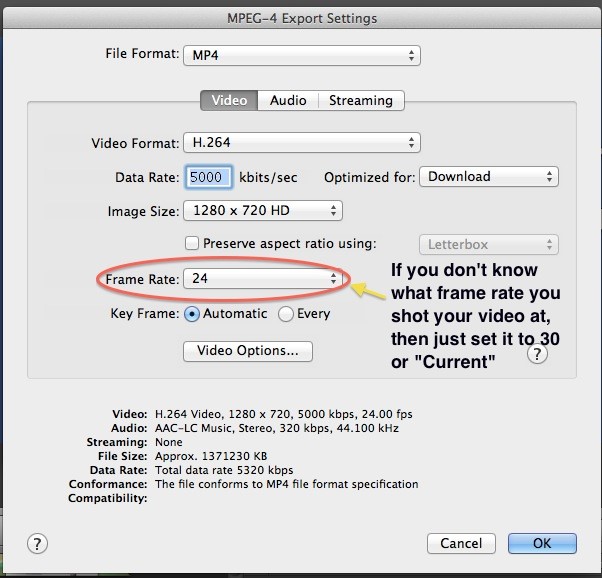
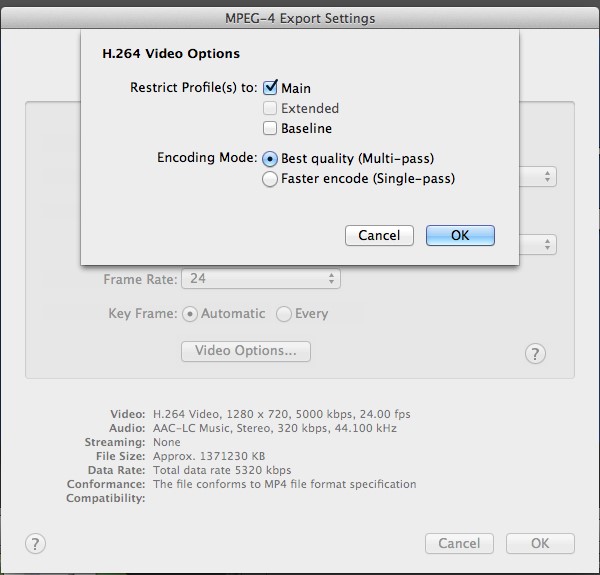
Then click on VIDEO OPTIONS (underneath Key Frame):
AUDIO:
OR consult with Vimeo’s guidelines for best video upload settings here:
https://vimeo.com/help/compression
Question: How do I upload an ebook or audio file to my server?
Answer: If it’s a one-time upload that not many people are likely to download at the same time, and the file is not too big, then you can upload it to your blog. See Module 23.13 for the video showing you how to do that.
But if you want to upload a larger file, or one that is going to be downloaded frequently and possibly with numerous people downloading it at the same time, then you’re best to upload it to an Amazon Cloud Server. Here’s all the steps and instructions for how to do that in the easiest, fastest way:
Question: How do I deliver my eBook, or my audio to my customer after they have purchased it?
Answer: This video shows you all the steps involved and how to get it done the quickest, easiest way:
Question: How do I set up an autoresponder series or email campaign?
Answer: This video shows you all the steps involved and how everything links together. We are using GetResponse to demo in this video, if you have a different platform, it may look different, but the steps will be the same. For any technical questions, phone your platform provider and have them walk you through it.
Question: Is Facebook making people pay for their fans and followers to be able to see their posts? I heard that Facebook is now only showing about 20% of what I post to people who “like” my page, is this true?
Answer: Yes, this is true. Facebook is looking to increase paid reach and shows content only to a certain percentage of fans based on an algorithm that they developed. The way it works is that Facebook shows the post to 16% of your fans at first. Then, depending on the way the post is received (how many people it engages, how many likes and shares it gets), Facebook may gradually increase the reach of the post.
The algorithm has been in place for about 2 years now. There has been a lot of “buzz” about this lately because Facebook drastically decreased the organic reach. Facebook has responded to this wave of criticism and will increase the reach of links to articles in it’s algorithm, so smart Facebook users will adapt accordingly. All free social media platforms change and develop over time – usually to make the platform more attractive to advertisers. So you need to constantly keep an eye on new trends and changes and think of how you can make sure you reach as many people as possible.
If a fan wishes to see ALL the posts of a given fan page, he can do so by changing his settings. You could do a post informing people that they can change their settings to receive all your fan page posts, and then boost that post to all fans, to make sure everyone sees it. However, from experience, we know that this process (getting people to change their settings) is not very effective.
Question: Is it possible to put html links into a pdf document?
Answer: If you have Adobe Acrobat, you can add the html links to the pdf. Otherwise, you need to add the html link to the Word .doc before you save it as a pdf.
- Open your word document in Microsoft Word
- Highlight the text you want linked
- Then go to INSERT –> HYPERLINK
- Make sure the web link includes the http://www. part too! Like this:
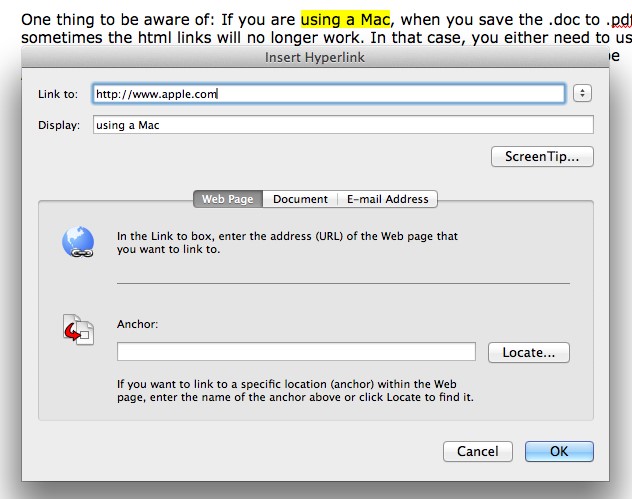
One thing to be aware of: If you are using a Mac, when you save the .doc to .pdf, sometimes the html links will no longer work. In that case, you either need to use a PC, or send the word .doc to a friend who has a PC! Or, you have to use Adobe Acrobat to add the html link again to the pdf.
Question: How do I install WordPress on my GoDaddy hosting account?
Answer: You can contact GoDaddy Support to walk you through it over the phone: 480-505-8877 or 1-866-938-1119. Or simply follow these easy instructions:
WordPress® is a personal publishing platform, or content management system, that you can use to set up a blog on your website.
To Install WordPress on Your Hosting Account:
Log in to your Account Manager.
Click Web Hosting.
Here are the rest of the instructions, based on the type of hosting you have. You can tell this by the second word in your hosting’s description beneath your hosting account’s domain name, e.g. Deluxe Web correlates to Web (Hosting Control Panel).
Web (Hosting Control Panel)
Next to the hosting account you want to use, click Launch.
In the Popular Apps section, click WordPress.
Complete the on-screen fields, and then click OK:
Domain — Select the domain on your account you want to use.
Directory — Enter the directory after the domain name where you want to install WordPress. If you want the domain name itself to use WordPress, the directory field should only have “/” entered.
Enter a Username, a Password (and its confirmation), and an Email Address.
WordPress will be installed to your hosting account with the options you selected within 24 hours. When it is complete, you will receive a confirmation email.
Linux (cPanel)
Next to the hosting account you want to use, click Launch.
In the Web Applications section, click WordPress blog.
Click Install this application.
Complete the on-screen fields, and then click Install.
Windows (Plesk)
Next to the hosting account you want to use, click Launch.
Go to the Applications tab.
In the WordPress section, click Install.
Select the domain name you want to use, enter the directory where you want to install WordPress, and then click Install.
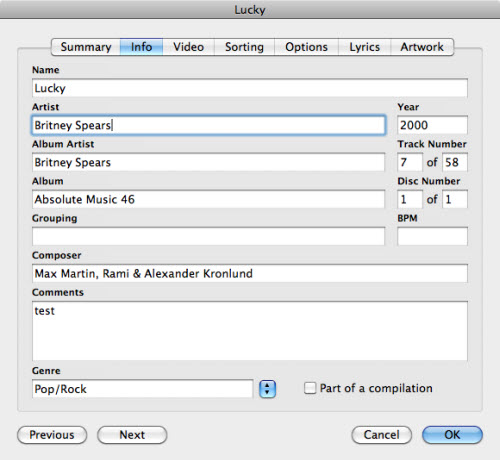
Question: How do I label my MP3 Audios with my name, album, etc.?
Answer: These labels are called iTunes ID3 tags (or iTunes tags). They are the metadata or information like artist, album, genre, year and so on. In iTunes, the tags are mainly used to categorize your music, display information for the files, sort the files and be used by Smart Playlist.
iTunes Built-in Tag Editor
Editing tag in iTunes is very convenient. Directly highlight a song and click once to edit tags one by one. Plus, iTunes also allows you to edit the tag information with the built-in info editor. To access it, right click on the file you want to edit the tags for, and select Get Info (or just press Command + I on keyboard).
Tag Edit Multiple Songs in iTunes
You could also edit the tags for multiple songs. It’s similar to editing the tags of a single file. The difference is you need to select multiple files before right-clicking and selecting the Get Info command. You can hold down Command or Shift key and click to select multiple files, or use Command + A to select all files.
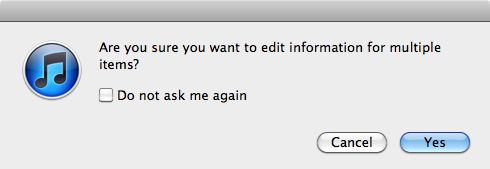
Tips: If you want to clear an iTunes tag such as a comment, simple uncheck the box before the comment text field and choose OK to apply to selected files.
Question: How do I add an anchor or jump link which makes a word a clickable link which links down to a specific spot on a the same page (or a different page) – not just to the top of the page?
Answer: This is a great way to efficiently send your readers to relevant content without forcing them to scroll through unrelated information.
I like to have two windows open to do this. In the first window, I have the page I’m currently working on (in Edit mode) – we’ll call this the MAIN page. In the second window, I have the page that that link will go to (also in Edit mode) – let’s call it the JUMP page.
In this example, let’s say my MAIN page is about different kinds of bears, and because pandas aren’t technically bears, I’m not discussing them here. I have, however, mentioned them in my FAQ page, and explained the phenomenon of them being mistaken for bears all the time. I want to send my readers there with a link, but I don’t want them to have to scroll through miles of unrelated FAQs before they find the relevant part. I want to add a hyperlink to my MAIN page that sends them to a specific part of my JUMP page. Got it? Here we go.
1. On my JUMP page (the second window) I switch to text mode and locate the section I want my anchor or jump link to go to. Ex: Are Pandas Even Bears?. I choose a simple anchor word, say “notbears”, and add this little html tag before the line I want to jump to so, it looks like this:
<a name=”notbears”></a>Are Pandas Even Bears?.
I press Update while still in TEXT mode (don’t go back to visual mode).
Then I go to my MAIN page, the first window. I stay in visual mode for this because it’s easier. I highlight the text I want hyperlinked (“click here to read why I’ve excluded pandas”) and click the link icon in my toolbar. When the window pops up, I paste in the URL to my JUMP page and at the end of it, without any spaces, I type in #notbears. It looks like this:
“http://www.myFAQpage.com/#notbears“.
I also select the “open in new window” box, then I click the Update button.
Then I Update the changes on the whole page and go to “View Post” to check if my link is showing up properly, and that when I click on it, a new window opens up my FAQ page, partway down, with “Are Pandas Even Bears?” at the top of my viewing window.
Note: If I want to do this part in text mode instead, I wrap my hyperlink text like this:
<a href=”http://www.myFAQpage.com/#problem” target =”_blank”>click here to read why I’ve excluded pandas</a>.
The target=”_blank” part means that it opens in a new window; if you don’t want a new window to open up, leave it out.
Note: Now, you can also add an anchor link to jump your readers further down on the same page; say you have a long wall of text and instead of separate pages for each chapter or section, you want to make clickable headlines at the top of the page that can send the readers to the appropriate section further down in your text.
In this case, you only need to edit one page, in one window. Stay in text mode for this, but otherwise it’s the same process.
Add the <a name=”anchor”></a> html before the part of the page you are jumping TO,
and <a href=”http://www.yourwebsite.com/#anchor“>hyperlink text here</a> around the text you are linking FROM (switch out “hyperlink text here” for your own title).
Unfortunately, you can’t jump from your site to a specific part of someone else’s site without editing THEIR site. In this case, when you have no control over the page you’re linking to, you have to manually tell your readers “scroll down half-way” or “scroll to Headline B” in order to direct them to the relevant information.
Question: Is there a FREE shopping cart I can use?
Answer: PrestaShop is a great little shopping cart that is used quite a lot in Europe (but can be used in any country) and it is open source software, i.e. free! PrestaShop comes with an easy, back-end content management system and if you are tech-savvy, you can install it on your server yourself.
For me, I would want to have my programmer do this for me. It can be integrated with your WordPress blog, so that you can feature products right in your blog posts. Or it can stand alone as a separate site, or, as a separate page on your site.
As long as your server has the capability to host PrestaShop (check this first), that’s all you need. Here are two detailed beginner’s guides to installing PrestaShop that you can either use yourself, or send to your programmer:
http://www.1stwebdesigner.com/tutorials/beginners-guide-prestashop/
and
http://www.siteground.com/tutorials/prestashop/prestashop_installation.htm
Next, here is a link to some great free PrestaShop Themes, again, choose one and then either send to your programmer, or do it yourself:
http://smashfreakz.com/2013/04/free-prestashop-themes/
And lastly, here is a free theme that integrates WordPress and PrestaShop together:
Recent Comments