If you’ve written a fiction book, you may be able to argue the merits of mainstream publishing over self-publishing… maybe. But if you’ve written a non-fiction book, then you definitely want to self-publish. Unless you don’t care about making any money from the book. Let me explain.
 I have a friend – Dr. Carolyn Dean – who is both a naturopathic doctor and a medical doctor. She has had 15 books published by mainstream publishers. She is well-known in her field, sits on the advisory boards of a few large and well-respected associations and she has sold a lot of books worldwide.
Well, her publisher has sold a lot of books worldwide. On her part, she has made so little money from all the sales that she has vowed to only self-publish from now on.
Here’s what many people don’t know about book royalties: You will receive your royalty (around 10%) from the price the publisher sells the book for, NOT the retail cover price of the book.
So the publisher can give away or discount thousands of books for which you receive very little or nothing.
The other problem with putting your work into the hands of a corporate publisher is they care very little for your content or your audience. Their primary concern is with their profits.
A publisher may get you to substantially change, delete, or re-write large sections of your book – even if you disagree with those changes.
 Here’s another example: a friend of a friend wrote a book about children’s past lives. A mainstream publisher offered her a contract and was very excited about the book. The marketing division came up with a detailed plan for advertising, promotion, book tour and so on. However, a couple of months before the book was printed, another book came along that the publisher was even more excited about and the company decided to pull the funding from her promotional campaign and put it behind this other book!
So she ended up doing pretty much all the promotion, book tour and signings on her own, funded by herself, for only 10% of the profits. Like Dr. Dean, she realized that if she had self-published her book, she would have done the same amount of work and got to keep all the profits.
How Much Profit?
Now as I’m talking about profits, I’ve decided to open up my account book for you, so you can understand exactly what I mean when I say the authors above “made so little money” from a mainstream published book. So let’s take a look at my first book, Listen To Your Gut and I’ll walk you through the numbers, so you realize why this is so important.
Listen To Your Gut retailed at $24.95 when it was first published. If I had signed a deal with a mainstream publishing house (like Knopf, or Harper Collins) I would have received a maximum 12% royalty payment. Although, as I mentioned above, that would be a 12% commission on what the publisher sold the book for, NOT the stated cover price – however, let’s just be generous and pretend I received 12% of the retail cover price (12% of $24.95). In that case, after 12 months of book sales (because it takes a while for sales to ramp up) I would be receiving a cheque for around $400/month from my publisher.
 BUT, by publishing Listen To Your Gut myself, by the end of a year, I was making $2790/month in profit. Yes, profit. This means I have deducted my production cost (graphic design and layout), printing cost, warehouse and fulfillment costs, and website costs. And I am left with (my net profit) almost $3K/month.
You get the difference? If you go with a mainstream publisher, you get pocket money, or you can hire a housekeeper once a week. You self-publish and you can quit your day job. PLUS you have acquired a list of customers who love your stuff that you can market your next book to! This is where the big, long-term money comes in. Many of my readers have bought 3-5 of my books, plus referred their friends and family. So you launch your next book, or a video course, and now you’re making $5,000-$6,000/month, or more.
In the next unit, where we talk about leveraging your content, it will become even more apparent why it’s crucial for you to hang onto the publishing rights for your content – and not give them away for pocket money.
Self-Publishing Gives You CONTROL and Money
Now let’s look at the fiction book market – because it is different from the non-fiction book market I’ve been talking about thus far. If you are already an established author, or someone with good audience-recognition (an actress or political figure, for example) then you can likely shop your book via an agent to a mainstream publisher and get a book deal along with some decent money from royalties (your commission on retail sales). But even so, keep in mind you will still make substantially less money than if you self-published.
However, if you are just starting out, or you are a lesser-known author, then it may be best for you to take more control of your destiny and also reap the financial rewards. I’m going to share two stories with you from fiction authors – in their own words – that illustrate exactly why this may be preferable to a publishing contract.
Rose Pressey, author of Forever Charmed, shares her experiences with self-publishing her books on Kindle (Amazon KDP):
The fiction bug bit me in 2006 and I began my writing journey. Thoughts of writing a novel had crossed my mind many times in the years prior to that, but I finally decided to stop talking about it and actually write. After finishing my first novel, I entered the seemingly endless query/submission/rejection merry-go-round.
Over the next four years, I completed five novels and endured over five hundred rejections from agents and publishers. I had a few exciting instances of signing with an agent and having an editor request a second look – but nothing seemed to pan out.
“Fast forward to April 4th, 2011 when I uploaded my first eBook to KDP. Me and My Ghoulfriends was a light paranormal romance that sold a whopping seven copies that first week after release. Seven may not seem like many, but I was hooked on the whole independent publishing concept.
As I already had four other complete novels simmering on my hard drive; I began to release one every month for the next several weeks. With more titles, sales took off exponentially. By June, I was selling well over 1,000 copies a month. Now instead of receiving weekly rejections from the slush piles, I was reaching readers around the world!
I’ve continued to write 2,000 words per day – have outsourced both my editing and cover designs to professionals, and have fourteen full-length novels on KDP – with regular monthly sales in excess of 10,000 copies. I’m thrilled to have people reading my books and sharing my stories.
The part I enjoy most about Kindle Direct Publishing is the independence it affords me in my writing. Since I suffer from Psoriatic Arthritis and have knee replacements, KDP allows me to work from home. I might just set the world record for joint replacements! I’ll soon have my hips replaced, elbows, and at least one shoulder.
If I finish a new book on Friday night, by Monday morning hundreds of people are able to enjoy it. Although I’ll soon be considered a ‘hybrid’ author being both indie published and traditionally published – my roots are always firmly planted within the indie community, thanks to Amazon KDP.”

So Rose’s story – aside from her success – also illustrates another important point. Once you are selling well as an independent author, the mainstream publishers will find you and offer you a book deal anyway.
The same process is happening in the music industry too. Many young artists (Justin Beiber anyone?) have their own YouTube channel and sell their own music through various platforms. They build their subscribers, sales, etc. and then the big labels come calling.
So even if a mainstream book deal is your end-goal, there’s no reason to sit around and wait for it. Get going with self-publishing your books, start building your audience, your sales, and then when a book publisher finds you, you can decide what to do then – and you’ll also be in a substantially better negotiating position.
 Here’s another self-publishing story from Raymond Bean, author of the School Is A Nightmare series:
November 2012 marked the four year anniversary of my leap into self-publishing. When I published my first title way back in 2008, I didn’t know what a Kindle was, no one read digital books yet, and self-publishing was about as cool as a canker sore.
At the time, the only thing I had to show for my writing was a computer full of stories and a binder full of rejections. I taught during the day, worked for a catering company on the weekends, and wrote as often as possible. I did what writers were “supposed to do”:
- Send out query letters
- Wait for responses
- Cross fingers and toes
Writing wasn’t paying the bills, and I had two young children to provide for. I’d read a bunch of Jim Cramer books on options trading after which I convinced myself I could figure it out. I wasn’t terrible at it, but I wasn’t that good either. I’d managed to skim a bit of a profit trading stock on Marvel Studios when it announced it would create an Iron Man movie.
One day my wife read an article in a local paper about a writer who’d self-published a book using a print on demand service. She convinced me it was time to stop investing in stock options based on comic book character movie hunches and start investing in my writing. I took my Iron Man money and invested it in self-publishing. As usual, my wife was right.
When my book, Sweet Farts (don’t judge, kids love it), released in November 2008, my wife and I crossed our fingers and hoped we’d be lucky enough to make our money back some day. We never dreamed that Sweet Farts would hit the Amazon Humorous Bestsellers list by February 2009 and stay there for four years running! At the time, I couldn’t have imagined that in only four year’s time I’d have eight titles out in the U.S., half a dozen foreign deals, and film offers for my books.
Last year, I launched my new series, School Is A Nightmare. I wanted to write a fun series for kids and bring titles to market quickly. Partnering with CreateSpace for the book creation services and KDP to reach my readers digitally has been the perfect combination. I’ve utilized free promotions, participated in the lending library and released an omnibus edition called Quadzilla to help expand the reader base for the series. I’ll release several more titles in the series this fall.
I’ve found that more and more kids are reading digitally on Kindle and Kindle apps. Self-publishing the series allows me to provide content to readers when I want and without delays. The ease of working with CreateSpace and KDP helps me experiment with new ideas and keep up with a rapidly changing market.
Going forward, I see myself self-publishing some titles and traditionally publishing others. The next installment of my School Is A Nightmare series is in edits right now at CreateSpace, I just signed a deal for a fun new series with a traditional publisher, and I have several titles completed and ready to go. The most exciting thing about right now is that when I’m writing a book, I know it will be released. I no longer have the dread that the work may never see the light of day.
The days of crossing my fingers and toes are over. I’ve also given up trading stock options. Self-publishing proved to be a better investment offering very low risk and extraordinarily high reward. I guess those Jim Cramer books paid off after all.”
So both Rose and Raymond’s stories illustrate nicely how taking control of your destiny – rather than waiting for someone else to hand it to you – is a much better approach. And again, in both cases, once they got rolling, the mainstream publishers came to them. But you’ll notice how Raymond is not going to give away his cash cow – he is choosing to self-publish some books and sign a publishing deal for others. Very smart.
This next account, from Stephanie Bond, echoes the experiences my friends had with their non-fiction books; losing out financially and being at the whim of the publisher’s marketing department:
I’m what has been termed in the industry as a “hybrid” self-published author, meaning I was traditionally published first, then migrated into self-publishing.
Why? Because although I’m grateful for the experience and the readership that writing for traditional houses gave me, I was constantly frustrated by the lack of marketing or the inaccurate positioning of my books.
But the biggest problem I had/have with traditional publishing is the protracted production schedule; when a writer has to deliver a manuscript a year to eighteen months prior to its release, he/she can’t respond to reader and market demands.
For example, my traditional publisher didn’t want to extend a series because the initial print run hadn’t sold as well as they’d hoped, so they switched me to a different project, which I had to accept to maintain a revenue stream. Fast forward a year and the original series had started to snowball, but the publisher had already “moved on” and didn’t want to continue the series, leaving my readers very unhappy. And I get those emails, not the publisher!
Over the years, I’d quietly collected the rights back to about a dozen of my romance and mystery novels as they fell out of print, not sure what I’d do with them, but inherently knowing they were safer in my hands. In 2011, my then-publisher ended yet another series of mine, and I was facing another reset.
A good writing friend suggested I dust off those reverted rights books, update them, and put them out on my own. Because I thought those books were some of my best (writers know which of our books are better than others!) and since I didn’t have anything to lose, I dove into self-publishing and clunked my way through my first project.
My sales were slow in the beginning, but after a couple of months, things started to pick up enough that I realized I could actually pay my bills with self-publishing. And then another writer friend shared her great experience with the Amazon Kindle KDP Select program. Coming from the traditional side of the business, I was reluctant to make my books exclusive to one retail source, but I’m so glad I did!
Offering my books for free to avid Kindle readers expanded my readership by leaps and bounds…my sales exploded. I’ve had several titles in the Kindle Top 100 paid list, and I’ve sold over 200,000 copies of two titles; one of them, Stop The Wedding!, is a romantic comedy my publisher turned down three times.
My book, Our Husband, which a former print publisher sold at less than impressive levels, was the best-selling self-published Kindle book of 2012.
To date, I’ve sold over a million copies of my own books. Now I’m able to continue series my publishers ended prematurely, and launch new projects. I love that my books are no longer static, that if a cover or a price isn’t working, for example, I can change it.
If I had any qualms about leaving traditional publishing, they were settled last fall: the royalty check I received from my publisher representing six months of sales for over 40 projects was less than I’d made the previous day in KDP royalties for about 12 books.
This month, the first book in my original self-published mystery series Two Guys Detective Agency will be released through KDP Select. The series features two estranged sisters (whose last name is Guy) who find themselves husbandless and broke and take on a faltering P.I. agency in a strip mall. And Hollywood is definitely paying attention to self-published books and authors: Two Guys Detective Agency has been optioned for TV series development and is currently being shopped to networks, so all good wishes appreciated!”

 For myself, I spent a few months trying to find an agent or publisher for the very first book I wrote, Real Women Eat Sushi, which was based upon the two years I lived in Japan, working in the fashion industry. But after a number of rejections and a letter from an agent who said, “I enjoyed your book so much I took it with me and read it over my lunch hour (and ordered sushi!)… but it doesn’t fit into any of the established genres, so I can’t take it on.” I took matters back into my own hands and I have self-published my books ever since.
Coincidentally (or not) about nine months after that letter from the agent, I saw a book – published by one of the companies I had approached – that was virtually identical to mine. Did they rip off my concept, or were they already in process with that book, and that’s why they rejected mine? I’ll never know, but let me just say that it was similar enough that it set my spidey-sense tingling. It also made me feel really glad I was done with the whole publisher/agent arena!
Don’t forget, that once you are established as an author, or you have a book that is selling really well, the publishers will come looking for you! Then you will be in a strong bargaining position for royalties, promotion, and editorial control. In that scenario, there is a much higher chance of you coming out of the deal satisfied – if that’s what you want.
But even in that scenario, I urge you to follow the lead of Stephanie Bond and Raymond Bean (in the examples above) and don’t give away the farm! Keep some, or most, of your books self-published and test the mainstream publishing deal with a new book, or series.

 I have a (stolen) hotel “privacy” card on my office door. I use it when I need to have no kid interruptions.- @amyjrosenberg


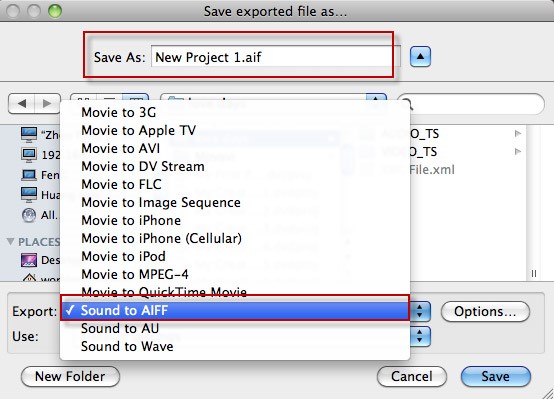

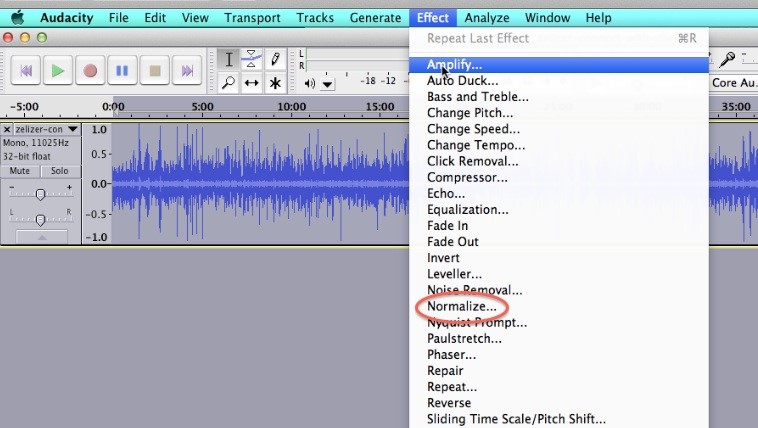
 The important thing is to pick the one that either draws you most strongly, or is the easiest, and start with that. Perhaps you want to start with just a PDF-format eBook, or a single MP3 audio. When you’re just starting out, it’s nice to pick something easy so you can gain confidence, satisfaction and fluency in your new business.
 So when he gets your email offering your helpful tools and information in audio form, packaged together with two or three freebies (expert interviews, or an in-depth teleseminar on one specialized aspect) of new, exciting content for $27 or $37 or $47, is he likely to purchase? Yes, you’ll get a pretty good conversion rate with that offering.

 Well here we go again, where I am going to give you information right here that is worth the entire price you paid for LTYF! Yep, I’m going to hand over the keys to the kingdom on this one. And we’re going to go deep into each of the six Chinese online marketplaces, whether to sell retail or wholesale, how to set up a Chinese bank account, how to warehouse your products in China, how to handle shipping within China, or to China from your country, everything!
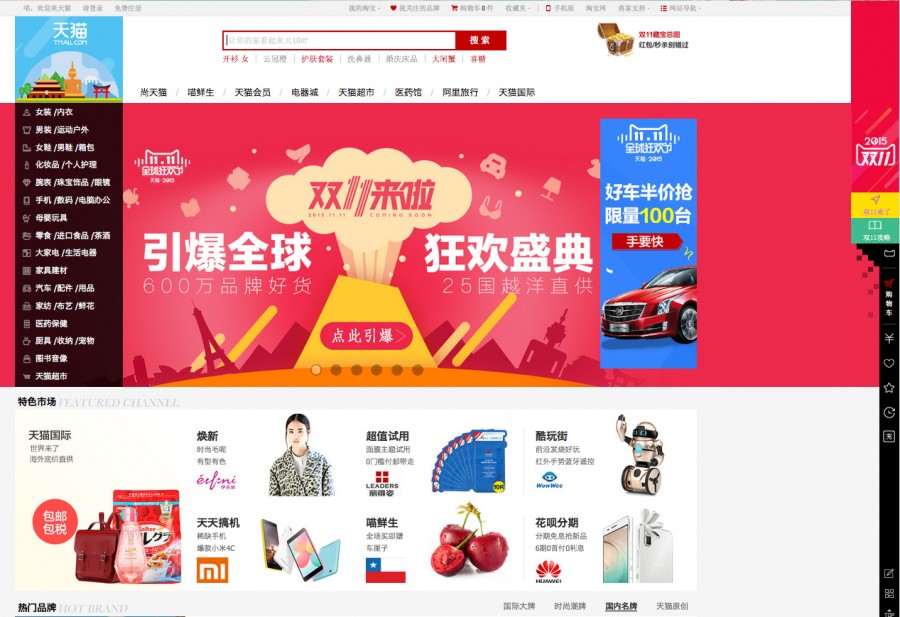
 On all three platforms, buyers are able to search for their desired products using keywords. However, an important distinction is that when buyers search for a product on Taobao, the relevant products from Tmall will also display. But, the reverse is not true and Tmall searches will not display products from Taobao.
 Tmall is a B2C platform (Business-To-Consumer, like Amazon), only can be registered as an enterprise user, and must pay an annual fee and deposit before you can start selling products.
 Tmall is a retail trading platform too, but only businesses can be sellers.
 The main consumer group of Taobao, Tmall, JD.com, JD.hk and Amazon.cn is the general public.


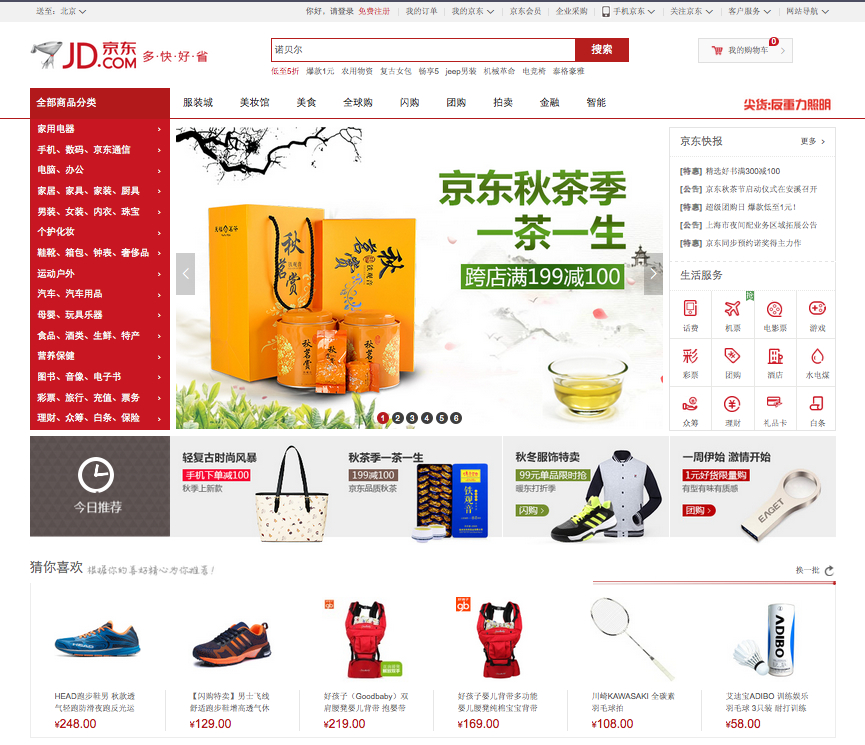


 As you scan the columns of this chart, you will quickly realize that Taobao.com is the cheapest e-commerce platform to get started with, but JD.hk is probably the easiest.
 Just to make this option even more exciting for you, as you learned in the second video, Jack Ma is one of the few people who understands the metrics for assessing small business loans. So be sure and check out his
  When you get into the nitty-gritty of transferring RMB (Chinese Yuan) from your Chinese bank account to your foreign (local) bank account, some interesting regulations can come into play. Obviously, you will have to check with each individual bank when you get to this stage for updated information. But at the time of writing, here’s how it works when you sell your products on Taobao, or Alibaba.cn, or Tmall; using Alipay as the payment processor:
 Again, you will definitely need an agent fluent in Mandarin to assist you with this process, but just to give you an idea of what’s involved, here’s the process and materials currently required to apply for a Chinese business license:
 Whew! Is this super exciting or what?? Or perhaps you’re just plain overwhelmed at this point and you need to let all this information percolate on the back burner for a while. That’s just fine too and this may be a unit you want to come back to in a year or two. Either way, it’s all good!
 This is a huge topic because it’s a part of your business that you can endlessly tweak and improve. So it’s important not to get bogged down in details, or overwhelmed – but rather, to focus on a few very simple goals: fulfilling orders, delivering products and keeping your customers happy! So let’s start at the beginning…
 Get That Product To Your Customer
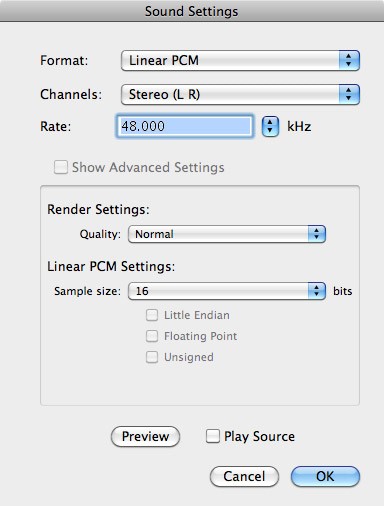
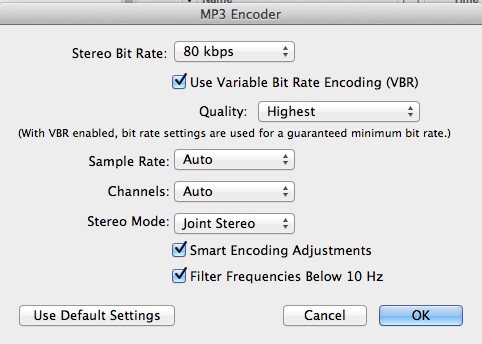
 DOWNLOAD and listen to this audio
 If you want to manufacture a physical product (as opposed to digital products that can be delivered online) there are a few ways you can go about this.


 What Is A Webinar?
 3. Create a Webinar Registration Page for a FREE Webinar about this topic. Your registration page can either be a Page on your site, or a blog post, or a Facebook Page. Your registration page needs to contain the bullet points of what you’ll be covering – the problem(s) you’ll be solving for attendees. And it needs to contain some kind of registration form.
 6. Offer Your Bootcamp or Special Product Offer, or Your Consulting or Coaching Package etc. Whatever you are offering, make it a special discounted offer only for people who buy right away, from your webinar offer. Tell viewers this is a special deal ONLY for webinar attendees. Remember, you can create your training or program later, it will actually force you to create it faster, HUGE BONUS for you if you tend to procrastinate.
 A teleseminar is simply a seminar (training or information) conducted via the telephone, or Skype, or webpage. Teleseminars often involve some kind of interaction. Either you are interviewing someone else, or your listeners can call in (or submit their questions via a webpage).
 5. Host the Free Teleseminar and Record it. You can either use a free teleseminar service provider (although I don’t recommend it as the line quality and recording quality is often poor), or you can use a multi-purpose provider, like

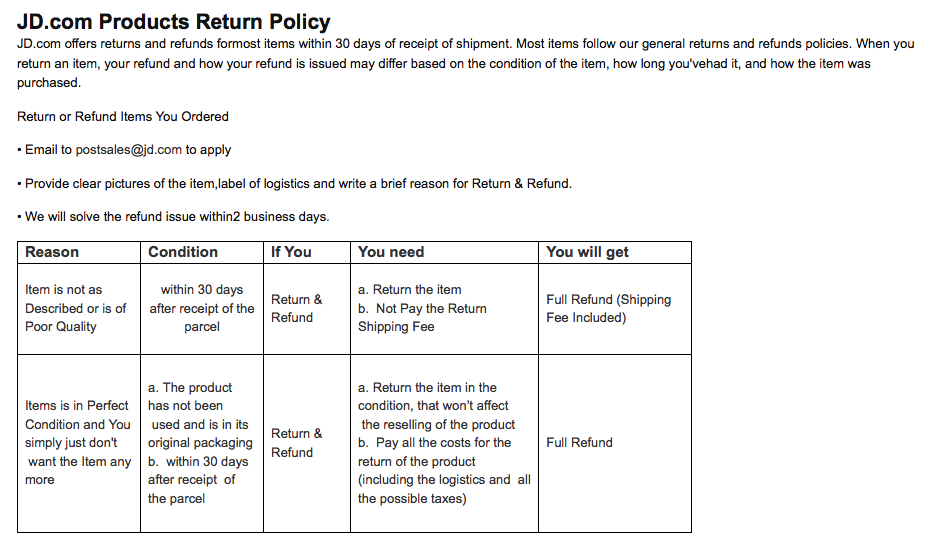
 Maybe your offer is special because you’re packaging it with an outrageous guarantee – a guarantee you wouldn’t normally give. Perhaps your normal guarantee is for 30 days on unopened product, but you’re going to extend that offer to 365 days (1 year) and they can send the product back in any condition. Or maybe they don’t need to send the product back. Whatever you figure will completely take away the risk of purchasing, you can offer that as a special guarantee.
 Another great way to encourage customers to buy is to package your product up with some fabulous free bonuses. That way people feel like they’re getting a ‘steal of a deal’ for so much stuff!

 Likewise, I also would feel fine about offering a discounted sales price in the next 24 hours as a special offer following a teleseminar, and only for the attendees of that teleseminar. Because that feels like a special gift to me, not a pressure tactic.
 For example, let’s say you’re an artist and you want to offer workshops or private sessions. You could research what the art schools in your area are charging and then position your pricing against theirs. If they are paying the costs of admin staff, office rent, insurance, etc. You can certainly undercut their price (and probably walk away with more profit) due to your owner-operator setup.
Recent Comments