 YouTube has always been a great (and free) place to upload your videos, but it’s even better now, since Google bought it. Google is improving YouTube so that your YouTube channel offers more options and ad revenue opportunities, videos are now getting better search engine rankings (due to improved keywording facility) and there are more post-upload editing and annotation tools (where you can add a website, or instructions to a finished video) available.
A possible downside to Google purchasing YouTube is that they are making it a lot more commercial and this likely will result in less usage over time and people switching to other video platforms that are less ad-happy. But that may take years to occur and for now, it is still the best free video platform to use.
Google has also improved the Help and tutorials sections of YouTube and has some great tutorials on how to produce good videos that grab and hold your viewers attention. However, when you are just starting out, you may want to avoid these as they may work against you by intimidating you and making it look complicated!
One of the first videos I ever shot – that contains a bunch of things I would never do again – is still considered helpful enough to people that it is fast approaching a million views. So at the end of the day, don’t worry about anything and just share something that is useful, or solves a problem, or offers hope, or makes people laugh. That’s really all you need to do and you will automatically get better as you go along.
When you do a YouTube video, remember to tell your viewers you have detailed info or a free report about that topic on your blog – then give the link orally and also put it as a hyperlink in the video description field (ABOUT section), so they can click directly to it. Remember, the goal of all your YouTube videos is to get people to sign-up or opt-in to your email list on your site.
 Vimeo has a very basic account available for free and then their paid plans start. They also don’t have the advertising monetization that YouTube has. And obviously, being that YouTube is owned by Google, which video platform is going to get better search engine ranking?!
However, if you want to have a more professional look to your videos, or you want to be part of a developed artistic (filmmaker) community, then Vimeo is definitely better. And if you want to offer private videos, for example, where your videos can only be viewed on your website, or within your membership area, then you’re going to need Vimeo Pro ($199/year).
I use Vimeo to host the WordPress tutorial videos and some of the other content videos on this site. But you’ll notice that I use YouTube for much of the simple how-to vids and other content that helps spread the LTYF program to potential customers.
Whether you choose to go with YouTube, or Vimeo, or both, the same instructions apply throughout this module.
But I’m Ugly, or Camera Shy!
If you don’t want to feature yourself in your videos – although keep in mind a number of homely people have very popular channels, so you don’t actually need to look good – there are a number of ways you can still upload excellent videos without ever filming yourself:
- You can get your kids to appear instead of you. Some of my most popular videos feature my daughter Zara, people often enjoy her more anyway!
- You can produce videos using pictures with you doing a voiceover. Any video editing software, like iMovie (for Mac) or Windows Movie Maker (free), makes it easy for you to create a video using jpg photos. Then you can easily record a voice track to narrate your video, using the same software. This way you can create videos that are instructional, or funny, or tell a story, or educate.
- You can create a slide presentation (with text and photos) using PowerPoint or Keynote. Then you save the slides as photos (jpgs) and import the photos into your video editing software (iMovie or Windows Movie Maker). Paste a track of music, or record a voiceover and you’re done. If you have Keynote (Mac) you can actually save the presentation directly to video.
- Either way, it’s a good idea to have a customized background for your slides that contains your website’s URL on the top right corner or bottom right corner. Or have your site URL appear at the beginning and end of your presentation. This way you can drive visitors to your site even if your video is embedded on other sites – in which case your YouTube description and link will not appear. Watch how to create a video using PowerPoint:
- Here’s another super-easy way to create an inspirational slideshow video directly on YouTube:
- Visit the upload page on YouTube
- Click Create under Photo slideshow.
- Upload photos from your computer, or select photos from an existing Google+ photo album, and click Select
- Drag and drop the photos to rearrange them. When you’re done, click Next
- Select an audio track from the library under “Audio”, or select No audio to have your slideshow play without music. (Note: You won’t be able to upload audio files from your computer).
- Click Upload when you’ve finished making your slideshow
- Perhaps you are doing tutorial videos that involve showing people what you’re doing on your computer screen. Perhaps you are showing them how to use a software, or format a document, or perhaps you want to show things that are on the Internet. In these cases, you would use a Screencast software to record what’s happening on your computer screen. This is also called Screenshot Video.
 The best free screencast software for Mac is Quick Time Player. Good paid screencast software for Mac includes Screenflow and IshowU HD. The best free screencast software for Windows PC is Screencast-O-Matic or CamStudio. Two of the best paid screencast software for Windows are Camtasia and SnagIt (SnagIt is much cheaper than Camtasia, but with good capability).
When you are making screencast videos, try to record the screen at 640×360 (16:9) so that the videos do not appear fuzzy. If you can’t do it in 360p, you can set it at 480p (854×480). Do not upload screencast videos in 720p unless you have no other option.
- Use a “whiteboard” to draw pictures or figures that illustrate what you’re talking about. Many math instructors use this method, but it’s also become popular for selling products and courses where they have a professional illustrator drawing pictures of people and scenarios as they talk. You can do-it-yourself by drawing stickmen, writing words, drawing arrows, circling text, etc. as you speak.
- Most people use their iPad (Bamboo Paper – Notebook is a free app that works well), or a special drawing tablet that hooks up to your computer for this. You can get these drawing tablets with a medium screen size, or a small screen size (cheaper). Personally, I prefer the medium size (8.5″x5.3″) since I find it difficult to write or draw small.
- Do a Skype interview with someone and just show and record them on the screen! I have had people do this with me a number of times and I don’t mind at all. Or you can have them large on the screen and you in a much smaller box, so less visible. Free software to record the Skype interview are Quick Time Player for Mac and Free Video Call Recorder for Skype for PC, available here: http://www.dvdvideosoft.com/products/dvd/Free-Video-Call-Recorder-for-Skype.htm
Remember, when you are making screencast videos, try to record the screen at 640×360 (16:9) so that the videos do not appear fuzzy. If you can’t do it in 360p, you can set it at 480p (854×480). Do not upload screencast videos in 720p unless you have no other option.
But I Don’t Have a Decent Video Camera!
Oh this is SO not a barrier to doing videos – let me tell you why… Leonie Dawson built her business to half a million dollars shooting all her videos from her laptop camera. Even while breastfeeding. Really. People do not care, they just want you to be real. Be yourself and your tribe will feel instant recognition and follow you. The rest will mosey on their way – which is good, because they’re not your customer anyway.
No video editing software? No problem. Just shoot short videos, start to finish using your mobile phone, or a Flip video camera (less than $99 and even cheaper used) – which plugs directly into your computer for uploading. You don’t need to add titles displaying your website, you can just give it verbally at the beginning and again at the end.
Are you out of excuses? If video is your thing, or if your site visitors really like video, or your message is a perfect fit with the medium of video, then get your butt in gear! Just start with the simplest, shortest vids you can manage and know that you will get better over time. It’s all good.
That’s really all that’s needed and you can literally start tomorrow. Let’s get your ideas flowing…
Jot down a quick list of video ideas; topics you’d like to present and how you’d like to create the videos for these:
Video Production & Marketing Musts
Whichever way you decide to create your videos, there are a few things you can do to maximize your video marketing:
Give Out Your URL – Always add your website to your video in a spot that cannot be cut without losing the content. Your videos will get picked up and featured on websites and blogs all over the world and you don’t want to lose this opportunity to market your site! It’s also a good idea to verbally give out your website URL during your video as well.
 Offer More Stuff – At some point in your video, direct the viewer to your website for more information, or a free eBook, or a detailed blog post, etc. You can add an “annotation” (like a note) to your videos on YouTube that goes to your webpage when someone clicks on it. You can also put a link to your site or page in the video description field that appears underneath your videos.
This is another place where you can implement the “give your best stuff for free” mandate. If you want to use video to advertise a program, or course, or service, or consulting that you offer – make videos that offer specific solutions or help. Use the video(s) as your chance to show people how good your stuff is. This is why you want to give some of your best stuff away for free. You want people to watch that video and be absolutely convinced that:
- a) You really know your stuff, they can trust you, you know what you’re talking about
- b) You are a great teacher and they will be able to learn easily from you because you explain things so well, or you really motivate them, or you’re funny and enjoyable
- c) If you are selling a video-based series, they also get to see the quality of your video and be assured they won’t be disappointed
Here’s an example of a video that delivers in spades on all of the above:
- The demonstration is clear and concise
- The camera is set up well and you can see clearly everything as he demos
- The title is catchy and holds a promise (which he delivers on)
- At the end of the video (which is a good length – approximately 7 minutes) he directs you to his website where you can buy his full-length training program and get more excellent quality instruction – just like you just watched.
This video has been watched over 1.2 million times, so he has gotten LOTS of free advertising for his brand, his course and his website from this video – and he deserves it!
Ask Viewers To Subscribe – You can build your YouTube Channel subscribers faster if you ask people (usually at the end) to subscribe to your channel. Your subscriber’s will be automatically notified when you post new videos and you can also email them directly if you have a special offer (but be respectful, you don’t want to anger them and make them unsubscribe).
Be Yourself & Have Fun – You will always engage the viewer better if you are free in yourself and allow your true personality to shine through. You are not a professional news anchor, so don’t try to be! Just have fun and deliver the goods. People will be patient with all kinds of quirks if they sense you are sincere and they get value from your content.
Use Royalty-Free Music – Don’t put any copyrighted music in your video without permission! Expensive lawsuits are never fun. Here are some music resources you can use when the time comes, the tracks on these sites are either royalty-free or very low priced (as low as $1.99):
However, keep in mind that royalty-free only applies to non-commercial uses of the music. Unfortunately, the definition of “non-commercial” is pretty nebulous. From what I’ve seen I would say that it is okay to use the music on a video or page where you are not selling anything – but then you must give the full music credit on the page, or at the end of the video. You cannot use the music IN or as part of the product you are selling (video, audio, etc.) without purchasing a commercial license for the music.
 YouTube does have music partnerships with some record labels – or some people have written to the music publisher and obtained permission to use the song – which is why you will see some videos with copyrighted music.
However, there is currently no easy way to discover which songs you can use, so I find it less time consuming to just use royalty-free music – or create your own! Don’t forget Garage Band on iMac– that is a very easy way to start creating your own music and I’m sure there are other apps and free software for easy music creation – just Google it!
If you have a little cash (like $17 or so) and you’re ready to brand your videos by creating a Video Intro that appears at the beginning of every video, then it is worth buying a music track from somewhere like Audio Jungle which will give you some high quality music, but also help to maintain exclusivity (i.e. less people will use paid music vs. free music). For example, this composer on Audio Jungle will give you a good idea of the variety available and how it all works: MojoMusic
The music that plays at the beginning of all the Listen To Your Freedom videos is a ‘video logo’ that I purchased from AudioJungle. Video logos are very short (around 20 seconds) so sell for under $20. The longer tracks of 2 – 3 minutes are more expensive ($30 – $80). The cost of the music varies depending on whether you want to use it only for free content, or whether you’ll be charging for the end product. Or whether you want to use it for one purpose only, or multiple purposes.
Publishing or uploading your videos to YouTube or Vimeo is also very easy as most video editing software (and some video cameras) have one-click uploads to YouTube and often Vimeo.
 Monetize Your Vids – You can also click a few boxes on your YouTube channel that tells YouTube you would like to run advertisements on your videos. YouTube will attach the ads automatically to the beginning of your video, or run them along the bottom; whichever option you select. If anyone watching your video clicks on the ad, or watches the entire ad, you receive a few cents in revenue from YouTube. It may not sound like much, but over time, you can build up to $50 or $100/month for essentially doing nothing.
If you select to play the ads that run before your video starts (True Stream or Skippable ads) they are more annoying to your viewer, but they pay a higher ad revenue than the ads that just run along the bottom (which you can close immediately by clicking the X). You might want to upload two videos and put a different ad type on each one, then monitor them to see if having the ad at the beginning affects your watch time (the amount of time people spend watching your video).
It is not enough to track Views, because someone may click to watch your video, encounter an ad and immediately click away. This will still show up in your video view count, but it doesn’t really have any meaning.
If you don’t want to bother to test, then just run the least annoying ads to start with. Once your videos pass a few thousand views, then experiment with using the True Stream ads.
For my videos, I use the low-paying ads that run along the bottom until my videos hit 10,000 views, then I switch them to the True Stream (skippable) ads that run at the beginning – where people can skip after watching 4 seconds:
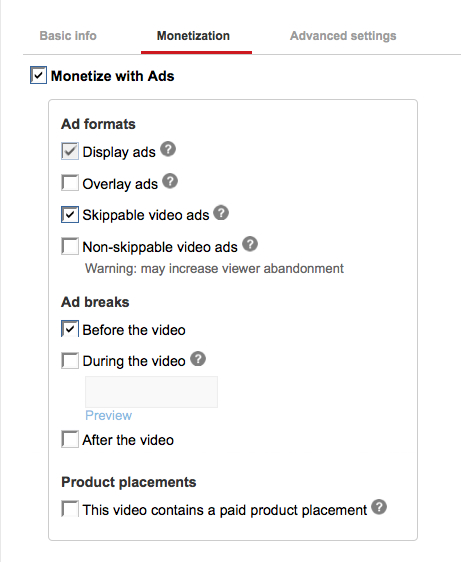
As you can see above, I also run the Display Ads in the sidebar beside the video – this is just an ad on the page, so doesn’t affect the video or viewership at all.
If you had a video that went viral, or passed a million views, then you could definitely switch to the ads that play in full before your video starts – people are not allowed to skip them – as these pay the highest revenue. But otherwise, I wouldn’t use these ads, or you are likely to severely limit your views, as most people will not sit through the ad.
Take YouTube To The Next Level
If you find you adore doing videos and want to make this a major part of your site promotion (marketing), then YouTube itself has a ton of fantastic (free) tutorials showing you how to make a really superb channel and deliver top quality content:
http://www.youtube.com/yt/creators/
Jody Jelas also has some fun video tutorials and here’s a good one:
Another cool tool is to use a ready-made video intro template – where the music and images are already done for you (you just customize it to your name, site, tagline, etc.). These are also really cheap (less than $10) and you can see a great selection at VideoHive.net
You may also want to customize your content by making use of YouTube trends. If you can create videos for your niche that are related to the currently trending videos, you may be able to piggyback on the trend and get a good number of eyeballs on your videos too. This is probably best used if your stuff is entertainment-based, or you sell trendy products, or your demographic (your customer profile – see Module 4) fits with the viewing audience. Visit YouTube’s official blog to see the latest trending videos.
Lastly, you can also drive some related-content fans over to your channel by leaving useful comments on related videos (other people’s videos in your niche or about your topic). If your comment is liked, your comment will be placed at the top of the comments listing for that video and a lot of visitors will click on your username – which then links to your channel bringing in fresh visitors.
Again, your business is based on your top interest, or passion; you know you’ll be active in that niche and reading or watching other people’s content anyway – don’t miss this super-easy opportunity to leave a thoughtful or helpful comment which takes you only seconds to implement. NEVER use this opportunity to sell yourself, that will just turn people off and get you marked as a spammer.
Just Be Yourself!
At the end of the day, take all the ideas and tools in this Module and stick them in your tool belt for easy access, but above all, just be yourself!
If you are just truly, authentically YOU in your videos, your tribe will find you AND you will have the most success that way too. Don’t try to behave like you think a healer/fashionista/guru/carpenter/designer/chef/coach or beauty queen (to give a few examples) should behave. Just be YOU and share your thoughts, tools, energy, humor, process etc.
For example, Bunny Meyer may not strike you as a particularly mainstream beauty guru. She dyes her hair both black and blond and refers to her fanbase as “the swamp family.” Her self-described hairstyle, “messy and imperfect,” is a true reflection of her uninhibited personality. But Bunny’s openness, self-deprecating humor and strong, confident voice have helped her develop a loyal audience.
Her videos include product reviews, daily outfits and funny rants, averaging 180,000 views each. She has over a million subscribers and an Etsy store where she sells stickers, buttons and travel cups. Because of her large fan base, she has sold over 700 items on Etsy.
Of course, if she knew about LTYF, then she could monetize that million+ fanbase way beyond a few items on Etsy, product endorsement deals and YouTube ad revenue! But never mind, when she’s ready I’m sure she’ll realize she can develop her already lucrative business even further.
What can you learn from Bunny? Viewers tend to respond to authenticity and confidence. You should consider fully embracing what makes you unique, no matter how different you may seem. Whatever you are likely running yourself down for, or wishing was different about you, is probably your unique selling point!
Overwhelmed?
 I know I covered a lot of options in this unit. But please know this is so that, as your skills grow, you can keep returning here for ideas.
You do not have to do or even understand most of the techniques covered in this section to get started! The most important items – that you can get going on right away – are:
- Get your YouTube channel set up – choose a username that is the same as your site if you can get it, or your own personal name.
- Upload your first video – remember, the first time you do something is always the hardest. So just shoot the simplest, shortest video (2 minutes is great) you can, give out your URL, and just begin the process of throwing yourself, your ideas, your solutions out there.
- Add the keyword tags to your video that will categorize it so that people searching on that topic can find your video. Just imagine you were searching for your video, what would you type into Google? And those are your keywords. You can also always add your name as a keyword, so people can easily find you. See the next unit, Module 17.8, for how to choose the best keywords for your content.
For now, let’s just get your first video up there – remember the first time you do anything is always the hardest! After that first time, you mow down all your blocks (by taking action) and it becomes easy-peasy!
Now take action!
Your YouTube channel name: ____________________________________________________
Topic for your first, short, easy video:_______________________________________________
Keyword tags for when you upload your first video:______________________________________
Remember, that if you don’t like YouTube, you can always use Vimeo instead. You can get a basic account on Vimeo for free.
One last thing for those of you who really want to run with your video channel and make sure you are uploading the best quality videos you can…
Best Settings For Uploading Quality Videos
Following are the formatting and uploading guidelines that YouTube and then Vimeo prefer; to give your viewers the best quality videos to watch.
Simple YouTube Video Formatting Instructions
Step 1: Open your file with a video editing tool like iMovie, Final Cut Pro, or Quicktime Pro.
In iMovie, select Share > Export Using QuickTime
In Finalcut Pro, select File > Export > Using Quicktime Conversion
In QuickTime Pro, select File > Export > Export: Movie to QuickTime Movie
Step 2: Next, verify your settings by clicking Options à Video settings
Compression Type: H.264
Frame Rate: 30 is preferred. 23.98, 24, 25, 29.97 are also acceptable.
Data Rate: Automatic
Key Frames: Automatic
Frame Reordering: Unchecked
Audio/Sound settings
Format: AAC
Click Show advanced settings and choose Constant Bit Rate as encoding strategy
Other settings
Size: Choose the original size of the video
“Prepare for Internet Streaming”: Fast Start
Make sure that you’re using one of the following formats (YouTube prefers .mp4):
.MOV
.MPEG4 (.mp4)
.AVI
.WMV
.MPEGPS
.FLV
3GPP
WebM
Step 3: Go ahead and UPLOAD your video to YouTube!
 Advanced YouTube Video Formatting (Encoding) Settings
Recommended bitrates, codecs, and resolutions, and more
Container: .mp4
No Edit Lists (or you may lose AV sync)
moov atom at the front of the file (Fast Start)
Audio Codec: AAC-LC
Channels: Stereo or Stereo + 5.1
Sample rate 96khz or 48 khz
Video Codec: H.264
Progressive scan (no interlacing)
High Profile
2 consecutive B frames
Closed GOP. GOP of half the frame rate.
CABAC
Variable bitrate. No bitrate limit required, though we offer recommended bit rates below for reference
Color Space: 4.2.0
Frame rates
Frame rates should match the source material. For example, content shot in 24fps should be encoded and uploaded at 24fps. Content recorded at 30fps should be uploaded at 30fps. Content shot in 720p60, should be uploaded at 720p60. Content at 1080i 60, should be deinterlaced, going from 60 interlaced fields per second to 30 progressive frames per second before uploading.
Bitrates
Standard quality uploads
| Type | Video Bitrate | Mono Audio Bitrate | Stereo Audio Bitrate | 5.1 Audio Bitrate |
| 1080p | 8,000 kbps | 128 kbps | 384 kbps | 512 kbps |
| 720p | 5,000 kbps | 128 kbps | 384 kbps | 512 kbps |
| 480p | 2,500 kbps | 64 kbps | 128 kbps | 196 kbps |
| 360p | 1,000 kbps | 64 kbps | 128 kbps | 196 kbps |
High quality uploads for creators with enterprise quality internet connections
| Type | Video Bitrate | Mono Audio Bitrate | Stereo Audio Bitrate | 5.1 Audio Bitrate |
| 1080p | 50,000 kbps | 128 kbps | 384 kbps | 512 kbps |
| 720p | 30,000 kbps | 128 kbps | 384 kbps | 512 kbps |
| 480p | 15,000 kbps | 128 kbps | 384 kbps | 512 kbps |
| 360p | 5,000 kbps | 128 kbps | 384 kbps | 512 kbps |
Resolutions
YouTube uses 16:9 aspect ratio players. If you are uploading a non-16:9 file, it will be processed and displayed correctly as well, with pillar boxes (black bars on the left and right) or letter boxes (black bars at the top and bottom) provided by the player. If you want to fit the player perfectly, encode at these resolutions:
1080p: 1920×1080
720p: 1280×720
480p: 854×480
360p: 640×360
240p: 426×240
The YouTube player automatically adds black bars so that videos are displayed correctly without cropping or stretching, no matter the size of the video or the player.
For example, the player will automatically add pillarboxing to 4:3 videos in the new 16:9 widescreen player size. If the player is re-sized (i.e. when embedded on another website), the same process takes place so that 16:9 videos are letterboxed when the player is sized to 4:3. Similarly, anamorphic videos will be automatically letterboxed when shown in either 16:9 or 4:3 sized players. The player can only do this if the native aspect ratio of the video is maintained.
You can adjust the fit of your video in our player after uploading your video by using formatting tags.
If letterboxing is added to a video before it is uploaded (i.e. in the case of creating a 4:3 video from a 16:9 master), the widescreen player will add pillarbox bars too, resulting in black bars all around the video (windowboxing) and a bad viewing experience.
Go to YouTube’s Help section for any other questions you might have.
Vimeo Video Formatting Instructions
In order to compress, or format, your video to be uploaded to Vimeo, you will need to export your video from your editing software (like iMovie) into a format that Vimeo accepts.
For the best quality video, export your video as a Quicktime or Mpeg4 (mp4) movie, using these settings:
Codec: H.264
 A codec is the format in which your video will be encoded. Vimeo accepts most major video codecs, but for best results we recommend using H.264. If you’re uploading High Definition (HD) video, choose the High Profile H.264 setting instead of Main Profile.
Advanced H.264 settings: To make your uploads extra smooth, choose the following advanced settings whenever possible.
Closed GOP
CABAC (to reduce your file size)
Here are some codecs that will not work on Vimeo: G2M2, G2M3, Canopus HQ.
Frame rate: 24, 25, or 30 FPS (Constant)
Vimeo accepts videos with frame rates of 24 (or 23.976), 25, and 30 (or 29.97). If you know the frame rate of your footage, it’s best to encode your final video at the same frame rate. However, if your footage exceeds 30 FPS (frames per second), you should encode your video at half that frame rate. For example, if you shot at 60 FPS, you should encode your final video at 30 FPS. If you’re uncertain what frame rate you shot at, set your frame rate to either “Current” or 30 FPS. If there is an option for keyframes, choose the same value you used for frame rate. Important: Always choose “constant” frame rate instead of “variable” frame rate.
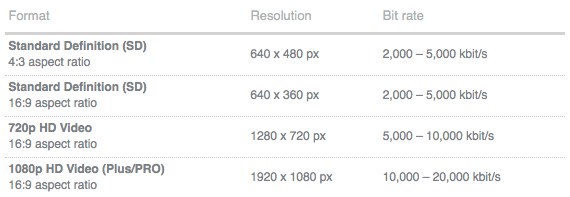
Bit rate: 2,000 – 5,000 kbit/s (SD) / 5,000 – 10,000 kbit/s (720p HD) / 10,000 – 20,000 kbit/s (1080p HD)
Bit rate (aka data rate) controls both the visual quality of the video and its file size. In most video editors, this is measured in kilobits per second (kbit/s). When you have the option, choose a “variable” bit rate and set the target to at least 2,000 kbit/s for standard definition (SD) video or 5,000 kbit/s for HD. Plus and PRO members have the option of uploading 1080p HD footage, which we recommend encoding at a bit rate of at least 10,000 kbit/s.
Resolution: 640 pixels wide (SD) or 1280 pixels wide (HD)
Common resolutions for SD video include 640 x 480 px (4:3 aspect ratio) and 640 x 360 px (16:9 aspect ratio). The most common setting for HD video is 1280 x 720 px (16:9 aspect ratio). Plus and PRO members have the option to present their videos at 1080p. 1920 x 1080 px is the most common resolution for 1080p video.
AUDIO
Codec: AAC-LC (Advanced Audio Codec)
For best results, we recommend using AAC-LC (low complexity) for the audio codec.
Data rate: 320 kbit/s
For best results, encode your audio at constant rate of 320 kbit/s.
Sample rate: 48 kHz
For best results, set your audio sample rate to 48 kHz. If your working setting is already less than or equal to 48 kHz, leave it as is.
Recent Comments