Archives for March 2019

How Do I Offer Coaching or Consulting?

Coaching and consulting services are particularly easy to add to your product roster because they do not require any production time – but keep in mind they do take your actual time to deliver, and therefore you’ll be limited in how much you can offer.

That said, you can also charge a premium for consulting sessions since they involve one-on-one physical time. And no matter what your current business, talent, or skill is, you can often add consulting or coaching to your product line-up, if you wish.

Who Can Offer Consulting?

Anyone. I really mean that: No matter what your business is, there is often some way you can add consulting to your product offerings. We’ve all heard of business coaches, life coaches, and health coaches, but how can YOU offer coaching or consulting?

Let’s get you brainstorming about your own business by going through some examples:

Horse Trainer or Dog Trainer: Not everyone can afford to hire you personally to come out and work with their animal and many people just need some advice, or a fresh perspective. So you could offer:

Problem-Solving Phone Consult (30 minutes)
and/or
Training Advice Phone Consult (60 minutes)

Home Renovation: What about the people who are in the dreaming or planning stage and just want to get some professional input at this stage?

Brainstorm Your Reno Consult (1 hour)
and/or
Your Reno Ideas & Advice Consult (1 hour)

Professional Artist or Photographer: Instead of just selling your own work, how about helping other artists with your expertise?

5-Painting Art Critique (1 hour) – Submit up to 5 works and then we will discuss your strengths, what needs to be developed, easy tips for improvement that yield big results and what direction you should go in next.
and/or
Sell More Art! (1 hour) – We’ll talk about your unique situation, assess your strengths and constraints and I’ll share my ideas for how you can take your art marketing to the next level.

Do you see what I mean?

Also keep in mind, that your consulting sessions do not have to be stand-alone sessions. You could offer them in conjunction with your eBook, or audio course, or tutorial. This would turn a single item into a package and allow you to charge a lot more for it.

Your consulting session could simply be a one-on-one support session to implement everything they have learned in your eBook. Or perhaps it is a critique and feedback session where you take a look at what they have created from your tutorial.

Here are some examples:

How To Plan Your Secure, Sexy Retirement eBook by Emilly Jones, CPA plus a 1-hour Personal Mastermind Session with Emily Jones

Art Deco Your Bathroom! DVD by Josh Mulligan and 1-hour Personal Consult with Josh to go over your ideas and design.

21 Days To a Healthier, Slimmer You CD by Annette Walters includes a weekly 1-hour compassionate group support, advice and cheerleading session with Annette (maximum 15 participants to ensure quality!) for 3 weeks in a row.

Now let’s brainstorm what YOU could offer for personal consulting, or group coaching sessions…


Take some time right now to brainstorm how you could offer personal consulting services:


Write down your ideas here for how you could package up a digital or physical product (that you have, or that you would like to create) with a personal consult, or group coaching session(s):


To offer coaching or consulting sessions, all you need is Skype – which is free – or Instant Teleseminar. Then you need a webpage telling people about your consulting services and how they would benefit from purchasing a session, on that webpage you either need a Contact Me form, or a Buy Now button (that links to your shopping cart, or PayPal) and that’s it. Could it be any easier?

Consulting services are usually one-on-one sessions. You can offer single sessions and packages of 3, 5 and/or 10.

Coaching services can be one-or-one, or they can be group sessions – for which you set a maximum number of participants. Mastermind groups are just a fancy name for group coaching sessions.

Coaching is often an ongoing, or fixed-term kind of arrangement. For example, you may offer a Mastermind Group with a maximum of 5 people, that runs for a full year and people have to pay up-front. Or you may offer one-on-one life coaching, or health coaching, or business coaching, that runs for a 3-month or 6-month term.

If you’re a counselor, or therapist you may only accept clients who will book and pay for a 5-Session Package – because that’s the number of sessions you know people need in order to see results.

Don’t just take whatever you can get! You are the expert and you know best the number and duration of sessions someone needs to experience positive results from working with you. Do not set yourself and your clients up for failure by accepting less than you know they need.

Strategic Pricing

You can also use pricing to encourage people to choose the session package you want for them.

For example, let’s say Magnus is a life coach. And he knows that people need to book a minimum of 3 sessions to see any kind of positive change in their daily life. But if they really want to be able to break habits that are no longer serving them, and cultivate new life-affirming habits, then 10 sessions are ideal.

In that case, Magnus would structure his pricing to service his goals. Maybe his price list would look like this:

Single Mini-Session (20 minutes) – Come try me out! $FREE

10-Session Package (60 minutes per session) – $1350 (Save $900!)

3-Session Package (60 minutes per session) – $599 (Save $75!)

1 Session (60 minutes) – $225

So the price Magnus is charging for his 10-Session Package is his ideal price per hour for a committed client – $135/hour. He has inflated the price on the 3-Session and Single Session in order to give people a strong motivating reason to book 10-Sessions.

Of course, his copy on his Coaching page (sales page) is going to go in-depth as to WHY his clients have found 10 sessions to be the best arrangement and all the benefits they have received from making that commitment to themselves.

He is also giving away a free consult so people can connect with him and see if they click with him – something they would definitely need to do before making a purchase of that magnitude. The hyperlinked text, Come try me out! links to his Free Consult Opt-in Form.

This is just a brief foray into pricing and positioning your services to get you thinking. When you’re ready for the nitty-gritty, we go into much greater detail on how to decide what to charge, and then how to position (present) that to your site visitors over here.

Hosting Consult Sessions

If you’re only conducting one-on-one sessions, many prefer to use Skype or Zoom so you can see the client and they can see you. It is more intimate and they can also show you things, or you can demonstrate things. While Skype has been around longer, I prefer Zoom – better connectivity, and a more robust interface with more options.

However, some people may be concerned with privacy, or they are not comfortable with you seeing how they look. For those reasons, you may want to offer (or also offer) sessions that are conducted via voice only.

Also, maybe you have a preference! Maybe you don’t have an office, so you have to conduct your sessions in your living room, or kitchen, and you don’t want people seeing your home. Or maybe you don’t want to have to get dressed, or do your hair every day!

You can use Skype for audio calls, but the audio quality may not be very good – especially if the session is being recorded. In these cases, it would be wise to consider using a teleconference service that can also record your sessions directly to MP3 files – like Instant Teleseminar.

You can also use Instant Teleseminar for webinars – which can be very handy for sessions that are tutorial-oriented.

Record Your Calls

The other great thing about Instant Teleseminar is that your client can call in using Skype, if they prefer. Or they can go to a page that has a listing of local numbers they can dial in on to reach the centralized call center. Either way, the recording is much better quality than Skype and both of your voice levels will be similar on the call and on the recording.

If you are recording from a Skype call, then Skype provides a list of recording software that is compatible with Skype.

Just Starting Out

If you’ve never given consulting or coaching sessions in your field of expertise before, and you don’t have a steady stream of visitors coming to your site yet, I’m going to give you a handy trick to get you started with no advertising cost.

Find someone in your field or niche who has either good traffic to their blog, or podcast, or steady book or product sales. Put yourself in their shoes, and think about how you would like to be approached… And then get in touch with them.

Think about how you can start building a relationship with that person in your niche. And is there anything you can do for them, or give to them? If you can start building relationships with other people in your field, you will then be able to interview them for your blog, or your podcast, or do a teleseminar with them, or even a joint-venture with them.

Then they will likely share that interview or offer with their audience and presto, you can get exposure to hundreds or thousands of targeted people instantly.

A sincere, heartfelt email to reach out to that person in your niche can have a remarkable effect. If you can’t think of what to say, or how to say it, then we have a wonderful audio exercise to help you connect to your own (real, future, or ideal) customers.

For example, here is an email I received from someone just starting out, who wanted to connect with me – how do you think I responded to this?:

Hi Jini,

I hope this message finds you and your family well and that you are enjoying this holiday season upon us.

I am writing for two reasons. First, I wanted to extend my heartfelt thanks for your work. I am a gal who healed my Crohn’s (like you!) and went on to become a certified health coach helping others do the same.

Your profound work with LTYG and your personal healing story played an absolutely critical role for me in finding my way back to health. You were a shining light during the darkest time of my life and you gave me hope that there was even the possibility that I could get well. I had no other role model for this radical thing I wanted to do and there you were calling me forward. You should see my tattered copy of LTYG – it was like a bible to me! And for all that, I sincerely thank you.

I wanted to see if you might be open to having a short phone conversation with me in the near future? Looking forward into 2014 I am currently in the process of getting quiet and searching within for the “voice” that wants to emerge in my work with Crohn’s & Colitis patients. Knowing that it all runs much deeper than the dis-ease itself I have a long-term vision of really getting into the spiritual and emotional aspects of illness for those who are ready to look at those places and heal.

That said, this trailblazing stuff can be a bit intimidating and lonely at times and I find myself longing to connect with others who are on a similar path. I absolutely marvel at what you’ve accomplished as a solo-preneur and would be so grateful for an opportunity to connect with you in the sprit of support for one another’s work. My thought is that when you’re up to something as revolutionary as healing body, mind and spirit it’s important to symbolically “link arms” with like-minded individuals to create a collective force that drives this purpose.

For that reason, I would sincerely appreciate a phone conversation with you if you have some time available in the next few weeks. I would be ever so grateful for any wisdom you might impart to me on this journey and I’m also curious and interested to know what’s next on the horizon for you and how I might support you in that.

Please let me know what you think. I can be reached at the email below and my availability is flexible to whatever your schedule may be.

Thank you again and Happy Holidays!

With Love & Light,
T.R.

Do you think I just pressed “Delete” on this email and never bothered responding? Of course not! Her email was absolutely heartfelt, she spoke in true vulnerability and good faith, and she was not self-serving, nor manipulative.

And notice how she just asked to connect via a phone conversation – she left it to me to decide when and how long. And then she expressed an interest to also discuss what I was up to and if there’s any way she can help me.

Notice that this email does not contain any website traffic numbers, or product sales, or any other attempt to position herself as “worth” my attention. She merely included her website, so I could go check it out if I wished.

Needless to say I did respond to this email and I not only had a conversation with her, I gave her a trial membership in LTYF so she could use it dig down and define her new direction and learn how to position herself so that the right people will find her. I also listed her on the Recommended Health Practitioners section of my site.

So find someone in your niche, whose work you love and who has had an impact on your journey. Reach out and connect with them.

Snail-Mail or Phone!

If you don’t get a reply to your email, send a hand-written letter. Hardly anyone gets snail-mail anymore, so it will definitely get opened! If that doesn’t work, then pick up the phone. I’m serious! So many people are so busy and are approached by so many people wanting to liaison that they will only respond to people who show they are committed and sincere. They purposely wait for the flaky ones to fade away.

Like the email above, you could ask for a phone conversation, or a podcast interview, or a teleseminar. Let them set the length, ask them what topic they are passionate about and suggest a few that you would be very interested to hear them speak about.

Even when I was just starting to do teleseminars, I rarely had anyone turn me down! In the decade I’ve been doing teleseminars, I only had one doctor who said no, due to time constraints. This was Dr. Jonathan V. Wright – who was busy lecturing worldwide and appearing on TV shows since he was featured in Suzanne Somers’ books. But even then, he referred me on to his right-hand doc instead – Dr. Wendy Ellis – and I did two fabulous teleseminars with her instead.

The only other person – also a medical doctor – who did not respond to my emails, nor return my phone calls, lived in Australia and was a world-renowned gastroenterologist who also lectured worldwide and headed up the GI department at one of the top hospitals in Sydney. Totally understandable that he would have zero time to respond back to me.

BUT, nothing is ever wasted… about 5 years later he emailed me requesting samples of one of my health products and then requested a phone conversation with me to discuss patient outcomes on the product.

So don’t get discouraged, even when you don’t hear back from people, you have planted seeds. And when your name pops up again, they will get a tingle of recognition. And when they hear about you yet again, or someone talks about you, or they see your book in the same category as theirs on Amazon… you never know what can happen.

Also, do not be afraid to let some time pass and then contact that person again! Sometimes you just have to wait for the timing to be right.

Once you have made some kind of contact with someone in your field, you could offer to provide free mini-consults to their people. As long as your consults would not directly compete with what they are offering, they will likely be open to this. This could be structured in the following ways to provide a win-win for both of you:

  1. They can offer a free consult with you as a free bonus to purchasers of their book, or program. This increases the ‘value’ of what they are selling. And they can position the offer like this:

Free Bonus #1 (Value: $75)
20-minute consult with life coach, Magnus Ferguson…short bio, etc.

  1. If you’ve done a teleseminar with them, then provide them with a download link to the audio to share on their blog. Below the teleseminar, they can offer a free consult with you as a special gift to their listeners. So then there would either be a link to your free consult page/form, or you give them the code for your form and they embed it right into the blog post.
  2. The other thing you can do, if you’re doing an interview with them on your podcast, or your blog, or a teleseminar, is to arrange your offer with them before the interview. Tell them that you will be offering a free consult to all listeners or readers at the end of the interview and ask if they would like to offer anything as well? Then, you give out your free offers at the end of the interview. When your guest links to your blog post, or makes your podcast or teleseminar available to his/her audience, your free consult offer will automatically be extended to their audience = free promotion for you to their list!
  3. In any of these scenarios, you could also offer them a commission if anyone from their list purchases a session or session package with you. In that case, then the link to your free consult webpage would be an affiliate link.

The Power Of A Free Consult

Why have I been talking for pages now about offering a free mini-consult? Well, let’s go back to the Golden Rule of Business: What would you like to receive? How would you like to be treated?

If I were just starting out, so I didn’t have much of a reputation yet; you weren’t hearing about my fabulous work from other people, and there weren’t dozens of podcasts and teleseminars out there where you could hear my voice, or get a sense of me… Would you just go ahead and pay $100+ for a session with me, just based on my website and perhaps a few emails you’ve received?

I know I wouldn’t! For something as intimate as coaching or consulting, I need to have a real sense of the person before I will book with them – or their reputation has to precede them. And when you’re just starting out, you don’t have a lot of social proof.

Annabel Fisher, EFT Practitioner, built her practice off of free consults. The main purpose of her website for many years was to accomplish one thing: Get the site visitor to sign up for a free 20-minute consult. Why? Because her conversion rate from her free consults was 80 – 85%. Yes, you read that correctly! Out of everyone who received a free consult in any given month, roughly 83% of them booked a paid session, or session package.

I also offered a free consult with Annabel as one of the bonuses my readers received when they bought my Listen To Your Gut book – my readers received a total of 7 bonuses that included a consult with Annabel, and another free consult with a life coach. As the author, both these bonuses supported the aim of the book and provided tremendous value – it was a win-win. Her conversion rate from these ‘free bonus consults’ was also very high: 80%.

Annabel’s conversion rate was so high because she only offered her free consults to very targeted niche prospects: People with a chronic illness; which was her specialty at the time.

She also ensured that the free consult was NOT just spent chatting and getting to know the person. She was very rigorous with ensuring that the person actually experienced the therapy method (EFT Tapping) during the free consult.

Her intake form for the free consult got the person to narrow down their top 3 problems at the time. And also asked them if there was something pressing they wanted to address during the consult. Annabel then made sure the initial chit-chat lasted no longer than 5 minutes – she would not allow people to get ‘into their story’ – and that left a solid 15 minutes for the client to experience the therapy and actually get some relief. She purposely set the consult at 20 minutes, so that she could stretch it up to 30 minutes, if she chose. But 20 minutes managed the client’s expectation nicely and then of course, they always felt pleased if they got some extra time.

The third reason Annabel’s conversion rate was so high is that she actually asked for the booking! Do not leave this up to the client. You do not have to be pushy in any way, but you do need to ask for the booking. Something like this works well:

“Okay, so would you like to book a session now? [leave 4 second pause of silence – don’t get nervous and jump in, wait the full 4 seconds!] Or would you like to think about it and check your schedule?”

Fourthly, for those people who did not book immediately, Annabel sent them a feedback, or follow-up email after a week. They were also added to her regular email list as soon as they signed up for the consult, so they continued to receive ongoing emails and offers from her.

Don’t minimize the importance of the follow-up emails as many people just need some time to get the money together, or things have to get bad/painful/difficult/motivating enough that they finally give themselves permission to book with you! Also, if they receive an email from you a few weeks later offering group coaching at a much lower price, then that may be the way they need to start with you, or it may suit them better. Let’s recap:

  1. Offer your free consults only to targeted, specific audiences.
  2. Treat the free consult like an actual session; make sure it is exactly what they would experience if they worked with you in a paid session. Stay in charge! Don’t let the client chatter on with their stories or small talk.
  3. At the end of the consult, ASK for the booking in a nice, respectful way.
  4. Follow-up with an email sequence (autoresponders) after the session.

So let’s take a few moments now to quickly map out how your free consults will look…


Brainstorm a list of people in your niche, or who have complimentary services, that you would LOVE to interview or feature, or even just reach out to:


Who will you offer your free consults to? And how many minutes do you want to give?


How will you present your free consult offer; email, webpage, teleseminar, etc.?


How will you structure and manage your free consults so that you will really give people a taste of what working with you will be like? What can you accomplish in the time frame you have chosen?


Use your email platform right now to create your sign-up form (see Module 10) for your free consult and paste the code into a Notepad or TextEdit file (plain text only).


How will you ask the person if they would like to book a session with you? What specific wording will you use? NOTE: Have this wording in front of you during the sessions, until you have learned it fluently:


How will you follow-up with people after their free session? Map out 3 emails here that you will send to the person who did NOT book a regular paid session with you.

Make sure you enter them into your email platform as automated emails (so they are automatically sent out on the days specified).

Treat the day you gave the person the Free Consult as Day 0.

Thereafter, have them receive your normal emails for your newsletter, or blog post, or whatever you normally send to the rest of your list.

Note: The day the person uses your opt-in form to sign up for their free consult may need to be designated as Day 1 or Day 0 in your email system. If this is the case, then make it your protocol to have that person booked for their free consult within 2 weeks of signing-up. Then set the first email to go out on Day 21 – that way you will ensure they have had their free consult by then and had at least a week to mull things over. Adjust the timing of the other emails accordingly. Let’s go map it out…

Now let’s create your email autoresponder series for AFTER someone has signed up for your Free Consult session, you have booked the session with them, and you have also already had the session with them. You may want to just jot your framework here for each email, then create the actual email text in your email program, to save yourself time.

Email #1 (Day 7) → Touch base, ask how they are and ask for Feedback on the free consult


Email #2 (Day 14) → Give them something for free. An eBook, or Report, or video, or MP3 audio. Remind them gently that whenever they are ready to book a session, you would love to interact with them again. Give a link to your consult booking page. Include a couple testimonials from past clients in the email.


Email #3 (Day 21) → Send them to a blog post that contains one of your tribe’s top pain points, or common struggles, or challenge. Let them know that you SEE them and you KNOW them. At the end of your blog post, make sure you talk about how/why a personal session (or session package) with you is so powerful and link to your consult booking page.


Group Coaching

If you’re curious to hear more, listen to this audio with Annabel Fisher, where she talks about how she started off charging $150/hour for one-on-one consulting, but then she leveraged that into group coaching – which was cheaper for each participant, yet netted her $492/hour.

Well, that story right there is an excellent reason why you would want to do group coaching whenever possible. It’s cheaper for your client, which makes them happy; and it’s more money for you, which makes you happy! Depending on your type of business, this is not always possible, or you have to think a little ‘outside the box’ to make it happen.

For example, if you are a doctor, you couldn’t offer group coaching for personal health consults. But, you could offer group coaching for people you’ve already had private sessions with. Let’s say you have a bunch of patients who are all struggling with diabetes. Well, you could set up weekly group coaching for the first 6 weeks that you are trying to get them all to switch to a healthier diet. Then perhaps you could offer them monthly coaching on-going, just to keep them on track.

Don’t forget the power of the support and camaraderie people feel with others in the group. This can be a powerful glue that holds your group together – because you are also providing community.

Anytime you have a few people in your tribe working on the same thing, or needing the same type of help, or who would benefit from the support of a community – you have the opportunity to offer group coaching.

Here are some of the different ways you can label it:

  • Group Coaching
  • Mastermind Group
  • Support Group
  • Class
  • Training
  • Clinic
  • Group Session

Hosting Group Sessions

If you’re only conducting one-on-one sessions, many prefer to use Skype or Zoom so you can see the client and they can see you. It is more intimate and they can also show you things, or you can demonstrate things.

However, for group sessions, people are often concerned with privacy, or they are not comfortable with a group of people seeing how they look. For those reasons, many group coaching sessions are conducted via voice only.

You can use Skype for audio calls, but the audio quality is not very good – especially if the session is being recorded. For group coaching, it would be wise to consider using a group teleconference service that can also record your sessions directly to MP3 files – like Instant Teleseminar.

You can also use Instant Teleseminar for webinars – which can be very handy for group sessions that are tutorial-oriented.

Record Your Calls

The other great thing about Instant Teleseminar is that people can call in using Skype, if they prefer. Or they can go to a page that has a listing of local numbers they can dial in on to reach the centralized call center. Either way, the recording is much better quality than Skype and everyone’s voice levels will be similar on the call and on the recording.

Don’t forget, that for group coaching, there will often be one or more people who don’t show up, so you need to record every session for that reason alone. Let’s figure out what you can offer for group coaching…

Think now about your audience, the products you have, or would like to have, what your people need, and brainstorm ideas for how you can offer a group coaching component to your existing stuff, or as a stand-alone, new product:


Write down how you are going to host and record your solo or group consulting or coaching sessions (which system or equipment are you going to use?):


In the next module, we’re going to talk about membership-based groups, courses, or programs, and this is an ideal service or product to offer your coaching or consulting clients!


How Do I Create Membership-Based Training, Courses, or Programs?

If you want to sell an entire course, or training program, or you want a platform that can present various media all in one place – perhaps video, combined with private articles and/or audios to listen or download – then you may want to set up a membership-based site, or a membership section to your existing site.

A membership program or site is one where people pay to become members of your group, or program, or club, or training course and that content is delivered online.

Each member is given a private username and password  to login. Perhaps they pay a monthly, or yearly, or one-time membership fee – you get to decide which. In some cases, your membership site may be a bonus add-on to another product you sell.

Listen To Your Freedom is a membership-based program. Here are some other examples of membership-based products:

  • Environmental spill clean-up certification course
  • Language tutoring course
  • Home haircutting course
  • Marketing program
  • Art tutorials
  • Hoof trimming course
  • Bathroom reno course
  • Healing certification course
  • Nutrition certification course
  • Community gathering and support program
  • Cooking tutorials
  • Meditation course
  • Health information site
  • Investor information/tips site
  • Support and networking site for people who have bought your book or audio course
  • And so on!

There are very few training, teaching or certification programs that cannot be turned into online membership-based programs. Even for those programs where some hands-on, in-person training is crucial, there is likely to be an entire chunk of the training that can be automated content delivery.

The other type of membership site is one that is based upon either community (a private club or group), or advanced, or proprietary information, rather then a training or teaching program.

For example, let’s say that you are an investment advisor. On your public site and in your free newsletter, you give away great advice and opinions. But you also offer an inner circle membership site where people get access to specialized information that is not publicly available. Maybe that’s where they get a list of what you’re privately investing in that month, for your own account. Or maybe there is a ‘hot tips’ section where you share your hunches, or ideas about the next big thing. Or your site hosts a lively discussion forum, where you post your comments or answers from time to time.

For my health business, I have an information-based membership site called LTYG Wellness Circle where people have access to:

  • Free eBooks
  • About 20 issues of an InfoLetter (this used to be quarterly, until I no longer wanted to do it)
  • My entire roster of teleseminars (otherwise you have to buy them in my Shoppe)
  • Case studies (from when I used to do private consults)
  • Videos (which are also publicly available on my YouTube channel)
  • Podcasts (which are also publicly available on my blog)
  • Special articles written by me
  • A community forum
  • Discounts on all LTYG Shoppe purchases for Gold members (10% discount) and Platinum members (15% discount)

This membership site was created before WordPress existed, so I had the whole thing custom-programmed in PHP, along with a forum softward called Vbulletin – which cost me about $4,000 at the time. It was never wildly successful, but it has generated about $2,000/month since 2005, so I can’t complain!

Bookmark this link if you want to talk more about turning physical products and processes into digital ones and how that saves you both time and money. Well, imagine how many more students or members you could have if most or all of your current in-person training was in the form of online, digital content?

Add Value To Your Content

A membership program can also be a way to add a greater perceived value to an existing course. Imagine you have a course that is currently delivered via email. So people purchase your course, and then each module, or section is delivered once a week as a PDF download link in an email.

This is a perfectly good way to deliver a course and if your PDFs have great covers and are nicely formatted, with great content, people will be well pleased with your course.

But now imagine that the exact same course is hosted on a dedicated site (or section of your site) online. The hyperlinks to other webpages immediately open up in another window. Your members have to complete a multiple choice quiz before they have access to the next section. You have online chat as well as a real-time forum available for any questions, along with another forum for networking, where your members can interact with each other. Your videos play instantly at the click of a button and your customers can listen to your audios live online, at any time. This online course is instantly accessible from any mobile device, in any country.

Which course do you think has a higher perceived value in the mind of your customer? Which course could you charge more for? Now let’s see if there’s any of your content that can be monetized further…


Take a few moments right now to jot down any current training, or information, or community support you currently offer that could be automated into a membership-based, online site?


And here are some different ways you can present your course or program:

  • Audio course
  • Video course
  • Written course (text)
  • Online Combination program (e.g. text with mp3 audios, or audio + video, or video with text, etc.)
  • Physical/Online Combination course (part of the course content is online and then part of it is live, in-person group workshops, or one-on-one sessions)

You also may not need to create a whole lot of new content to set up your membership course. Maybe you take an eBook you’ve already written and break it into chapters; each chapter is one module or unit. Or perhaps you already have 20 articles on one topic or teaching – just gather them together and you have 20 sections or modules ready for your membership training program. How about adding a few videos here and there and an audio download from you with each module – now you’ve got a super value-packed program!

The great news – since your site is a WordPress-based site – is that you do not need to purchase separate software to run a membership site or section. Nor do you have to pay a programmer to code the entire thing from scratch!

WordPress Membership Plugins 

You simply need to install a WordPress membership plugin to your existing blog! Or, you could dedicate a separate domain (site) for your membership program, install WordPress there and then install the membership plugin on that new blogsite.

If you want to set-up the membership area yourself, using a free plugin, then it would probably be better to set up a separate site (separate domain name) and host it there. That way you can take your time getting it set up, without your main site being affected.

The other big reason you would want to set up a separate site/domain for your membership program is that once you install a Membership plugin on your WordPress blog, the search engines will no longer spider your free/public blog posts the same way. This is because Membership sites are password-protected, so the search engines cannot scan them properly and your search engine rankings for your blog/site will plummet.

For this reason, I have BrainstormYourBiz.com as my public blog post site that search engines can scan/index as usual, and ListenToYourFreedom.com as my private membership site (which is also a WordPress blog). Again, yes, I tested this! Originally I did try to keep them together as many advise it is no problem. But it is only no problem from a software/functionality perspective. For search engine rankings it is a big problem.

Note: You do not need to buy additional hosting to set up another site/domain – you can sub-host it under your existing account, so your only additional cost is for the domain name. Call your hosting provider (e.g. GoDaddy) and ask them to set this up for you.

Also, if you plan to offer multiple membership-based programs, courses, or tutorials, then you’re going to need a different URL (domain) for each one. Because you can only run ONE membership program off of each blog.

Here’s how it works: Your blog becomes your membership area (or membership site). Your blog posts become your password-protected membership content. So all your content (text, video, audio) is presented in the format and layout of a blog post. BUT these blog posts are password-protected and can only be viewed if the person has logged in to the site, or members area.

If you decide a membership site would work well for your products or services, you have two options: free or paid.

1. Free Membership Plugin – The cheapest option is to combine Vimeo Pro ($199/yr) with a free membership plugin for WordPress, called Members. This will allow you to password-protect your entire site.

Of course, if you don’t need to have private videos, then you don’t need to pay for Vimeo Pro and you can embed your public videos from YouTube – or don’t offer video. And, it’s perfectly fine to stick with just text and/or audios, if you prefer.

The big difference between free membership plugins and paid plugins is the number of features available and the different ways you can structure your membership levels and present your content. See the chart below for more details.

 2. Paid Membership Plugin – If you want a premier membership plugin, then you may want to use the same one I use for LTYF, WishList Member ($97), and then you can combine that with Vimeo Pro if you want to host private videos. You may have noticed that in LTYF I have a mix of both public and private videos that I offer.

More Membership Site Ideas

Here’s a great video from WishList Member, showing you the Top 10 Membership Models you could use to structure and offer a membership program. This video is a GREAT source of ideas, so even if you’re not thinking about doing a membership program at this time, try watching it anyway, so the ideas can percolate in the back of your head for when you’re ready.

Free vs. Paid Membership Plugins

As I mentioned before, the main difference between a free membership plugin and one like WishList Member that you have to pay for, is the number of features available (cool things you can do) and the ability to present your content in different ways.

Here’s what I mean – and these are just some of the key differences, there are many more features available in WishList Member that I have not covered here. So for a complete picture, please visit the webpage of each plugin for the details:

Free vs. Paid Membership Plugin Comparison Chart

Members – Free WishList Member – $97 (one-time fee)
Can only password-protect entire blog site. Can choose which parts of the site (pages or posts) you want to have public and which private.
Cannot have some content private and some public. Can have a public blog and private member content on same site.
Once someone has logged in, they have access to all the content. Can offer different types of membership according to how much people have paid. Each level only has access to certain content. E.g. Silver members access Modules 1 – 6; Gold members access Modules 1 – 14.
Cannot split the content into levels; where members cannot have access to the next level until passing a test, or getting approval. Can limit advancement to the next module depending on whether member has passed the test for that module, or been manually approved by you.
Cannot offer quizzes, or tests. Can offer multiple-choice quizzes or tests.
Cannot set different levels of membership (e.g. Silver, Gold, Platinum) there is only one type of membership available. Can set up as many different levels or types of membership as you wish (Silver, Gold, etc.) and each can only access certain content

As I already mentioned, I used WishList Member with this Listen To Your Freedom site. I used a programmer to install and configure the plugin cause I’m just not a techie-gal!

Whether you are using a programmer, or configuring the membership plugin yourself, you need to get the structure and organization of your content worked out first. This is not hard, since there are only 3 elements to play with: Widgets, Blog Post Categories, and Blog Posts.


Then you, or your programmer, can set up the membership section or site according to your plan. After it is set up (configured) you can start uploading your content (create your blog posts).

Of course, you can also pay someone to upload and format your content if you already have it in Word .doc format, and this certainly makes the process quicker! Make sure you double-check all the work, though, as you are sure to find incorrect links or typos.

Okay, so now you know all the details about setting up a membership site, or a membership section on your existing site, let me tell you about one more thing you can add to really enhance your membership program.

Community Forum

You can also add great value to any type of membership site by adding a community forum for your members to connect, discuss ideas, support each other, and ask and answer questions.

You can also decide how active you want to be on the forum. Perhaps you only go on there for an hour a few times a week, or month. Or maybe you like to spend an hour a day and really be the hub of your community. It’s totally up to your personal preference. Perhaps you don’t go on there at all, and you just have your VA (virtual assistant) keep an eye on things and answer questions.

The interesting thing about adding a community forum to a membership site, is that your members just may find this the most valuable thing about your program! Since each of these is free plugin, you might as well offer it as an added value to your membership site and see how your members like it and utilize it.

The most full-featured, free community plugin for WordPress is BuddyPress.

A simpler version of BuddyPress, if you just want more of a forum is bbPress – also free. Or SimplePress is another free, full-featured, yet simple forum. Here’s what a SimplePress forum can look like:

Another really streamlined free WordPress forum plugin that is beautiful in it’s simplicity is Moot. Here’s an example of what a Moot forum looks like:

And just in case you want a super full-featured forum, you can use Vbulletin. BUT be aware that Vbulletin is not a WordPress plugin. It is a piece of software that you have to pay for, download and then link to your main site – so you will need to pay a programmer to set it up for you.

Setting Up Your Membership Site

Whether you choose the free membership site plugin, Members, or the paid plugin, WishList Members, both are plugins that run on your blog.

Remember that if you choose the free plugin Members, you cannot also have public blog posts, as well as the private member posts. So in that case, you will just have the fixed pages of your site and your membership section (private blog posts). With the paid plugin, WishList Members, you can run both public and private (members-only) blog posts on the same site.

But as we discussed, if you want to get good search engine rankings for your content (and of course you do!) then you may want to keep your existing site as is, and run your membership site on a different domain (URL). For example:

Main Site: www.GreatPlugs.com

Membership Site: www.GreatPlugsProgram.com or www.PremiumPlugs.com

Tip: As I mentioned before, you do not have to pay for separate hosting for this second domain and membership site – you can set it up as a sub-domain under your main hosting account. So the only thing you have to pay extra for is the domain registration.

Now let’s brainstorm ideas for a membership-based site (or sites) that you would like to offer your tribe…


Write down here any ideas or thoughts you have about a membership-based site (or sites) that you would like to offer your tribe. And your structure for how you would like to set it up:


How Do I Paint My Own Covers or Graphics?

Whether you think you can paint, or not, here’s a way to use watercolor paints (from the dollar store) to create your own eBook, CD, DVD or program covers. This technique is so simple, you can even get your 3-year-old kid or nephew to do it for you!

People are using this exact same painting technique to create quotes that they pin or post in hope they’ll go viral. Here’s an example:

Watercolor paints are the easiest way to create a beautiful, yet totally unique image to use as the background for your CD, DVD or eBook cover. And require no artistic talent whatsoever! In fact, you could even get your kids to do them for you.

Here’s how you can easily artwork your own covers using just:

  • A cheap set of kids’ watercolor paints from Staples
  • A cheap dollar store paint brush
  • Masking tape
  • A spray bottle (also from the dollar store)
  • Pieces of watercolor paper. You can’t use regular paper with watercolor paints as the paper needs to be thicker and absorbent. I like to use 140 lb watercolor paper. You can get watercolor paper from an art store, or online at DickBlick.com

And when I say this is so easy, even your kids can do it for you, I’m not kidding. Here’s one done by my friend’s 3-year-old, using exactly the same tools and method I’m going to show you. It’s beautiful, isn’t it? It would be a great background to use for an eBook, CD, DVD, Manual or Report cover:

Okay, so no excuses left and let’s get started!

STEP 1: Tear your watercolor paper into the size of piece that you want. Think about the product you want to make a cover for, and then make it the shape you need. For a CD you would want it square, for an eBook, you would need a rectangle, and so on.

Just make your fold line, scrape tightly across the fold line (I’m just using a vitamin bottle to scrape down on the fold line), fold back again to the opposite side and scrape the fold line again, then tear:

You can either use your hands to tear the paper:

or you can use a ruler to tear the paper:

STEP 2: Tape down your piece of paper, using the masking tape to make a border on all four sides (the tape will form a border on the part of your paper that is covered by the tape) like this:

STEP 3:  Now use the spray bottle to spray water all over your piece of paper – go ahead and soak it!:

STEP 4: Next, spend some time thinking about which colors would fit the “feel” of your product. If your eBook subject is peaceful or feminine, then maybe you want to use yellow and peach, rather than black and red, for example.

Now use your brush (moisten first in some water) to smoosh around in the paint color of your choice and get a nice lot of paint on the brush.

Then just put that paint onto your wet piece of paper. You can paint it on, splatter it on, tap it on, dab it on, circle it on – whatever you want! Let your inner child come out to play here and just go for it! It’s impossible to make a mistake:

OR

STEP 5: Wait for your art to dry, then gently tear off the masking tape. Scan the image into your computer. Or you can use your camera or cellphone to take a photo of the image and upload that to your computer. Here’s one done by a friend of mine:

STEP 6:  Now crop your scanned image to the desired dimensions (square, rectangle) and maybe rotate it, depending on how it looks best. I have both cropped this image into a vertical rectangle (for an eBook cover) and then rotated it left.

STEP 7: Now add a border if you like and your text by using Preview (on iMac), or Photoshop, or GIMP (free for PC). See Module 14.2 for the instruction videos if you’ve forgotten how to add text to photos. Free online tools you can use to add text to your images are AddText.com and Fotor.com. For this eBook cover I added an orange border, title, sub-title and author name:

Or here’s another version, where I changed the placement of the sub-title:

Voila! Your original piece of artwork has been turned into a beautiful cover for your eBook and is ready for blogging, pinning, posting and listing in your shop. How easy is that?

And will this eBook cover work for Kindle or other e-reader platforms? Let’s reduce it to thumbnail size and take a look:

Yep, you can still read both the title and author name and it still looks good. No excuses now, eh? So listen to your freedom and get painting!

Note: You could also use this tutorial to create your watercolor image for your book and then contract a designer to add the text. You would simply hire an eBook designer on Elance.com or Fiverr.com or EnvatoStudio.com.

How Do I Create a Basic or Free eBook Cover?

If you don’t need anything too fancy – maybe you just need a quick cover for your free eBook – then Microsoft Word has some nifty templates you can use.

For this next project, I used Microsoft Word to create an eBook template that I use for a lot of my free eBook give-aways. It may be simple, but it looks clean and professional. And keep in mind my audience for this freebie – the design doesn’t matter so much, they are just really keen (and sometimes desperate) for the information.

For your eBook, you might want to do something a little more glamorous and have an image or some slicker graphics.

There are many templates in Microsoft Word that you can customize to your liking – you can change the font style, size, color and also change images, borders, or background colors.

Simply open up a Microsoft Word document and then click on GALLERY:

Choose from any of the templates you see lined up in a row – Microsoft Word calls these Cover Pages.

Let’s say you choose this template, or Cover Page:

You can easily change the photo to customize it, by right-clicking on the image, then select: CHANGE PICTURE. Like this:

Or, you can just drag and drop a new picture over top of the existing one – not as reliable as “Change Picture” but it can work!

Here’s what it looks like when I have changed the picture and also the color and size of the font for my name:

Pretty spiffy hey? And honestly, that took about 5 minutes.

You then drop in your text on the next page, or start typing your text, and when you’re finished, you save it as a PDF. Done! How easy is that? ~ Love it! ~

Here are two more eBook covers I created using Microsoft Word:

If you have a Mac, you can also use Pages to create some nifty DIY (do-it-yourself) cover templates for your eBooks.

That said, you can also use a great online DIY design tool – Canva which is just superb, easy to use, and mostly free (they charge only for premium pictures and designs, which are still very gently priced). They are especially great if you’re needing lots of social media or blog graphics, but really they’ve got you covered for just about anything.

Here’s a graphic I whipped up in three minutes just to show you how cool Canva is:

How Can I Create My Own Cover For My Project?

Create Your Own Cover

If you know graphic design and have the tools and programs you need, of course you’re way beyond the rest of us and can probably make something awesome in half an hour! But if you’re on the rest-of-us side of that equation, there are still tons of options. If money is super tight, or, if you have a subject matter that lends itself to a more artsy cover, you can easily create your own cover for your book, CD, or DVD. Here are two examples of covers created from hand-drawn artwork:

CD

 BOOK

You’ll have to balance your design aesthetic with your budget and then choose the best design service you can afford. If you can’t afford to pay for design, then don’t let that stop you! At the end of the day, your site visitors and people from your email list KNOW you and they know the quality of your content. They will not be put off purchasing by the fact that your book has a plain cover.

You can also learn, or teach yourself, to use design programs like Photoshop, or try one of the great design tools that are cropping up like Canva, which you can use for free.

So let’s look at some ways you can design and create your own covers for your books, CDs, programs, DVDs, courses and tutorials. Let’s get your creative mind whirling!

There are many ways to create your own professional-looking covers for your products, your program, or eBook, or audio. One way is by placing text on top of a really great photo.

For example, I needed some slides to form the slideshow for the homepage of my LTYG Holistic Health Shoppe – I know this is not a product, but I want to show you a variety of ideas. You could easily adapt this to a book, program, or audio cover!

I bought some images from fotalia.com ($15) and then used Preview on my Mac to add text:

You could also create a basic book, or report, or CD or DVD cover using this same technique. Here are videos showing you exactly how to add words to photos, or images: The first is for PC, the second for Mac.

STEP 1: Open your photo in Preview.app for Mac (or GIMP for PC) by right-clicking on the jpg photo or png photo you want and selecting Open With –>Preview:

Now you’re ready to add words to your photo! These videos will show you how:

How To Add Words To Photos – PC

How To Add Words To Photos – MAC

Audio CD Cover Tutorial

Let me take you step-by-step through how a Freedomite used this Module to create covers for her Audio CD series.

This is how Lori Clarke created one of the covers for her Guided Connection series of audios. The audio is available in digital MP3 format only. So she just wanted a cover that looked good to display on her website and in her shop.

1. First, she painted the butterfly image herself on a canvas, then took a picture of it.

High Quality Photo of Original Butterfly Painting on Canvas:

2. She then drew out her cover idea, and used a graphic designer (sourced on Elance.com) to put it all together with the colors and effects she specified. She paid the designer $12.50 for the cover.

Hand Drawing of her Cover Idea, scanned as jpg (this is what was sent to the designer):

3.  Finished Cover:

Does that look completely professional, or what? Not to mention unique and beautiful.

Note: The reason Lori included her website URL under her name is because the CD will be available on other people’s sites as well as her own. So she wants those viewers (or buyers) to have a way to contact her directly. If this was a physical CD, then she would just include her website, bio information and CD description on the back of the CD. But since it’s purely digital, all that people will see is the front cover.

You can also design your covers completely on your own if you have access to photo editing software (like Photoshop), or use a spiffy online design tool like Canva (free, or you can pay for upgraded images) or if you have Preview on iMac you can also do your own basic work – as I showed you above.

For her next Audio CD cover, Lori decided to play around with Preview.app on her Mac and see what she could create on her own – without having to pay a designer.

Since this painting was a smaller watercolor, Lori scanned it directly into her computer and saved it as a .png (or you could save it as a .jpg too):

She then opened the photo in Preview.app – right-click on the photo and select “Open With…. Preview”:

Her photo then opened in Preview on her Mac computer (or you can use GIMP on PC) and she used Preview to add blocks of color and words to this photo. Here is version #1:

She used the same techniques I showed you in the video above, but she also used Tools -> Annotate -> Add Rectangle to create the border. Then she used Tools -> Annotate -> Add Line to place the lines underneath the title and above her name.

Then Lori did another version of this cover, for Version #2 (below) Lori used Tools -> Annotate -> Add Rectangle to create the border and the colored blocks. She used Tools -> Annotate -> Add Line to place the lines underneath the title block and above her name block.

THEN, before she added the text that appears in the colored blocks (because Preview won’t let you add text on top of a Rectangle), she took a photo of it using the free app SnapNDrag. If you have a PC, you can use Snipping Tool (also free) to take the screenshot photo:

She opened this new photo in Preview again and then used Tools -> Annotate -> Add Text to add the words. And here is the finished .jpg of Version #2:

So let’s see if her two Audio CDs could appear on her Store page, side by side and look good:

What do you think? Although her branding of this product is the same: Guided Connection – which she should trademark as soon as she can afford it – these audios are not part of a series. So, personally, I actually like the fact that they look different. It also makes me look more closely at them. As well, I think that the cover she did herself looks as good as the cover the designer did!

The only thing I would change would be to re-size it to the same dimensions as her original design – the “I Am Enough” cover needs to be narrower in order to match the other one. But she’s nearly there!

Of course, you can use this same technique to create a photo-based cover for your eBook, or DVD, or Workbook, or Manual, etc.

How Do I Get a Cover Made for My Product?

Even if all you can draw is stick men, YES, you can create your own covers (or ads) for your digital content (audios, videos, eBooks, online courses or programs, etc.).

This is an awesome way to put your own energy and intent into your work – which will make it more authentic, powerful and unique. It is also the ideal method to use if you cannot yet afford a full-fledged graphic designer!

Of course, when you give a designer a brief and then get them to modify it until it is exactly what you envisioned, you are also putting your own energy and intention into the process. But when you create the actual cover yourself (or maybe just a piece of it) you are achieving the same result, but at a lowered cost.

The best way to find a graphic designer to help you with the final version, or to polish what you’ve done, is to post the job on Elance.com. Do not even look at a company with a Feedback rating lower than 4.5 stars, or 90% positive. Fiverr.com is another good marketplace to try, and very cheap.

And then look at their actual portfolio to see if they have ALREADY done the type of design you want. Only pick someone who already “gets” and has designed your idea of a good cover.

There is no charge to you to post your project and receive quotes for the job on Elance (the provider pays Elance the brokerage commission). I outsource everything now. My long-term computer programmer for $20/hour is in Pune, India, my latest logo design project was done in Buenos Aires, my forum management (to keep out porn, spam etc.) is done in Assam for $5/hour, my virtual assistants for customer service are in Los Angeles and Washington, etc. etc.

With Fiverr, there is also no registration fee and you simply pay for the Gig with the provider you choose. The money is held until the provider has delivered your project to you.

Book Cover Design

My publishing company (Caramal Publishing) has been running since 1999, and we’ve published 18 books, plus CDs and DVDs, so I’ve had a fair bit of experience and tried a number of different methods.

Your book cover design will vary depending on whether you are only selling an eBook, or if you are also selling a printed book.

An eBook cover is much simpler as you only need the front cover. The design also needs to be cleaner, since it needs to be readable when it is thumbnail size. Here’s an example of two books on Kindle, as they come up in search results, the first one is done well and instantly readable, the second one may look fine in a bookstore, but it is very difficult to read on Kindle:

Amazon’s Kindle has a place where you can easily design and create a cover for your eBook. You can make one based on an image you provide, or select an image from their gallery of stock images, customizable with a variety of different layouts and fonts:

https://kdp.amazon.com/self-publishing/help?topicId=201113520

If you want to get the interior layout of your eBook or Kindle book formatted and a cover design done, definitely use Elance.com to source a cheap-as-chips designer from India, Russia, China, etc. In fact, due to the competition in this marketplace you can often find a North American designer who will quote for only a little bit more.

There is no charge to you to post your project and receive quotes for the job (the provider pays Elance the brokerage commission). If you use Elance.com it will be very cheap to get your eBook, DVD, or CD cover and interior ready and available.

You can also use Elance to have your book formatted and uploaded to Kindle – which can be quite the hassle to do yourself.

Another great place to get your book cover design done, is at BookBaby. They have basic or deluxe design packages at different prices, with a very fast turnaround time. And they can also take care of formatting and uploading your book to Kindle, Nook, Smashwords and other e-reader platforms.

You should also take a look at the eBook designers on Fiverr.com or Microlancer.com as it’s very fast to scroll down the page and find someone quickly whose style you like, and what they charge is listed right there.

For example, this designer from Bulgaria (took me about 4 minutes to find her) shows a great versatility in design, but all have a clean, professional look for – wait for it – only $70 complete!

And last – but not least – don’t forget CreateSpace! Both CreateSpace and Kindle offer free eBook cover creators – where you login and create your own cover from templates they provide. They’re not great, but you will get a decent book cover. Here’s a sample of some CreateSpace cover templates:

The main drawback to using CreateSpace template covers is they do not print on the spine. So when your book sits on a shelf, the spine is blank and you can’t tell which book it is.

Hiring a Designer

If you want to have something more professional – and also make sure it doesn’t look like anybody else’s, then you may want to have a graphic designer do an eBook, or CD, or DVD cover for you.

Or, if you have a series of audios, or DVDs, or ebooks – so each ebook is different, yet they’re part of a series – then you may want to have a designer prepare a unique template for you that you can use for that entire series.

That’s what I did for my Jini’s Healing Guide eBook series. I sourced an eBook cover designer on Elance.com who prepared 6 different designs for me for $60. I then chose this one for my cover design for this series, which sells in my Shoppe and on Kindle:

I then use this same cover for all my eBooks in this series and I just switch out the photo and title. I purchased images from fotalia.com or shutterstock.com, but if you were into photography you could absolutely use your own photos. Here’s another example:

Within 1 week of getting five of these eBooks up on Kindle, I was selling one per day. Not big revenue, but $148/month for automated revenue is nice! Over time, this will increase substantially – once people start leaving reviews and my eBooks rank higher in the Kindle search results.

Here’s what they look like side-by-side in my Shoppe – you can see why I wanted them to look visually distinct, yet also have it obvious that they are part of a series (think Chicken Soup for the Soul – good marketing strategy!):

I then took one of the other designs and had him tweak it to give me a cover for my What You Need To Know About… series. He only charged me an additional $10 to tweak the template design to what I liked:

Here’s what this series looks like in my Shoppe:

Are you getting some ideas and inspiration for your own CDs, DVDs, programs, eBooks – or eBooks you want to create down the road? I hope so!

Remember, to contract a designer to do your book cover or series template for you, you simply hire an eBook designer on Elance.com or Fiverr.com or EnvatoStudio.com


How Do I Launch A New Product Or Program?

Once you’ve created your products or courses, how do you tell people about them? How can you communicate how wonderful your new product is before someone’s experienced it?

Well, good thing you have your blog, and your email list of people who are connected to you and want more from you! You can now use your blog and email list to launch your new product or program to your followers and give them a taste and a preview of what they’ll be getting.

There are quick and simple ways to launch a new product or program, or there are more lengthy, involved product launches.

The type of product launch you decide to do depends on your whether your new product is a simple eBook (for example) or a 6-week long, very intensive, expensive training course.

Obviously, the more complex the product or program, and the more money you are asking people to pay, the longer and more detailed your product launch should be.

A longer, more detailed product launch gives you enough time to address every single question, doubt, or objection someone might have to purchasing. It also gives you enough time to deliver some fantastic content, so people know that your stuff is really good and is worth paying money for.

Simple Product Launch

The simple way to launch a new product or program is to let your email list (including blog subscribers) know about it by:

1. Email everyone on your list with some great info or a free gift related to your new product. So you give the info or gift first, then you tell them about your new product and the special offer you have for them. Make it a timed offer (good only until X date), and/or a special discounted offer (only to my readers).

You provide a link to a webpage or blog post where they can get (sign up for) the free gift and your sales copy with the shopping cart (or PayPal) link is underneath that. Or, you put a download link to the gift right in the email. And then also link to your sales page.

READ the email after you’ve let it sit for 24 hours. If you wouldn’t send it to your best friend, then it’s too salesy or smarmy and you need to re-write it. Pretend you are writing to a friend, not a sales prospect.

Also publish this same email as a blog post, but don’t give a download link to your freebie in a public blog post – make them sign-up to get it. The download links are only for people who are already on your email list. Use your email marketing platform to generate the code for the sign-up box. Then paste that code (in TEXT mode) into your blog post.

*Remember that every email you send, must have an ‘Unsubscribe’ link at the bottom as this is required by United States CAN-SPAM laws.

Here’s what that first email could look like – feel free to use this as a template and just tailor it to your customer and product:

2. You email everyone again about 10 days later with some more information, or help, or video, or a freebie on the same topic. Again, give the offer for your new product after you’ve given the freebie. Make it a timed offer (good only until X date – make sure it’s the same date you gave in the first email!), and/or a special discounted offer (only to my readers). Link to your sales page, or landing page, for your new product. And again, give it the friend-test before sending.

3.  Send a third and final email 24 hours before your special offer will expire.

This next step is very important: Put LAST CHANCE in the subject heading.

It doesn’t matter how you word the Subject heading of your email, just make sure those words, “Last Chance!” are in there. Trust me, we have tested this repeatedly and you will get as many purchases from your ‘last chance’ email as you got from all your previous emails.

You can make this one short and sweet if you like – just re-state your offer, making it clear that this is the last chance to grab it before the offer expires – and you can also provide the links again to the freebies at the end, in case they missed them. Send them to your landing page, or sales page, to read more about your product and purchase it.

And that’s it. Your simple launch of your new product or program is complete.

Do not ever think that you can email your people once about your new product or service and get a good response! Always email at least 3 times.

Now, if offering your new product for sale three times feels too pushy for you (and maybe for your market it is), you can accomplish the same objective, but with a softer sell. Instead of giving the special offer in every email, you focus on giving great free information, or telling stories for the first two emails, and then you only give the sales offer in the last email. Here’s what that kind of a product launch can look like visually:

You then continue to talk about your product in your blog posts and your videos – always sending people to the landing page, or sales page for your product. Perhaps at the end of your next teleseminar, you’re going to promote it again with a special offer. But you won’t promote it again to your list (unless they are new sign-ups) for at least 4 – 6 months. This is how you avoid burning out your list and making people annoyed so that they unsubscribe.

Now I know that a lot of Internet marketers are way more aggressive with their lists than I am. But how many of them do you think have retained the same subscribers for over a decade? And how many of them have a conversion rate from their sign-up forms of 18 – 20%? I’m in it for the long-term and my people know that and love me for it. Most of the Internet marketers giving advice today won’t be around in 10 or 20 years, they are primarily interested in scoring big and moving on.

Of course, you should email your list at the frequency that feels right to you. And by all means, test it and see what gets the best results for your particular niche.

Here’s a Freedomite’s experience from the receiving end:

Once I got familiar with the processes of Internet marketing through LTYF, I became hypersensitive to it being used on me. I am already conditioned to shut down as soon as I feel advertised at, so this added awareness was fascinating to me. My own inbox was a perfect place to learn about marketing – with the curiosity of a potential marketer, but from the point of view of the consumer! I am interested in holistic health and fitness, so I sign up for a lot of freebies as I do my research, and subsequently end up on a ton of lists of people in the same industry.

I noticed that I quickly grew tired of almost anyone who emailed me daily or even bi-weekly, and just unsubscribed from their lists. Their stuff seemed repetitive, insincere, and a waste of my time, making health promises I knew were unfounded or just manipulative.

I also noticed that because I knew how digital delivery worked (i.e. that digital products are effectively infinite), if someone tried to word it to sound like they had limited numbers or copies of a digital product, or otherwise tried to bring the rains of fabricated scarcity down to encourage the sale, I’d call BS immediately. That might work for first-time buyers, but people get savvy quick and the more you rely on assumed ignorance, the more suspicious you’ll make your customers. And suspicion does not a sale make. So I learned that sincerity and respect for your customer – and their intelligence – is paramount! The inbox is a very personal place, so Internet marketers have to be aware of the psychological effects of their approaches.

The same was true for sensationalized (and, eventually, repetitive) subject lines and selly emails, or people who sent me affiliate links to everything under the sun, including protocols and guides that were in direct conflict with that person’s product and philosophy. It made me wonder – if this is the best thing since sliced bread, and so was last week’s special offer, where does that leave your product? It just gets lumped in there with everyone else’s Super Magical Amazing Best Exclusive Life-Changing Offer That Takes 2 Minutes and Tastes Exactly Like Chocolate – eventually, my nervous system is flooded and I no longer feel any response to your buzz words and promises.

Basically, a lot of people emailing me had gone affiliate-happy and were trying to milk their lists for everything and anything, and I noticed that both the frequency and the impersonal/manipulative/insincere/formulaic quality pissed me off and made me jaded. And the only people I ended up buying from were the people who stood out – who seemed more sincere, less grabby, who gave more away for free (so I could really trust they knew their stuff), and who didn’t email me constantly. The people whose emails I actually looked for, and wondered when I didn’t hear from them for a while – those separated the wheat from the chaff for me. So I guess I also learned how personal automated messages can actually be – and that there’s actually an art to all this.>

Most importantly, I realized that people who just were themselves were the ones I inherently trusted – and liked, and bought from – the most. And I realized that, when done like this, email marketing was totally okay with me, instead of being an insidious invasion of my inbox. Which gave me tremendous insight and comfort around the construction of my own eventual email campaigns…”

Segmenting Your List or Permission Marketing

If you are able to segment up your list into the people who are specifically interested in your product (if you have an email marketing program like Infusionsoft), then you can send a longer series of emails to get them excited about your new thing – without ticking anyone off.

If you can segment your list, then you send out your first email announcing a freebie related to the topic of your new product. Everyone that opts-in (signs up) for the freebie is put (segmented) into a new list of people who have expressed an interest in your topic. You can now send more than 3 emails to these people without risking having them unsubscribe, because they have clearly expressed an interest in your topic or product.

Here’s what a longer, detailed product launch – where you are able to tag and segment your list into a group of interested people – may look like visually:

Long Detailed Product Launch

As I mentioned, if you have a high-priced offering, or a training course, or complex offering, then you need to take longer to explain to people all the details and benefits your product or program will give them.

You need to communicate, bit by bit, over time, all the great benefits and address all their doubts, questions and objections to joining you in this fantastic experience.

Running a campaign like this also requires that you have a good email management platform in place. And you will also need other tools, like a way to host a teleseminar, or a call-in Question and Answer session.

So don’t worry if you don’t have the confidence or framework in place to do a launch like this yet. This is one of those units that you can download, or come back to in the future when you are ready.

For those of you who have already had your site up for a while and you’re doing the Listen To Your Freedom program to increase your revenues and lessen your work hours, then this may be the ideal next step for you.

Know that I have paid $3000 for Jeff Walker’s Product Launch Formula and tested his and other marketers’ complex systems extensively. What I’m presenting you with here is what actually works, even though it may not be as exhaustive. Longer doesn’t mean better!

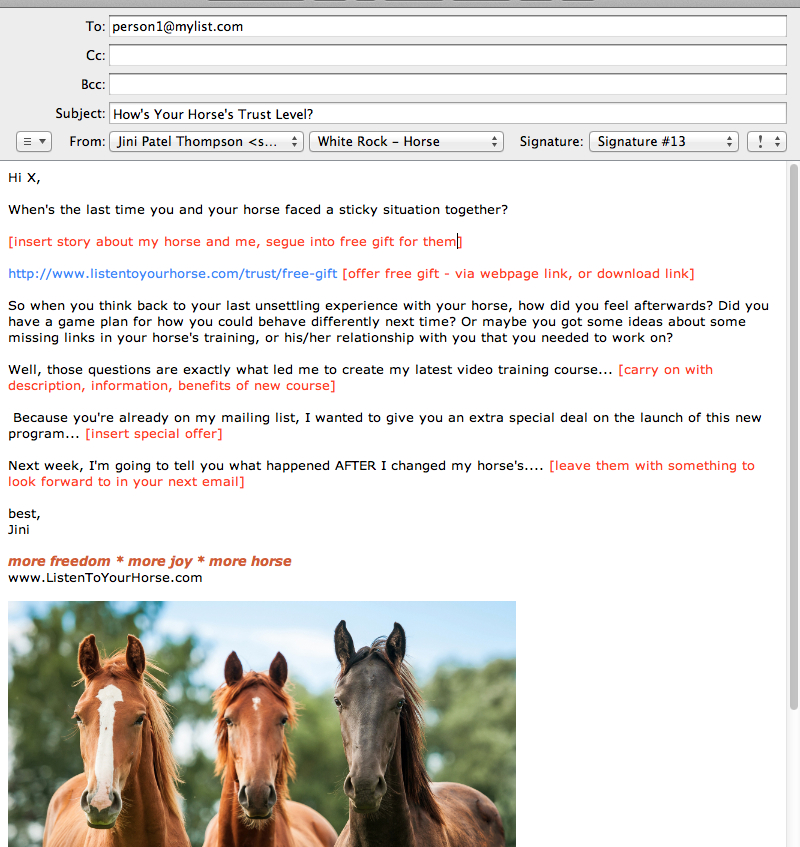
So, for a more complex product launch, you need to have at least these five elements in place:

  1. Host a call-in Q&A session – you can do this via Skype or a teleseminar hosting platform. Tell an exciting or entertaining story that is going to make people want to join you on the call. Show them how being on the call is really going to help them with something they’ve been struggling with.
  1. Host a webinar where you give people further help and instruction – really give away some valuable information for free. But, because the content is directly related to your product, you will also be telling and showing people everything that they will receive and the benefits of each aspect of your product or program.Or at least prepare a video – remember you need to cater to different styles of learning. Send them to your landing page, or sales page, at the end of the webinar or video to read more about your product and have the chance to purchase it.
  1. Give two to three freebies – where the free item is directly related to the item you’re selling. You want to give people a valuable gift for free (audio, video, instruction page, etc.) and also give them a taste of the quality of products you produce, or what working with you (in the case of a training program, consulting package, or workshop) would be like. Again, link to your landing page, or sales page, after giving them the gift, where they can read more about your product and maybe purchase it.
  1. When you send the freebies, you also give them detailed information on the benefits of your product or program – just like in the webinar, but this time it’s in written form. Try to communicate using stories, or testimonials, so you don’t come off as “selly”. Perhaps you also give them the chance to download a PDF with full product info, or link to a video. Send them to your landing page, or sales page, to read more about your product and purchase it.
  1. You must have an email management platform that allows you to sub-divide your list, so that you only continue to email people who have expressed some interest in your first or second email on the topic. If you don’t take the time to segment your list into people who are interested, and people who are not interested, then you risk annoying the uninterested people and having a large number of your list unsubscribe.When you email the people on your “interested” list, be sure and have an ‘Unsubscribe’ link at the bottom that takes them out of this product launch, but ideally, not out of your main database. Remember that every email you send, must have an ‘Unsubscribe’ link at the bottom as this is required by United States CAN-SPAM laws.

Swipe From Others

One of the best ways to figure out what kind of product launch you like and which formats and emails suit your message, is to subscribe to other people’s email lists so that you are on the receiving end of one of their product launches.

Always, always look to your competitors or people you admire to see how they are doing things. Then you can pick and choose the elements that resonate with you. You can also use their emails as templates to design your own.

Successful people who are good at doing product launches include:

You could just get on their email list, then the next time they do a product launch, save all their emails to you in a separate folder, and then pretty much copy each one (tailoring to your product and your audience of course) to form your own product launch.

No, this is not plagiarizing, because you are changing all the words to suit your product, or program and your audience. What you are swiping is the framework, or the concept behind the sequence – and that is done all the time, in art, in science and yes, in business.

Swipe From Me!

You can also receive the full product launch sequence for either my healthy gut guide, 7 Steps To A Healthier Gut

Or sign up for Jini’s 7 Freedom Steps at Listen To Your Freedom (if you don’t have it already) and copy that. BUT be sure and use a different email from the one you first signed up with – if you are already on my list, you won’t receive the same email sequence as a newbie.

Then save every email I send you into a separate folder and perhaps even print them out. Spread them out in front of you when you get to the end and you will have a step-by-step guide of what to do and how to do it.

The benefit to signing up to my list again (use a different email) is that you will experience the timing of the emails and get a feeling for the process.

As you receive each one – you could swipe the framework and come up with your own email (launching your product to your people), so that by the end of seven weeks, you have your own launch sequence completed!

Also, keep in mind you don’t need to have seven emails – you could have three, or five, or ten. Whatever feels right to you and whatever YOU would like to receive.

Your Landing Page

Whether you choose to do a simple product launch, or a more complex product launch, it’s a good idea to use your email sequence to drive your people to a landing page, or to a sales page, where you tell them in detail about your product and offer them the chance to buy it.

And don’t worry, we’ll be talking extensively about what to put on your sales page when you’re ready to make one!

So to summarize, for both the simple product launch, or the long, detailed product launch (outlined above), your sequence will look like this

  1. Email your list. OR Create a compelling sign-up offer – then email out your timed (one email per week) launch sequence to your opt-ins.
  2. Create a landing page, or sales page, on your website, which you link to in all your emails in the sequence.
  3. Give out the URL for that landing page everywhere you talk about your product, in your blog, teleseminars, interviews, etc.

For example, let’s say I wanted to follow this format for Listen To Your Freedom. But instead of having just a landing page, I wanted to spice it up by adding a squeeze page as well (which pretty much forces them to give me their name and email if they want to see more), before I will tell them what the course is about.

Why would I do this? Well, the situations this type of “squeeze” tactic would be appropriate for (and actually benefit the visitor) is when your product is too complicated or detailed to explain adequately in a webpage, or one email. If you have a high-priced product, people really need to understand WHY your product or service is worth every penny you’re asking. And it’s pretty hard to communicate all the benefits they will experience in just an email or two.

So in this instance, I may want to have a Landing Page that gives a brief outline, with top benefits offered (video is a great way to communicate this) and one that really identifies my ideal customer. Like this one:

1. Landing Page

Next, when they click the OPEN button on this Landing Page, they are sent over to this Squeeze Page – where the primary purpose is to give them sufficient reason/motivation to give me their name and email. I do this by offering them something valuable:

2. Squeeze Page

Lastly, now that I have their name and email, so I can continue to build the relationship, I give them access to the Sales Page. Although I do not expect anyone to buy the program at this point! People need more time and space and they need to actually experience the power of my stuff before they’ll part with this kind of money. And I understand that. That’s why it’s crucial that I offered them something valuable for free first on my Squeeze Page, so they can get a really good sense/taste of how I can help them.

3. Sales Page

In the emails I send them ongoing – where I continue to give them excellent, valuable free stuff to develop and deepen our relationship – I will continue to include a link to this sales page. That way, when they are ready, they have easy access to take action right away and purchase.

However, when you’re first starting out, or if you have a lower priced product, then you may only need a sales page with an opt-in offer on that page – which can also be called your landing page, since they don’t go anywhere else afterwards.

Your landing page (which can also be your sales page), is very simply where you speak from your heart about your product. Where you address all the pain points, or problems your visitor is facing, and you tell them about your solution(s).

Make sure you also put your opt-in offer on your landing/sales page. Maybe that person came from a blog link, or was referred by a friend, so make sure they can always opt-in to your launch sequence to learn more about you and start developing a trusting relationship with you.

One point: If you want to build suspense, you don’t have to link to your sales page in every email – you may choose to save that for the last two emails. Whichever way you feel is best.

Where Should I Host My Landing Page?

At this point you may be wondering: Is it best to host my landing page on a separate URL, or incorporate it into my main site? And should I have the main menu showing, or not – so that people cannot click away from the page?

Some people have a landing page that only offers one option – for example they want the visitor to sign-up for a free audio, or video. There are no other options or links available on the page. That’s what I showed you in the Listen To Your Freedom example above. Statistically, that method works.

Personally, I don’t like to use this method unless I have to! I don’t like to force people to do things. I prefer to give people a choice, trusting that when the time is right, they will get with me.

But as I explained in the LTYF example above, there are times when this approach is actually the best way to serve your visitor and provide for their needs. You may have a product or program that is ideally suited to that kind of landing page – listen to your gut.

If you do go that route, then after opting-in, the person will then be transferred (automatic url-forward) to your sales page where you will give them all the details about your product, or seminar, or course.

Some people like to use a paid plugin for WordPress called OptimizePress to design and host their landing pages, so check them out as they are a great option. You do need to check first that OptimizePress will integrate easily with your shopping cart, or email marketing program though.

If you are with Infusionsoft, you can create landing pages easily within your account.

For myself, I usually just create a Page on my site and I pay my designer to create some nice forms, charts, boxes, or graphics for me, as desired.

There is no right/wrong choice here – just ask yourself: If I was coming to this page, what would I like to see? How would I like to be treated? And then just do what YOU would like! It really is that simple.

Whichever way you choose to go, make sure your landing page, or sales page:

  1. Looks really good; inviting and attractive.
  2. Works well and looks good on mobile devices (responsive design) like cell phones, iPads, tablets, etc.
  3. Make sure your page loads quickly (1 second or less) and any audio or video plays instantly, without glitches.

If you don’t want to link to a dedicated landing page, you could also link to your shop listing for the product, or your Amazon listing.

Get Your Affiliates To Promote Your Program or Product

Here’s a way to ensure that the people you would love to joint-venture with (have them promote your product to their list) agree to do so: By making them part of your product!

For example, if your product is a teleseminar series, then you can invite Guru X to be one of the people you interview for the series.

Think about it. If Guru X is featured in your series, is he likely to send an email or two out to his list (with his affiliate link) telling them about the series? Most likely, yes.

Here’s an email template I used to procure guests for Listen To Your Freedom. Feel free to swipe it! Remember that swiping doesn’t mean plagiarize; it means use it as a template, a guide, and change all the words to your own.

***********************

Hi X,

I’m a big fan of your…[describe what I love about their book, product, blog, etc.]

I currently have a list of 45,000 from my health site (ListenToYourGut.com) and I would love to introduce them to what you are doing.

Let me explain: After repeated requests from my readers of, HOW DO I GET YOUR LIFE? I created a 24-Module, comprehensive business training program that shows people how to build an automated, online business – at their own pace, doing what they love – to create their idea of freedom.

So I am in the final stages of creating and uploading this program – called Listen To Your Freedom – to the site and I realized that an interview with you would really be great in Module X.xxx.

I already have content from Seth Godin, Pamela Slim, Pat Flynn and Bernadette Jiwa, so rest assured you would be in good company.

Well, let me know if that interests you and of course, whatever we create you are also free to use however you wish with your list. I’m thinking a 45-minute interview about [insert topic] would really showcase your expertise.

My style is fun, good energy, down-to-earth and honest/transparent. My primary goal is get great tools out to people in a dialogue of trust and openness.

I look forward to hearing from you (i.e. please say yes!),

Jini

p.s. Here’s a recent interview I did with Annabel Fisher on How To Leverage & Multi-Purpose Your Content, so you can get a feel for what I’m doing:
[link to mp3 interview]

***********************

There are three things I want you to notice about this email:

1. Notice this sentence in my email that lends social proof (evidence from peers) to what I’m asking them to do:

I already have content from Seth Godin, Pamela Slim, Pat Flynn and Bernadette Jiwa, so rest assured you would be in good company.

They probably assumed I also had interviews with these well-known biz people. But I did not say that, I said “content” and what I actually mean there is that I quoted from their blogs or books. But of course, I’m happy for them to assume!

2. Notice the first sentence of my email:

I’m a big fan of your…[describe what I love about their book, product, blog, etc.]

I did not talk about ME. I talked about them and what I loved about their work. Think about it. If I started out talking about me, it screams out ‘this person wants something from me!’ So right away my email recipient would take an energetic step back and become wary or jaded.

By starting out with what I love about their work, they are feeling appreciated and I’m also showing them that I ‘get’ them and I’ve done my homework (inspires confidence).

3. Notice my second paragraph:

I currently have a list of 45,000 from my health site (ListenToYourGut.com) and I would love to introduce them to what you are doing.

I have a big point of leverage when approaching people because I have a large email list. But if you didn’t have a list, or only a small one, you could replace this sentence with:

I specialize in [what you do, eg. I would write: natural healing for gut disorders] and I would love to introduce my readers to what you are doing.

You would then go on to describe the product you are creating (as I did) and if the idea is exciting, or appealing, or admirable – combined with points 1 and 2, they will most likely agree to the interview.

You can use this same type of email to approach people you would like to do a teleseminar with, or feature on your blog. Just remember to always open by talking about what you love about them, or their work, or a specific article they wrote. Then move onto talking about your idea, your venture, or your proposition.

Your Turn

Let’s take everything you’ve learned in this unit and put it into action – by planning out your first (or next) product launch!


Are you excited about officially launching your first product?! Let’s plan it out… Choose ONE of your products that you want to launch and write the name or title down here:

____________________________________________________________________________

____________________________________________________________________________

Is this product suited to a simple product launch, or is it an expensive or large product that needs a more complex product launch?


Do you need to create an attractive, compelling opt-in offer (freebie) to get things rolling, or are you just going to email your existing list, or both?

How many emails are you going to include in your launch sequence?___________________

Are you going to drive people to a landing page, sales pages, shop listing, or Amazon listing? What is the URL?


Now plan out your launch sequence emails – what are you going to say? What freebies
are you going to o er? Are you going to link to any blog posts, or videos? Pretend you are writing to your friend or cousin and write out each of the emails in your sequence (or at least bulletpoint plan them here and do the writing in your email program, to save yourself time):


Remember that when it comes time to write and design your product sales page, that we have really great instructions for what to include, how to price your product and how to position it to your ideal customer.

Okay, now let’s get into some specifics about selling more books – because I know many of you are going to start with a book or eBook as your first product. And why not? An eBook is one of the easiest and cheapest products to create, yet has great value and positions you as an expert in your niche. Onto the next unit…!


How Do I Leverage and Multi-Purpose My Content?

13_31Jini Patel Thompson talks to EFT (Emotional Freedom Techniques) Trainer & Mentor, Annabel Fisher, and gets all the details, pricing, etc. of how Annabel went from doing one-on-one sessions where her time was worth $150/hour to leveraging her expertise into group sessions where her time is worth $492/hour. And then multi-purposing (leveraging) her content even further into digital, automated programs where she is no longer trading her personal time for money, but is making money as she sleeps, or visits with friends!

Annabel shares her process, but also what blocked her from leveraging her expertise and content, and what slowed her down – and how you can avoid making the same mistakes.

This is a fantastic, behind-the-scenes look at the process of leveraging or multi-purposing your content in a way that breaks it down and really shows you how easy it is.

DOWNLOAD How To Leverage & Multi-Purpose Your Content: (Right-click and Save As… to your computer)

Or click the PLAY button below:

[sc_embed_player fileurl=”http://listentofreedom.s3.amazonaws.com/leverage-your-content.mp3″]

Hopefully you now have a good understanding of how to leverage and multi-purpose the same content into a variety of different products – that sell for different price points. Let’s brainstorm ways you can leverage or multi-purpose some of your content…


After listening to the audio with Annabel Fisher, how can you apply these ideas for leveraging or multi-purposing content to your existing products, or the ones you’re thinking of creating?


How Do I Leverage FAQs into Paid Products or Programs?

There are so many ways you can turn your information or solutions into products. But what if you’re not sure HOW to compile that information, or WHAT solutions your tribe needs or wants? Well, in this unit, we’re going to look at ways you can take the common questions, or feedback from people in your niche and leverage it into content (products).

Leveraging your content means that you take it from the current form it’s in and offer it in a different way, which increases the perceived value of the product. When you leverage your content, you package it up as different products that showcase your information or expertise to maximum advantage.

Leverage Your FAQs Into Products or Programs

For example, if you published an eBook comprised of your forum FAQs, what value would people place on that? What would YOU be willing to pay for an eBook of Website FAQs? Not too much, eh?

But what if you looked at your FAQs and you realized that one of your tribe’s biggest problems (for which they are begging for a solution) is… how to ensure their pipes don’t freeze in winter (for example). If burst pipes carry a $2,000 repair tag, how valuable would an eBook be that taught them How To Make SURE Your Pipes NEVER Burst In Even The Worst Winter…? Now how valuable is that eBook, which contains exactly the same information as the Site FAQ eBook?

So although this type of content starts from an FAQ, it is NOT positioned, nor presented as an FAQ (which has a low perceived value). It may be the exact same content or information, but it is positioned as X Training, or a Course, or Seminar, or Solution.

Just be sure to deliver detailed answers that give enough information for the person to be able to take action, or achieve clarity, or move forward in some way. Even if you are going to make this piece your freebie, NEVER NEVER give away poor quality stuff for free. Why would I give you money when you have shown me you do a poor job, and don’t really know what you’re talking about? Make sure your free stuff is your best stuff that really showcases your strengths.

Your customer’s or site visitor’s FAQs are also their most pressing problems. So when you give them solutions to their top problems, you are positioning yourself as the expert and the person who can really help them move forward.

Use Anyone’s FAQs! 

Keep in mind, that your customer’s FAQs (frequently asked questions) don’t have to come from your own blog, or forum, or Facebook page! As you participate in, or research niche forums or blogs, you will begin to notice that people are asking the same questions over and over again. Even reading product reviews on Amazon, you may notice that people have the same concerns or problems.

So it doesn’t matter where those FAQs come from, what’s important is what they tell you about where people are searching for answers and solutions. And if you provide those solutions, you know you will have a pool of people interested in what you have to say.

Just remember what I said above and do NOT position your eBook, or Report, or video, or audio as an FAQ compilation! Make sure you position it as a SOLUTION to the problem(s).

To illustrate what I mean, the following examples contain exactly the same content and the topics are pulled from FAQs, but you will see how the positioning, or presentation of the content (as a solution to a problem) completely changes how you feel about the value of each.

So which do you feel is more valuable?:

High School Grads FAQ
or
How To Choose The Best College And Maximize Your Potential

Mogul Skiing FAQs
or
How To Dominate Moguls In 3 Days Easy

New Car Buyer Q&A
or
How To Save $250 in Gas By Treating Your New Car Right

Notice how for each of the good titles, they also contain a benefit. The benefit (good things the person will experience) always comes first. The features, or details, or specifications, come afterwards.

Also, look at the examples again and see how each one of these could take any format! They all could be made available in any of these forms:

  • An eBook
  • A course
  • A workshop
  • A teleseminar
  • A webinar
  • An audio recording, lecture style
  • A consultation
  • A video or DVD

How To Do It

Now that you’re starting to understand what I mean, let me walk you through exactly how to take those lovely FAQs from your people and turn them into products your people will love to have. Don’t worry, we will cover selling and delivering those products to your customer. In this bit we’re just focusing on product creation and getting it ready to sell.

When you build your business upon listening to your tribe and giving them what they are asking for, you will never be looking for revenue streams. Every single product and service in my health business (350+) has come from offering people the same solutions or products that I use myself, or from people asking me, “Could you PLEASE do this…” or “It would be helpful if…”

But where do your site visitor FAQ (frequently asked questions) come from? Ah, well now we are into the value of your blog, your videos, your Facebook page and other forms of social media where your tribe can interact with you. I’ll give you lots of ideas and instruction on how to engage your audience and get a dialogue going.

Another way to quickly gather your people’s top pressing questions is to survey your email list. Have you set up your opt-in or sign-up offer so you can begin collecting names and emails for your email list? Even if you only have 20 or 30 people on your list right now, that’s enough to start.

Ask them what their current challenges and difficulties are. Use a free service like SurveyMonkey.com and then create products that provide the solutions to those challenges, or difficulties, or desires. Or send them an email, or blog about a specific topic, and at the end of the email or blog post, ask them to share their frustrations or experiences around that topic.

If people keep asking me the same question over and over, it tells me that I am currently not providing them with that solution – so I better create it! If it’s a small question, I’m at the point now where I’ll make the answer a freebie – either a blog post, or a teleseminar, or video, or free eBook. For the answers that require a more in-depth response, those I’ll monetize and sell as an eBook or printed book, or teleseminar, or DVD.

Lastly, don’t forget to hang out in other people’s forums and blogs that cater to your niche and you’ll be able to glean some good FAQs from their tribes too. Now let’s brainstorm how to gather some of your own FAQs…


Where are your current FAQs coming from? And where can you go to glean more and get even more in touch with your tribe’s pain points, or difficulties, or challenges?


Here are some quick and easy ways you can listen to your people and then give them the solutions to the questions they are asking you – and thereby create your first products! For each of these product ideas, you can then decide whether to make it a free or monetized product.

*Remember: For each of the ideas below, do not present, title, position, or refer to them as FAQs or Q&A! Always present the topic, the idea, or the question as a lead-in.

For example:

WRONG: “Here’s a question from my blog: How can I stop my pipes from freezing in the winter?”

RIGHT: “Let’s talk about how you can make absolutely sure your pipes don’t freeze this winter.”

Stay with me as I go through each of the product ideas below and you will see why it is best to present your topics this way.

Basically, if your content was always going to stay free (low perceived value), then you could call it a question, or FAQ, or whatever you wanted! But if you decide later to package up that information (your replies) you may then have to do extensive editing, or even re-do the exact same information in order to position it as a paid product.

Okay, let’s get started and you’ll see what I mean.

Here are the different ways you can leverage (package up) your FAQs into paid products:

Every week do a Q&A video. Each video features one of your customer’s FAQs (but remember, you DON’T EVER call them FAQs or Q&A! You simply present the question or the topic. The video could either be you presenting live, or a PowerPoint video, or a screenshot video, with your voice accompanying it. You can publish these single-topic videos to your public YouTube account – which will also help you generate search engine traffic for these topics (videos often rank higher in search engines than text, as there is less competition).

PACKAGE IT UP – Then take 6 to 10 of these videos and package them together into a Training Course with a cohesive theme or solution, where you email out the webpage link to one video per week. You would add an additional video at the end, or perhaps also at the beginning of the course, which are not available anywhere for free. NOTE: You would need to have a private video hosting account for this option, which is about $199 per year: Vimeo Pro.

Or, if your budget is tight, you could publish all the videos to a public YouTube account, but your Training Course has the videos embedded on a private, password-protected Page on your WordPress site, along with some customized text from you, or perhaps a quiz, or a download link to a PDF, or audio. In this way you are providing additional, private content so your customer feels the value of what s/he has purchased. But don’t upload the videos to your regular YouTube channel, where your people are likely to see them. Instead, create a second channel (that you don’t list or promote) and upload them there.

Every week (or month) do a Q&A blog post. Each blog post gives your detailed answer to one of your customer’s most frequently asked questions.

PACKAGE IT UP – Then take 6 to 8 of these blog posts and package them together into a more detailed Training Course or email Mini-Course (all relating to a central theme, or problem, or skill, etc.); where you email out one training, or action step per week. Again, you can copy/paste your public blog posts onto private, password-protected Pages. So when you email out each weekly piece, you give the link to the private page, along with the password for access.

You may be wondering: But won’t people get mad that they paid for content that is freely available on my blog? Honestly, I would be surprised if even ONE person contacted you about this! This is because people don’t know all the content you have on your blog. It is highly unlikely that anyone will have already read, and remembered more than 1 or 2 of your posts on that topic. But if that happened, of course you could issue a refund. And of course, you could also do the same thing I suggested above, and create some additional text, or a link to download a PDF, or audio, for those private Pages to differentiate them from the free blog posts.

Combine weekly videos with blog posts. Follow the exact same instructions above, but mix it up! Some weeks you give a video, others you send an email tutorial, or a PDF they can download. You can also add audio MP3s to this mix. Whatever you have, whichever way you prefer to present your stuff (content, information), it’s all good.

If you are only offering the occasional video (maximum of 3 videos), then you can upload these videos to a free platform like YouTube and it will not devalue the price people have paid for the program. But don’t upload them to your regular channel, where your people are likely to see them. Instead, create a second channel (that you don’t list or promote) and upload them there.

Turn your FAQs into an eBook. Again, you do NOT call this ebook FAQs, or Q&A with Jini – which has a low perceived value. Instead, you take all your FAQs around a particular topic – the ones that combined together solve a problem, or give a solution, and your eBook is the detailed solution to that common problem.

For example, let’s say you have a life coaching business and you continually get questions about procrastination. Or perhaps your clients and site visitors have a hard time believing in themselves and their lack of worthiness leads to sabotage in their life or business. For sure, you have already received tons of questions on both these topics and no doubt written lots of blog posts answering those questions too.

Well, guess what? Just compile all those blog posts, client emails and FAQs together and you now have two eBooks; one on How To Stop Procrastination Cold & Claim Your Success and the other on Top Ten Ways to Finally Have Faith in Yourself & Feel Empowered.

Remember Pat Flynn? Here’s what he has to say about packaging up your blog post content into an eBook:

“When I was creating my very first product, an eBook for my site at greenexamacademy.com, one thought kept racing through my head:

Why would anyone pay for this?!

“You see, I had built a blog that had all of the content one would need to pass the exam for which the site was about – and it was all free! So to package it into an eBook and sell it almost seemed like a sin to me.

“Again, why would anyone want to pay for an eBook that has the exact same information that could be found for free on my site?

“Fast forward to today and over 10,000 copies of the eBook sold – not one person has ever complained about the content of the eBook being the same as what could be found on the site.

“Not one. Why do you think that is? Because the eBook was convenient – and people will pay for convenience.

Right, hopefully we’ve put that roadblock to bed and you’re freed up just a little bit more about multi-purposing your content.

Note: We’ll be covering book and eBook creation in depth later on.

Weekly or Monthly Teleseminar Series. Craft a series of teleseminars around the top FAQs (problems/solutions) that your customers experience. Invite an expert to be your guest for each one – make sure you choose someone that has real value to offer.

Make it free for people to join the calls, or listen to the replay each week. You only have to offer this live once (note: avoid date or seasonal references in the calls). Thereafter, you simply send a link to the replay page. The replay page is a hidden webpage on your site, where they can listen to the call – with WordPress, it’s not hard at all to set up hidden webpages.

Now take five or six of those teleseminars and put them together to form a series. If you have been solving your customer’s top problems, you will easily be able to pull a theme or themes from the content you created.

Let’s say you did 10 teleseminars on different challenges faced by authors of young adult novels. You can now package these together into a course on: How to Write a Young Adult Novel and Publish It on Kindle.

You could also choose to split this content into two courses. One on how to write the novel and the second on how to publish your novel and sell it as an eBook, or printed book.

Depending on your audience and type of content, you may also want to have each teleseminar transcribed into PDFs. If they contain lots of instructions, or formulas, or more concrete information, then PDFs are a good idea – so you offer both the audio and written transcript for your course.

If your content is more about inspiration, or clarity or concepts, then leaving them as audio-only is fine. Although you could charge more for an Audio + eBook, so for lighter content you may want to still do the book, but lay it out with lots of graphics, or printable charts; make it visually appealing.

Bonus: Of course, if you have the teleseminars transcribed, you can then put the text together and form an eBook, or printed book. Remember that different people prefer to learn in different ways. Maybe each teleseminar could be one chapter of your book. Some may prefer to buy your content in Audio teleseminar format and others in eBook or printed book format. You will also get some people who will buy both.

Video or Blog Post-based Course. Remember above, where you turned your reader FAQs into a weekly blog post, or a weekly video Q & A? Well, you can follow exactly the same format to create a course or training program, but make it even more in-depth.

You can still give your simple, or weekly Q&A away for free to build your audience, your exposure and your reputation (positioning you as an expert), but you can expand on each topic, go more in-depth to increase their value, and monetize them.

For example, your weekly public videos or blog posts contain a plan, but your monetized course offers the detailed implementation steps for that plan, or walks the person through it, broken down into step-by-step action modules, or, combines the detailed plan with a private consultation.

Example 1: So if you have a health business, your free course (PDF, eBook, or video) tells people which herbs to use to cure acne and then briefly tells them about each herb (constituents, history, extraction, picture) and gives a few people’s stories. Your monetized course or eBook (the one they have to pay for) gives this same information, but also gives the exact dosages and application instructions along with more detail, more photos and more stories.

Example 2: If you have a fitness business, your free course (PDF, eBook, video, or audio) gives people a brief outline of the top 5 most popular workouts to lose weight and sculpt different types of physiques (big and muscular, lean and sinewy, strong but smooth, elegant muscles, etc.) and a photo of what these physiques look like. Your monetized eBook, or training package has people select the type of body they want from the 5 physiques and then they receive a more detailed eBooklet on that specific training method along with an instructional workout video where you lead them through three workouts (beginner, intermediate, advanced) to create that physique.

Example 3: If you are a financial planner, your free course (PDF, eBook, video, or audio) has outlined the Top 10 strategies for maximum growth with varying risk levels. Your monetized package includes an instructional video on 1 to 3 of these strategies (walking them through real life application examples), combined with a one-hour private consult to apply the strategy of their choice to their own portfolio in a way that will maximize their results.

Okay, let’s break here and take some time to write down the ideas and inspiration you have for the products YOU can create for your tribe…


Take some time to write down the ideas and inspiration you have for the products YOU can create for your tribe. Which of the formats we discussed (video, blog post, eBook, teleseminar, online course) twigged your interest? How would you like to turn your tribe’s FAQs into products or programs? Write any and all ideas here:


What’s the ONE easiest product for you to create right now? Pick the one that either draws you most strongly, or is the easiest, and start with that. Perhaps you want to start with just a PDF-format eBook, or a single MP3 audio. When you’re just starting out, it’s nice to pick something easy so you can gain confidence, satisfaction and fluency in your new business.


How Do I Design the Look and Feel of My Site?

We’re going to explore how to visually design and present your site according to colour, so that you are evoking the desired response in your site visitors and also appealing to your ideal customer.

How do you want people to FEEL when they come to your site? This is a key decision as your language, colors, images, etc. will all reflect or embody the feelings you want people to experience. Do you want them to feel:

  • Happy/cheerful
  • Professional/reliable
  • Zen/centered
  • Cozy/cocooning
  • Wild/outrageous
  • Adventurous/excitement
  • etc.

For this step to be really fruitful, it’s really essential to be able to define exactly who your customer is. Once you’ve have a really clear idea of who your site is for, you’ll want to pull out all the details about just your customer’s EMOTIONAL state:

  1. Where they’re coming from (emotionally); what is your visitor feeling at the moment when they click through to your site?
  1. What might make them feel better?
  1. What and how do you want them to feel when they reach your site?
  1. What are their primary emotional needs? Do they need or want to feel safe, happy, protected, loved, inspired, excited, creative, calmed, taken care of, cosseted, nurtured, challenged, macho, tough, feminine, masculine, dainty, etc. – the list is endless!

If you’ve already developed a customer profile, let’s run through each of the questions above to further nail down your customer’s emotional reality.

You can see from the GoPro site screenshot below, that they have answered all of these questions and their site colors and photos are designed to appeal to and engage their customer; primarily male, aged 20-45, loves high speed or challenging, action sports. Notice the colors the skier is wearing – none of this is by accident! Part of the reason GoPro has been so successful is they know their customer intimately and so the word-of-mouth on what you can DO with their cameras (benefits, not features!) has driven their sales faster than any marketing campaign.

After you’ve answered each of these questions, you’ll be primed to put all your investigation into writing – and then action, as you create a website that appeals and attracts your ideal customer! Grab your notebook and write whatever comes to mind when you read these questions:


  1. What is the emotional state of your customer when they arrive at your site?  “My customer feels…”:
  2. What are your customer’s emotional needs? “My customer wants to feel…”:
  3. What is the feeling (or the feelings) you want to convey to your visitors and customers when they arrive at your site? “My site makes my customers feel…”
    Hint: yes, pull from your answer to #2 above and then add anything else you think would be good for them to feel, enjoy, or experience when they come to your site:

Use this list for inspiration if you’re stuck:

Safe, happy, protected, loved, inspired, excited, creative, calmed, taken care of, cosseted, nurtured, challenged, macho, tough, feminine, masculine, dainty, reassured, convicted, free, vibrant, hopeful, visionary, homey, artsy, sporty, capable, light, powerful, raunchy, beautiful, owing, edgy, sleek, etc.


Now, remember what I said at the very beginning of this page? That your language, colors, images, etc. will all reflect or embody the feelings you want people to experience on your site.

Now that you know a lot more about your customers’ existing feelings and how you want them to feel while visiting your site, let’s distill those feelings down and simplify them. Overall, do you want them to feel?:

Happy/cheerful
Professional/reliable
Zen/centered
Cosy/cocooning
Wild/outrageous
Adventurous/excitement
Safe/nurtured
_______________________(add yours here)

_______________________(add yours here)

_______________________(add yours here)


Awesome! Now that you know in very simple terms (a few words) what you want your site visitor to feel, we can move on to choosing the colors that evoke those emotions.

Start by choosing the colors that resonate with you and represent the ‘feeling’ of what you do and the emotions you want your site visitor to feel. Don’t worry, we will get deeper into site design, but for now, let’s just focus on the look and feel of your site.

Remember that different colors give the viewer different feelings. Also, colors on their own (a single color) can convey a vastly different feeling than that same color used in combination.

For example, if you wanted someone to feel safe, you wouldn’t use red and black. But if you wanted someone to feel macho, adrenaline, assertive, then red and black would be perfect colors. On the other hand, red and orange would be a good combination if you wanted your site visitors to feel creative, or luxurious, or sumptuous but in an edgy or earthy kind of way (think Bali).

So before I start filling your mind with what other people (the experts) think about color, I want you to take a few moments, close your eyes, and imagine the colors that you feel would convey the desired emotional experience to your site visitors.


Write your thoughts here about the colors and combinations of colors you feel would be great for your site. There’s no right or wrong here and no one’s going to see your answers, so just let your imagination roam!: