 We’ve talked often in Listen To Your Freedom about how people have different learning styles and preferences. So while some people prefer a book, or online course and workbook, others prefer learning via video or audio.
So when you’re deciding which format (audio, video, written) to present your solutions or information in, it helps to take into account all of these factors:
- What do YOU enjoy doing? Do you prefer writing, or video, or speaking (audio)?
- What does your customer prefer, and what do they need, based on their lifestyle?
- What are you able to do, and what can you afford to do at this time? It is better to just produce something simple, rather than waiting for your ideal scenario.
For me, audio is one of the easiest ways to develop and package content. Probably because I find it quite easy to speak, or read aloud, and I make very few mistakes when I’m speaking – so I don’t need to do much editing.
But let’s say you’ve already written a book or eBook. Well, creating an audio version of the book is an easy next step – and some customers will buy both.
Or perhaps you want to provide additional in-depth training in your audio course.
Or perhaps your book, or online course is really huge, so you want to chunk it down into stand-alone units and each unit consists of three one-hour audios.
All you need to create an audio course is a high-quality microphone that plugs into your computer, and Audacity, a free, easy-to-use recording software. Or, you can use a teleseminar recording service, and you dial into it with a corded, land-line telephone (ensures good quality).
Microphone Recording
If you want to use a microphone to record MP3 files directly onto your computer, you have a few different ways to go, Premium, Mid-Level, or Budget Bob. Let’s start at the top…
Premium Recording Set-Up
 The Shure PG-42 USB mic is a really good microphone (about $249) that plugs right into the microphone jack on your computer. It will give you the clearest, best quality audio and can be used to record singing as well. Keep in mind though, that for a microphone of this quality, you also need to have a fairly quiet room to record in.
Unless you can completely avoid popping your “P” sounds (which causes a bit of a muffled boom in the recording), you also need to purchase a microphone pop filter. And by the way, the only way you can completely avoid popping your “P”s is to not pronounce them!
The Nady MPF-6 Clamp On Microphone Pop Filter is a good one, at a really good price (about $18).
You then can record onto Audacity (free for both Mac and PC), or GarageBand (Mac) or the very high-end Pro Tools for Mac or PC (really not needed unless you’re recording music).
However, please know that there is NO point in getting super high quality recording tools if you don’t have a soundproofed place to record in! Remember that the finer your equipment, the greater range and quality of sound it will record. So yes, it will pick up the crows outside, your washing machine, someone knocking on your front door, and your chair creaking.
Next, your recording room would also need to be set up to create a good quality or timbre of sound. For example, hardwood floors, bare walls and windows are all hard surfaces that the sound will bounce off of. So you need carpet on the floor, and rugs or thick fabrics covering the walls and windows (or egg cartons work well too).
Mid-Range Recording Set-Up
 Now let’s look at the mid-range: A much cheaper mic, that has also gotten rave reviews from podcasters and Internet radio show hosts is the Audio-Technica ATR2100 USB/XLR Microphone. At only $53, it is far cheaper than the Shure mic listed above. But if all you’re doing is recording audio products (no singing) then this will likely be just the ticket. It plugs into your computer via a USB cord. It also comes with a mic stand for your desk, so you don’t have to hold it.
Then you would also purchase this Reduce Pop and Windscreen Mic Cover to place over your mic head and help get rid of those popping-P sounds – since it’s less than $3 you might as well get it, then do a test recording with it and without and see which works better for your voice.
Here’s my test recording, done in my office using the Audio-Technica microphone and the mic cover, recorded using Audacity:
Click the PLAY button [sc_embed_player fileurl=”http://listentofreedom.s3.amazonaws.com/audiotechnica-USB-test.mp3″]
Alternatively, you could wear a headset microphone that plugs directly into your computer. Again, it is best to get one that is corded for bes t quality and no interference during transmission. Just make sure it is compatible with your computer. Here are two good quality headsets that you could use:
Plantronics Audio 326 Stereo PC (plugs into the microphone jacks on your computer) – note this one is only for use with a PC, it will not work with a Mac, unless you buy an adapter (about $13).
Plantronics Audio 478 Stereo USB Headset Microphone (plugs into a USB port on your computer – so better sound quality) – about $29
Here’s my test recording, done in my office using the Plantronics USB headset microphone, recorded into Audacity:
Click the PLAY button [sc_embed_player fileurl=”http://listentofreedom.s3.amazonaws.com/plantronics-USB-test.mp3″]
Stereo Plug vs. USB Plug
If you get a microphone or headset with an audio/stereo plug (plugs into the microphone jack) it draws power from the computer, and converts your voice into an electrical signal only, and then sends it into the sound card where it can be processed as data.
But if you have a microphone or headset with a USB plug, it directly converts electrical signals into data, which is sent to the computer via USB. This usually results in better sound quality via the microphone.
The other benefit to the USB headset is that when you plug it in, the audio in/recording and audio out devices are automatically switched to the headphones. If you have a laptop, you may be frequently unplugging and plugging the headphones back in, so having the audio setting switch automatically would be a definite plus.
You’ll note with the three microphones above, the Stereo PC headset is less than half the price of the other two. Now you know why. But if your budget is really tight, know that you can still get a good quality audio recording with the Stereo PC headset.
Whichever type of microphone you use, you then can record using Audacity software (free for both Mac and PC), which is also very easy to use. Or Quick Time Player (Mac).
Budget Bob Recording Set-Up
 Now let’s see what Budget Bob has to say: Believe it or not, you can also try recording using Voice Memo on your iPod or iPhone. I’ve heard recordings done using Voice Memo that were perfectly good and sellable audio recordings – you just have test repeatedly to get the perfect distance and then you have to maintain that position for the duration of the recording. So basically, you and your device cannot move for the duration of the recording. And of course, you have to record in a fairly soundproof room.
You can also use the microphone on a set of really good cell phone ear buds (in-ear headphones with microphone), plug them into your computer microphone jack – instead of your cell phone – and use the ear bud microphone to record directly onto Audacity software (free for both Mac and PC), which is also very easy to use.
However, for both these Budget Bob options, you must make sure your recording level is set as loud as you can make it, so that people will be able to play your audios in their iPod, or on a stereo system to their yoga class (for example). There’s nothing worse than buying an audio that you can’t turn up loud enough.
So again, set your input levels really high, record a 3 minute clip, then play it back on your computer and on your iPod or cell phone and see if you can turn it down low enough when listening through ear buds and high enough when playing on your computer or player to a room full of people. ALWAYS, always, TEST your stuff!
Basically, whichever recording device you choose – at whatever budget level, you then need to download it to your MP3 player and listen to it through headphones. Then also listen to it on your computer. Make sure it sounds good when it’s right in your ear, in your car, and on your office computer.
Now let’s get into the specific recording how-to’s…
How To Record & Export MP3 Files Using Audacity
Let me start by saying that Audacity is such a great free recording software that I and two of my friends began using it without any instructions whatsoever – it’s just that intuitive.
Of course, any learning curve can be shortened by having some instruction first, so here are a couple of videos that will no doubt save you some time in trial and error.
NOTE: Both these video demo’s are done on a PC.
Install Audacity
Now that you have installed Audacity, you can go ahead and use it to record and also to export .wav files. But, if you want to export the much smaller .mp3 files (which take much less space on your hard drive or iPod!), then you need to first install the LAME encoder.
I know this may seem like a hassle, but trust me, if you’re going to use audio at all, then this is just a one-time setup hassle for something you will use over and over again for years! You do NOT want to send WAV files to your customers or opt-ins as the file will take up a lot of space on their device and they may hesitate to buy any more from you. Always send out MP3 files.
Install Audacity LAME Encoder for MP3 Export
Next, here’s how to use Audacity to record your audio:
Record Audio On Audacity
And lastly, here’s a video I did, showing you how to import an audio, edit the audio, and then export the audio as an MP3 file you can then send to your people, or make available for quick and easy downloading:
Import and Edit Audio in Audacity
Telephone Recording
This is the method I personally use for recording audio courses. If I’m doing a meditation, then I use my friend’s professional studio – cause I’m just that picky. Also, I don’t have music in the background, it’s just my voice, so the recording has to be pretty pristine, with zero background noise.
But to create an audio book, or an audio teaching course, I just use my phone to dial into my teleconferencing account, hit Record, and away I go. Oh, did I mention I clear my house of children, unplug the phones, make sure the laundry is not running and put a sign on the front door first?
I prefer this method because I’m already paying the $47/month fee for my teleconferencing service (InstantTeleseminar.com) anyway. And the set-up and recording are super easy.
If you want to go this route, the key piece of equipment you need to have is a corded, landline phone. I’m talking about one of these:

That means you do NOT use a cordless phone, or a cell phone, as neither gives good audio quality. For example, on this call with Paul Zelizer on Connecting With Your Customers, he was using a cordless phone and halfway through our call it started picking up another person’s conversation, that then got recorded onto our call as well! So I had to do some editing and splicing on that one. In extreme cases, you would need to re-record the missing bits and splice them in – too much hassle! Just use the right equipment the first time.
And your corded phone also needs to be a good quality phone – that doesn’t mean it has to be expensive, but you need to search for one with good audio quality (read the reviews!) like this Panasonic Corded Phone (about $15).
If you’re going to be making a lot of recordings, then I would also get this Plantronics S12 Corded Telephone Headset System to plug into the phone and use the headset instead of the handset. Not only will this be more comfortable for you, but you will get MUCH better audio quality on your recording.
If you think you’re going to be hosting teleseminars or podcasts – anything where you’ll be interviewing someone or hosting live calls, then this is probably the most cost-effective route to go: Get your Instant Teleseminar account and a corded landline phone. I also insist my guest call in from a corded landline if at all possible.
Oh yes, one more thing – you actually need to have a landline in your house or office! This is what we all used to have, before cell phones came along. You can also use a cable-based landline (runs on your TV or Internet cable – not on WiFi), which should be fine, but it is not as good as a fiber optic telephone line.
You will have to examine your particular audio environment and your recording needs and then pick the best solution for you. I have provided you with all the components here, but you will have to mix ‘n match to customize the best solution for your unique needs. See the chart below for a quick overview comparison.
Regardless of the recording method you choose, you will need to ensure your office or house is really quiet, or record at night when everyone is asleep!
One last consideration: Many people are not aware that cordless phones and cell phones give off biologically unsafe levels of radiation. Dr. Charlie Teo – one of the most renowned neurosurgeons in the world – does not carry a cell phone on his body, nor put it to his head. He places it on a table, or a counter, and puts it on speakerphone.
Cordless phones emit even stronger radiation than cell phones – strange, but true. I have lots of information about WiFi and cellphone technology and how to make it safer on my Listen To Your Gut blog (type “wifi radiation” into the Search box). But for now, just know that we do not have any cordless phones in our house – they are all corded phones. And we all turn our cell phones off when we come into the house. Here’s one of the best videos on this topic:
So that is another factor to take into consideration if you’re balking at getting a landline hooked up. A landline can run on either fiber optic or cable. So if you already have a cable TV account, you can also run your corded phone on a cable phone line – just call your cable TV provider.
Oh and do not get a corded phone that also has a cordless handset with it – that defeats the purpose and you will still radiate yourself and the other people in your house.
So to summarize, here are your four options to obtain a good quality audio recording. Keep in mind that for each of these scenarios, your environment must be really quiet – no dogs barking, children playing, phones or doorbells ringing, doors opening or closing, no laundry or dishwasher noise, etc. Many parents find it easiest to record late at night!
Note: you can use Skype to interview someone and record your interview, but only if you are planning on giving the audio away for free. This is because the quality of Skype is just not good enough (in my opinion). Here’s a sample of an interview recorded on Skype and you can see for yourself what I mean about quality:
Click the PLAY button [sc_embed_player fileurl=”http://listentofreedom.s3.amazonaws.com/daniel-vitalis.mp3″]
Of course, since this audio was given away for free and was fantastic content, I did not mind the fluctuating volume levels, or missed words, or occasional static – if I had paid for it, I would not be impressed.
Skype has a section of its site where they provide links to both free and paid software you can use to record your calls.
Audio Recording Methods Comparison Chart
| Solution | Pros | Cons |
|---|---|---|
| Shure mic with Nady Pop Filter – you record directly to your computer, using Audacity, as an MP3 file. | Fantastic audio quality. Super easy to use – everything in one place. | Most expensive (about $270). You cannot interview anyone else. Only you can speak and be recorded – unless you are recording from a Skype call. Need soundproofed and sound-optimized recording room. |
| Audio-Technica Microphone with Foam Ball Mic Cover – you record directly to your computer, using Audacity, as an MP3 file. | Good audio quality. Super easy to use – everything in one place. Great price (about $39). | You cannot interview anyone else. Only you can speak and be recorded – unless you are recording from a Skype call. |
| Plantronics Audio 478 Stereo USB Headset Microphone – you record directly to your computer, using Audacity, as an MP3 file. | Good audio quality. Because you are wearing headphones, if you want to record a Skype call, your mic won’t pick up the other person’s voice coming through your computer speakers – so you won’t get any feedback noise and the audio levels from both of you should be good. Plugs in via USB port. Super easy to use – everything in one place. Great price (about $29). | You cannot interview anyone else, only you can speak and be recorded – unless you are recording from a Skype call. |
| Plantronics Audio 326 Stereo PC – you record directly to your computer, using Audacity, as an MP3 file. | The cheapest option and will still give you a good audio recording. (about $13) | Plugs into the microphone jacks on your computer, which is not as good as a USB connection. Only for use with a PC, it will not work with a Mac, unless you buy an adapter. You cannot interview anyone else, only you can speak and be recorded – unless you are recording from a Skype call. |
| Good quality Corded landline phone and Instant Teleseminar account – you dial into a conference call platform and their system records your call as an MP3 file. You control the call, speakers (callers) and recording via a Control Panel on the Internet | Good audio quality. Easy to use. Lots of other uses too: weekly podcast, or teleseminars, webinars, or interviews, or Internet radio show, or any other purpose where you need to interview someone, or have other people on the audio, or participating via the Internet. Reasonably priced (about $63, then $47/month). | Not as good audio quality as a direct microphone. You also need to pay for a landline (cable or fiber optic) if you don’t currently have one operating. Bit more hassle than a mic to your computer as you first have to set up the call (takes about 3-5 minutes), then dial in. |
REMEMBER: For ALL audio recordings, to save yourself hours of wasted time, be sure and record a 3-minute test clip first. Then play it back on your computer and on your iPod or cell phone and see if you can turn it down low enough when listening through ear buds and high enough when playing on your computer or player to a room full of people. ALWAYS, always, TEST your stuff!
Here are all my test recordings again, using the different audio recording methods, you can easily compare and then choose which suits your purpose best:
1. Audio-Technica microphone and the mic cover, recorded using Audacity:
Click the PLAY button [sc_embed_player fileurl=”http://listentofreedom.s3.amazonaws.com/audiotechnica-USB-test.mp3″]
2. Plantronics USB headset microphone, recorded into Audacity:
Click the PLAY button [sc_embed_player fileurl=”http://listentofreedom.s3.amazonaws.com/plantronics-USB-test.mp3″]
3. Instant Teleseminar with a corded, landline phone (no headset):
Click the PLAY button [sc_embed_player fileurl=”http://listentofreedom.s3.amazonaws.com/InstantTeleseminar-Test.mp3″]
After listening to each of these, I feel that the Audio-Technica gives the best voice quality, but it will pick up the most ambient (background) noise in the room or house. The Plantronics has the best balance of good voice quality and low ambient noise. The corded phone into Instant Telseminar has an edgy real-time sound to the voice, and like the Plantronics headset, there is low ambient noise. But I think if I used a corded headset plugged into the phone (with noise-cancelling mic) I would get a smoother audio quality.
This Plantronics S12 Corded Telephone Headset System would be my choice in this case, since there is a switch to set the microphone between high and low gain, and there is a dial to fine tune it within each of the settings. Here’s what a Freedomite said about this headset:
Out of the box, I sounded very loud in my own ear piece and if I were typing, you could hear it on the recording. So I set it to low gain, and moved the dial to a lower setting. My voice remained clear in the recording, but not too loud in my own earpiece, and sounds of me typing or moving around could not be heard on the recording. This is fantastic! With my previous headset, I could not turn down the gain this low, so I had to be very careful about background noise.”
When you have recorded your first “real” audio, download it to your MP3 player and listen to it through headphones. Then also listen to it on your computer. Make sure it sounds good when it’s right in your ear, in your car, and on your office computer. After you’ve got the first one sounding great, record the others using the same settings (write the settings down!).
Example: How I Created A $69 6-CD Audio Course
 1. Used my Instant Teleseminar account to record my audios. ($47/month).
2. Dialed in from my corded, landline phone (excellent audio quality). Pressed record.
3. Talked for 60 minutes teaching people what I wanted them to learn for Audio 1. Downloaded MP3 recording to my computer.
4. Screwed up a little at the beginning, so used Audacity (free software) to edit my mistake. Exported as an MP3 file and made sure to set my fields for Artist Name, Track Name and Album Title – so that when someone imports my track into iTunes, or their iPod, it shows up properly.
5. Imported the MP3 file into iTunes, checked that my titling and name showed up correctly, and then converted it into a smaller file size MP3 (see instructions here), yet still with excellent quality. Tested it on my computer, my iPod with ear buds, and my car to ensure audio quality and volume levels were good. Made sure there were no spaces between the words of my filename (or people can have trouble downloading the file). Used hyphens or underscore lines to separate words. For example: choose-your-best-idea.mp3
6. Repeated steps 1 – 5 for all six audios
7. Emailed final MP3s to InfoDistributors.com (manufacture CDs and DVDs). They emailed me the design template (instructions) for the artwork for a 6-disc audio program.
8. Got my designer (found on Elance) to create a design from that template (cost $75). I emailed the finished design back to InfoDistributors.com
9. Created a video and a dedicated Page on my website to sell the program (my sales page). I shot the video with my Canon video camera (you could also use an iPhone, or Flip camera). If you want a really slick-looking landing page (sales page) you can either use your designer to create it as a Page on your blogsite, or use a WordPress Plugin called Optimize Press. If you are using Infusionsoft as your CRM platform, then you already have landing pages for your use.
10. Began emailing my list about my new Course, and carried out other marketing activities, like posting on Facebook, affiliate promotions, and a live webinar, or teleseminar to give some great free content, but also promote my course.
DONE!
All you have to do to create an excellent audio course is copy these 10 steps above. You can go ahead and create your content at any time and don’t worry, we will elaborate on Steps 9 and 10 in coming Modules. For now, all you need to focus on is creating your content or products.
NOTE: If I were creating an audio course that was delivered digitally via download links (no physical CDs), then I would skip steps #7 and #8 and replace them with:
7. Uploaded MP3 files to my server. Made sure there were no spaces between the words of my filename (or people can have trouble downloading the file). Used hyphens or underscore lines to separate words instead. For example: choose-your-best-idea.mp3
Emailed my designer to create CD cover art and package art to display in my shop and marketing materials.
You have to think of how YOU would like to receive your product. Personally, I understand that a boxed set of CDs has far more perceived value than a list of download links. However, I also find it super annoying to have to import each CD, one at a time, into iTunes and then transfer them to a playlist on my iPod – which takes about one hour total.
So personally, I may prefer to receive the boxed set of CDs along with all the files downloaded onto a memory stick (USB Flash Drive). That way I feel the specialness of the boxed set, but I can also insert the memory stick into my computer and transfer all the MP3 files to my iPod in about 20 seconds (Infodistributors.com also does custom USB flash drives).
However, I may also not care about the physical CDs and be happy with just the USB flash drive – because that alone is far more convenient than downloading a bunch of files! To communicate more value, you could have the flash drive imprinted with your name or program name and present it in a really nice box, or get a custom shape flash drive, like these, for example:


Or, you could always offer both the physical CDs and the USB flash drive and let your customer choose which format they want!
Lastly, just make sure you took note of #5 above and TEST your finished product to ensure:
- File size is not too big and is in MP3 format for best compatibility across devices (see below for how to compress files).
- Audio quality is good – test on both your iPod and computer.
- Volume range is good (i.e. Can I turn it up loud enough if I’m playing it on my computer, or for a group, and can I turn it down low enough if playing through ear buds?)
- File name does not contain any spaces – words must be linked with hyphens or underscore. Example: eat-green-foods.mp3
- Track title shows up the way I want it to.
- My name shows up as the Artist, and the Album shows up correctly as the name of my audio series
Throughout Listen To Your Freedom, you will hear me telling you to TEST everything before you release it to your customers, or as a freebie to your site visitors. Remember that you can sell a crappy product once, but that customer will not buy from you again. And whatever the quality of your free stuff, your site visitor will expect the same quality from anything they purchase – so make sure your free stuff is GREAT.
NOTE: Many Internet marketers would sell an Audio Course like this for at least $97 or $197. Set your price according to your market and when you’re ready, check out this page for details on how to price your stuff.
My Audio Track Doesn’t Show Up Properly in iTunes or Windows Media Player!
The data that you attach or embed into your audio file that allows other apps to read your info, or show your album cover, are called ID3 tags.
The easiest way to add ID3 tags to your audio is to add the required fields (Track Title, Album Name, Artist/Composer, etc.) when exporting your file from Audacity (see the videos above) as an MP3 file. Here’s what that looks like:

If you also want to show an album cover or have an image show up along with your audio track, then you need to use a special software to attach that image to your MP3, like Jaikoz or Mp3Tag.
Now that you’ve seen some more ideas for how to create an Audio Course (rather than just a single audio), brainstorm a larger project you would like to create in audio MP3 form; either a paid item, or a freebie. Something you could o er as a course, or a series of audios:
How would you like to record it? What equipment do you need to get?
 A CD or audio (MP3 file) can be a great item to have for your customers or site visitors since many people prefer to listen, rather than read. Many people even prefer it to video, since you can listen while you run, drive, walk the dog, lie down, or cook.
 hich you can create in one day) you have positioned that solution as a “package” and thereby greatly increased the perceived value of that solution.
 Note: you can also use Skype for this step, but only if you are planning on giving the audio away for free. This is because the quality of Skype is just not good enough (in my opinion). Here’s a sample of an interview recorded on Skype from Daniel Vitalis and you can see for yourself what I mean about quality. Click the PLAY button, or, you can download this audio from the link below:
 Digital Content Ground Rules
 computer (or device) to actually download a video for viewing. And it also takes a long time to download a video file, so this is best avoided. In the coming units I am going to show you the best ways to deliver video-based courses, or content and how to host your video files. But in the rare case they do need to actually download the video, and for whatever reason you need to do this, then .MOV is the best file format to use and the most compatible across devices.
 1. Upload the product to your server. This is where you first upload your piece of content (MP3 audio, PDF eBook, report, etc.) to your server. Your server (ISP) is where you have your site hosted. You can either upload PDF files using your blog interface – see
  A smooth purchasing experience will increase the chance of your customer returning to buy something else, or recommending you or your product to someone else. Specifically, because the perceived value of a digital product can be less than a physical product (and many buyers might be new to digital products), you need to deliver something convenient to buy, download and use. This makes the speed and ease of digital delivery into an added bonus, instead of a hassle. Every complication, error, or time-suck in your process, even if it’s fairly benign, will frustrate your customers – and that’s the last thing you want to do!
 o doubt you will refer back here as time goes on and as you create new and different kinds of content or products.


 Lisa Sasevich
 Personally, when I speak, my main goals are to connect, give the audience something that changes their life, and begin building a relationship with those people. If I were to then give them a sales pitch, it would feel incongruent for me.
 So let’s say you’ve published your softcover or hardcover book, and it’s available for sale on Amazoan, in Barnes & Noble bookstores, and on your site. Or you’ve published your e-reader book on Kindle, or Nook.
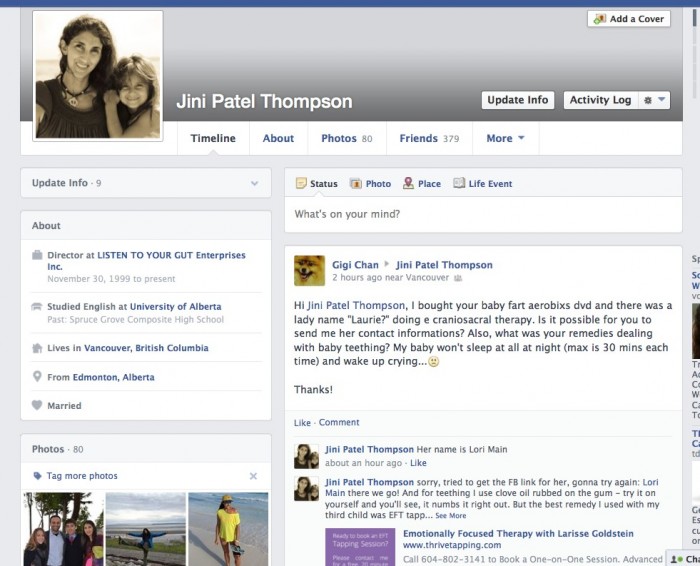
 Although it looks like you have to enter all your personal information, you actually don’t, and it works with just the password and the Image Verification fields filled in. NOTE that I don’t recommend you set your webpage up like this! This is way too confusing and she must get a lot of customer service questions about this process. I’m going to show you a method you can use that is much simpler and clearer for your reader or customer.
 HOWEVER, as I said, there is a much simpler way for you to set up exactly the same thing on your handy-dandy WordPress site in three easy steps, that is also less confusing for your customer:


 Like Facebook, Twitter is free and you can easily “share” your blog posts and videos with Twitter, so they are automatically tweeted out to all your followers. Personally, I don’t feel it’s a great tool for promotion, because I’ve found it doesn’t drive much traffic compared to other methods, but it’s so easy, you might as well add it to your repertoire. It’s also super easy to have your blog post directly to Twitter automatically for you.


 If you’ve been on Facebook, then you have already seen the advertising options available – the ads are in the sidebar and in “sponsored posts” that appear right on your timeline.
 The great thing is that once you have your Facebook component set up, you can automate all your blog posts to appear as soon as you publish them. Simply install a free plugin on your blog, like


 Lastly, in the Keywords field, here’s where you choose a maximum of five keywords or keyword phrases and separate each word or phrase with a comma. So if you have a keyword phrase do not insert the comma until the end of the phrase. Do not use more than 5 keywords or it looks spammy and will decrease your ranking.
Recent Comments